DRIVING PRECAUTIONS
• The radio system is not waterproof. Avoid driving through puddles,
wet grass, or mud. Water could damage the electronics.
• Do not continue to operate the Nitro Sport with low batteries.
After the battery power drops below a certain point, the model
will continue with the last command it had from the transmitter.
Indications of low battery power include slow operation and
sluggish servos. On the transmitter, a flashing red light indicates
low transmitter batteries.
• Do not drive the Nitro Sport at night, on public streets, or in large
crowds of people.
• If the truck becomes stuck, do not continue to run the engine.
Remove the obstruction before continuing to drive.
• Do not attempt to push or tow objects with the Nitro Sport.
• The model is controlled by radio. It is subject to radio
interference from many sources beyond your control. Since radio
interference can cause momentary loss of control, allow a safety
margin around the truck in order to prevent collisions.
• Use common sense whenever you are driving your model.
Intentionally driving in an abusive and rough manner will only
result in poor performance and broken parts.
6
Shutting Off the Engine
Before starting the engine it is important to know how to shut it off.
The correct method is to pinch and hold the carburetor’s fuel line at
idle speed, until the engine dies.
Starting the Engine
Before you start your engine for the first time, make sure you have read
all instructions and precautions in this manual. Pay close attention to
the break-in instructions in the next section, and make sure you have
read and understood them before you run your engine.
Your engine must be at room temperature (70°F or 21° C) or above
the first time you start it. If it’s cooler than room temperature
outside, remove all fuel and keep your model indoors until you’re
ready to start it and then take it outside. We do not recommend
running the model in temperatures below 35 degrees.
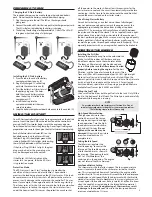
1.
Turn on the radio system.
2.
Make sure the throttle trigger on the transmitter is in the idle
(neutral) position.
3.
Connect the EZ-Start controller.
4.
Press the starter button in short two-second bursts and watch
for fuel moving through the fuel line up to the carburetor. Watch
closely! The fuel moves very fast. If the fuel doesn’t move through
the line within 5 seconds, prime
the engine by briefly (one or two
seconds) covering the exhaust
outlet with your finger until the fuel
is just visible in the carburetor fuel
line. Watch carefully! If the engine is
primed too long, it will flood with
fuel and stop turning.
5.
Once fuel reaches the carburetor,
the engine should quickly
start and idle.
6.
Disconnect the EZ-Start controller
from the model.
7.
Proceed with the engine break-in.
8.
Do not rev your engine with no load (wheels off the ground).
BREAKING-IN THE ENGINE
(VERY IMPORTANT!)
Once your engine is running, it must be broken-in. The key to
breaking-in your engine is patience.
The break-in time will take
about 1 to 1½ hours.
During the break-in period, your engine
may appear to malfunction with symptoms such as stalling,
inconsistent performance, and fouled glow plugs. Don’t give up
on it! These are just “break-in pains” that every new engine has
to go through. They will disappear once you get through the
break-in period.
Just keep it running, and throttle on and off as
smoothly as you can. Sudden bursts or releases of the throttle can
stall your engine.
Resist the temptation to tune the engine
for performance and/or run for extended times at wide open
throttle. Soon, after about the fourth tank of fuel, your patience
will pay off with solid, consistent performance.
During Break-in...
• Special break-in fuels are not required.
• Drive the model on a smooth hard surface.
• If possible, avoid running on very hot, humid days.
• Run with the body off for extra engine cooling.
• Turn the mixture screw (needle) clockwise (in) to lean the mixture
and counterclockwise (out) to richen the mixture.
• Do not allow the fuel tank to run completely empty, possibly
leading to a burned plug. An extremely low fuel level causes the
fuel mixture to be too lean.
• Keep extra glow plugs handy. The break-in process, because of the
engine running rich, can cause deposits to form on the glow plug,
leading to failure.
The First Tank of Fuel
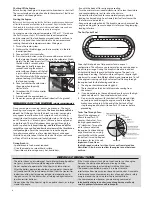
Drive the Nitro Sport on a flat paved surface in an oval
configuration. This will cause you to naturally vary your speed over
the entire rpm range. During this break-in time ease in and out
of the throttle slowly to avoid stalling the engine. The goal is to
simply keep it running. The fuel mixture setting may require slight
adjustment to correct for different altitudes and temperature. To tell
if the engine is running rich (high volume of fuel flowing through
the engine) look for the following conditions:
1.
The engine should accelerate sluggishly.
2.
There should be a thick trail of blue smoke coming from
the exhaust.
3.
If you do not observe the conditions above, then turn the high-
speed needle out 15° (counterclockwise) and retest.
4.
Do not rev the engine with the wheels off the ground. High,
no-load rpms can damage the engine, usually resulting in a
broken connecting rod. At the end of the first tank of fuel,
stop the engine and allow it to cool for 5-10 minutes before
proceeding.
Tanks Two Through Four:
Shut off the engine and
allow it to cool for 5-10
minutes, then refuel. Turn
the high-speed needle in
15° (clockwise). Turn on the
radio system and restart
the engine. Continue driving
on your oval course, varying
your throttle, until the second
tank of fuel is used up. Repeat
this process for tanks 3 and 4.
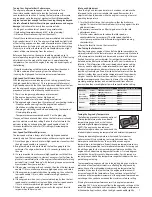
Important: Do not lean
the high-speed mixture less than 2 turns out from closed (see
illustration). also, be sure to allow the engine to cool between
each run.
2
1
/
2
turns out
2 turns out

