16 • Traxxas
XL-5 electronic speed controls are factory set and should not require
any adjustments. These instructions are provided for your reference.
Precautions
• Motor Limit:
The XL-5 has a 15-turn modified motor limit for 540 size
motors and a 12-turn modified motor limit for 550 size motors when the
motor is properly geared. If the motor or speed control is overheating,
try a smaller pinion gear. Do not attempt to use a more powerful motor
(fewer turns) than the above mentioned motor limits or you could
experience frequent thermal shutdown.
• Insulate the Wires:
Always insulate exposed wiring with heat shrink
tubing to prevent short circuits.
• Water and Electronics Do Not Mix:
Do not operate the model in or around
water. Never allow water, moisture, or other foreign materials to get
inside the speed control.
• Disconnect the Batteries:
Always disconnect the battery pack from the
speed control when not in use.
• Transmitter on First:
Switch on your transmitter first before switching on
the speed control to prevent runaways and erratic performance.
• Don’t Get Burned:
The transistor tabs and the heat sinks can get
extremely hot, so be careful not to touch them until they cool. Supply
adequate airflow for cooling.
• Always Use Heat Sinks:
Three heat sinks are factory-installed on the speed
control and must be used for maximum cooling and performance.
• 4 to 8-Cells Only:
The XL-5 can only accept a maximum input voltage of
9.6 volts. Always adhere to the minimum and maximum limitations of the
XL-5 as stated in the specifications table.
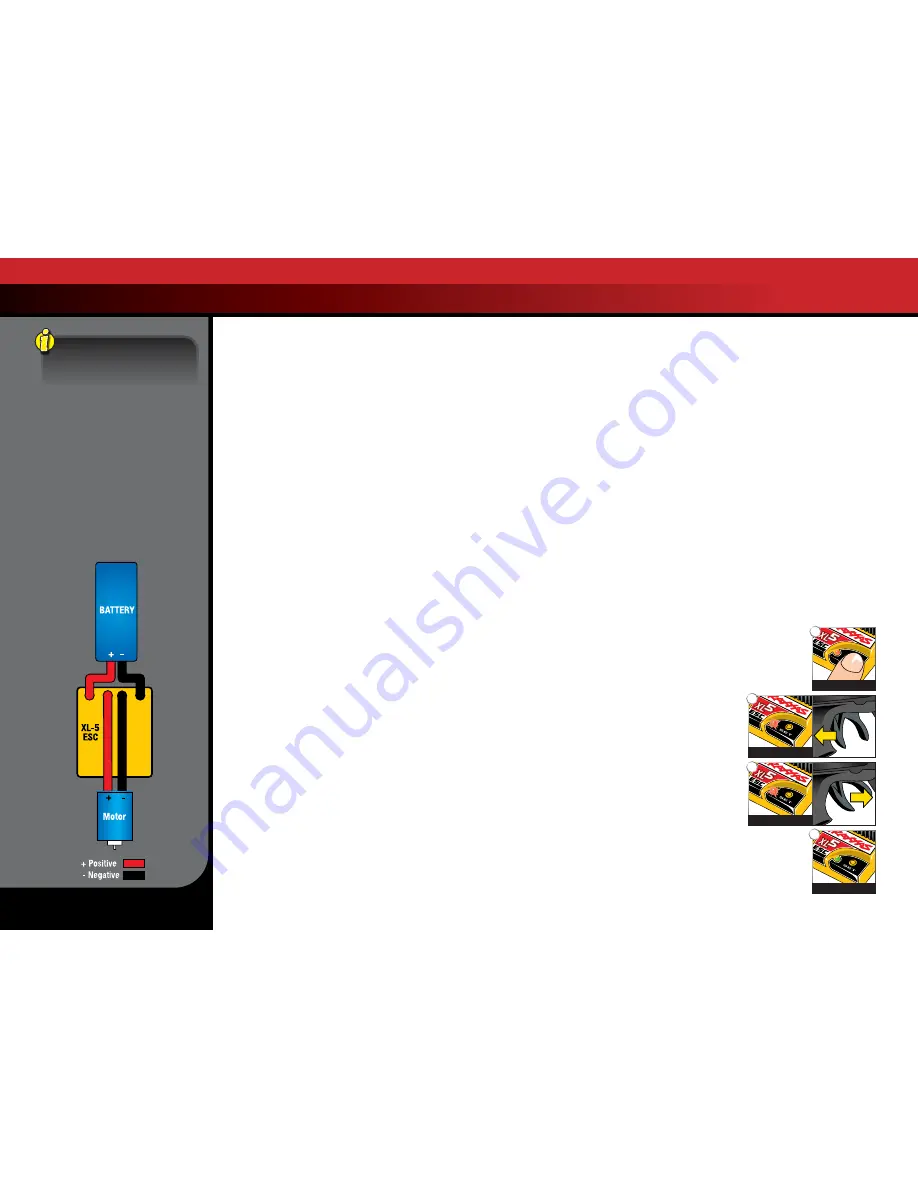
• Use Stock Connectors:
If you decide to change the battery or motor
connectors, only change one battery or motor connector at a time. This
will prevent accidentally mis-wiring the speed control. If the XL-5 is not
wired exactly as shown in the diagram, it can be damaged! Please note
that modified speed controls can be subject to a rewiring fee when
returned for service.
• Use Neutrally Timed Motors:
For reverse use, the motors must have
0° timing. Modified motors (with adjustable end bells) timed to 0° or
Johnson/ Mabuchi (closed end bell) motors are recommended. Using
motors with other than 0° timing will draw excess current in reverse, and
can result in the speed control overheating and premature motor wear.
• No Reverse Voltage:
The speed control is not protected against reverse
polarity voltage. When changing the battery and/or motor, be sure to
install the same type of connectors to avoid reverse polarity damage
to the speed control. Removing the battery connectors on the speed
control or using the same-gender connectors on the speed control will
void the product’s warranty.
• Motor Capacitors Required:
Ceramic capacitors should be properly
installed on every motor to prevent radio interference.
• Do Not Let the Transistor Tabs Touch:
Never allow the three separate
transistor banks to touch each other or any exposed metal. This will create
a short circuit and damage the speed control.
• No Schottky Diodes:
External schottky diodes are not compatible with
reversing speed controls. Using a schottky diode with the XL-5 will
damage the ESC and void the 30-day warranty
Transmitter Adjustments for the XL-5 ESC
Before attempting to program your XL-5 ESC, it is important to make sure
that your transmitter is properly adjusted (set back to the factory defaults).
Otherwise, you may not get the best performance from your speed control.
The transmitter should be adjusted as follows:
1. Set the throttle neutral switch to the 50/50 setting.
2. Set the throttle trim to the middle “0” setting. This adjusts the
neutral position.
3. Set the Channel 2 servo reversing switch to the left position.
4. Do not change the position of any of the servo reversing switches after
programming the XL-5 ESC.
XL-5 Setup Programming
Read through all of the programming steps before you begin. If you get
lost during programming or receive unexpected results, simply unplug the
battery, wait a few seconds, plug the battery back in, and start over. The
default profile is Profile #1, 100% forward, 100% brakes, 100% reverse. You
can change the profile later after setup is complete.
1. Disconnect one of the motor wires between the XL-5 and
the motor. This is a precaution to prevent runaway when
the speed control is turned on before it is programmed.
The motor does not run during the programming sequence.
2. Connect a fully charged battery pack to the XL-5.
3. Turn on the transmitter (with the throttle
at neutral).
4. Press and hold the ESC set button (A).
The LED will first turn green and then
red. Once the LED turns red, immediately
release the set button. The red LED will
turn off after one and a half seconds.
5. Next, the LED will blink RED ONCE. Pull
the throttle trigger to the full throttle
position and hold it there (B).
6. After two seconds, the LED will blink RED
TWICE. Push the throttle trigger to the full
reverse/brake position and hold it there (C).
7. Finally, the LED will turn solid GREEN, indicating the
programming sequence is complete. The LED continuously
shines green indicating the XL-5 is on and at neutral (D).
Adjusting the Electronic Speed Control
(MODELS 3605 and 3705)
A
B
C
D
Green then Red
Once Red
Twice Red
Solid Green
XL-5 Specifications
Input voltage:
4 to 8 cells (4.8 to 9.6V)
Motor limit:
15-turns (540)
12-turns (550)
Peak current - fwd/rev:
60A/60A
Braking current:
60A
BEC voltage:
6V
Transistor type:
MOSFET
XL-5 Wiring Diagram


