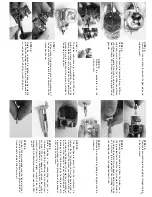
STEP 36:
Reinstall the carb
uretor
, header
, a NEW glo
wplug,
and engine mount.
Use a ne
w header gask
et when
re-installing the header on the engine
.
Reinstall the
engine in the tr
uc
k in the re
v
erse order of remo
v
al.
Don’t f
orget to reconnect the y
ello
w g
rounding wire to
the engine mount.
The reb
uilt engine m
ust no
w be
brok
en in.
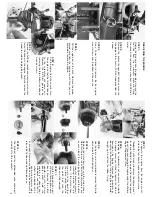
STEP 31:
Reinstall the bac
kplate and a ne
w bac
kplate gask
et
with the 3x8mm caphead machine scre
ws
.Tighten the
scre
ws in small increments
, in a cr
iss-cross patter
n
until all the scre
ws are tight.
STEP 32:
Install the appropr
iate siz
e ball bear
ing into one side of
the clutch bell gear
.
The
T
-Maxx comes stoc
k with a
20-tooth clutch bell gear which requires 5x11mm ball
bear
ings
.
STEP 33:
T
ur
n the gear o
v
er and install the other ball bear
ing.
STEP 34:
Install the split-be
v
eled cone onto the cr
ankshaft.
Ne
xt,
install the flywheel.
Install the clutch adapter n
ut with a
10mm deep soc
k
et.
Gr
ip
the flywheel with pliers
while tightening the
adapter n
ut.
STEP 35:
Install the clutch shoes
e
xactly as sho
wn in the
dr
a
wing (leading edge
engagement).
Ne
xt, install
a 5x8mm
T
eflon
®
w
asher
follo
w
ed b
y the clutch bell
gear (with bear
ings
installed).
Install the
remaining 5x8mm
T
eflon
®
w
asher f
ollo
w
ed b
y the E-
clip (see step 9).
STEP 25:
T
o assemb
le the connecting rod and piston, place a
drop of caster oil in the top end of the connecting rod.
Inser
t the wr
ist pin through the piston and the top of
the connecting rod.
Secure the wr
ist pin with the G-
clip
.
Mak
e sure the G-clip fits securely into the g
roo
v
e
machined in the piston.
Be careful not to scr
atch the
sides of the piston.
STEP 26:
Reinstall the cr
ankshaft into the engine and mak
e sure
that it spins freely
.
Inser
t the connecting rod and piston
assemb
ly through the top of the cr
ankcase
.
The G-clip
nor
mally f
aces the carb
uretor
.
Put a drop of castor or
after-r
un oil in the bottom end of the connecting rod.
Use y
our fingers to gently push the end of the con
-
necting rod o
v
er the cr
ankshaft jour
nal.
STEP 27:
Place another drop of oil on the connecting rod b
ush
-
ing.
Rotate the cr
ankshaft se
v
er
al times to distr
ib
ute
the oil.
STEP 28:
Inser
t the slee
v
e into the top of the cr
ankcase
.
Rotate
the slee
v
e so that the notch in the slee
v
e will line up
with the pin in the cr
ankcase
.
Holding the engine
upside do
wn will mak
e it easier f
or the slee
v
e to go
o
v
er the piston.
STEP 29:
Install ne
w head gask
ets on the head.
Use one thic
k
and one thin gask
et.
Reinstall the head using the
3x12mm caphead machine scre
ws
.Tighten the scre
ws
in small increments
, in a cr
iss-cross patter
n, until all
the scre
ws are tight.
STEP 30:
Reinstall the star
ter shaft.
Align the notch in the star
ter
shaft with the cr
ankshaft jour
nal pin (arro
w).
12

