6
STEP 4: SETTING THE IDLE SPEED
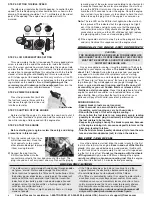
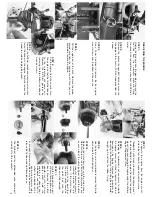
The idle screw regulates the throttle opening to control the idle
speed. The throttle opening at idle should be set as shown in the
drawing. The opening should be 1 to 1
1
/
2
millimeters at the widest
point in the opening. The engine may not idle well until it is
warmed.
STEP 5: LOW SPEED MIXTURE SETTING
This screw meters the fuel at low speeds. The low-speed mixture
screw is located in the end of the carburetor, inside the throttle
arm. This screw controls how much fuel enters the engine at idle
and low throttle. This adjustment will smooth the idle and improve
acceleration to mid-speed. Make this adjustment with the throttle
closed, after setting the idle.
Gently
turn this screw clockwise
until it stops against the needle seat. Be very careful as it is diffi-
cult to know when the needle has seated due to the thread hold-
ing material on the needle’s thread.
Overtightening of the
screw may result in damage to the needle seat.
Now turn the
low-speed mixture screw counterclockwise 1
3
/
4
turns.
STEP 6: PRIME THE ENGINE
Press the primer button (built into
the fuel tank) several times until the
fuel moves through the fuel line and
into the carburetor.
STEP 7: SHUTTING OFF THE ENGINE
Before starting the engine it is important to know how to shut it
off. The correct method is to pinch and hold the carburetor’s fuel
line while running at idle speed until the engine dies.
STEP 8: START THE ENGINE
Before starting your engine, review the safety and driving
precautions in this manual.
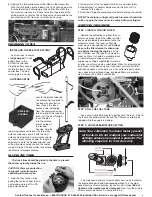
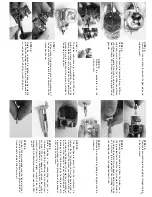
1)
Turn the radio system on (trans-
mitter then receiver). Place the
truck against a curb or some
other immovable object to prevent
it from moving forward.
2)
Connect the plug from the
EZ-Start control box into the
connector mounted in the rear body mount of the truck. The
plug is keyed so it will only insert one way. Preheat the plug by
removing one of the motor wires and holding te start button for
5 seconds. Reconnect the motor wire and press the start but-
ton on the EZ-Start to turn over the engine. Do not hold for
more than 5-10 seconds to start the engine. Once the engine
has started, it may be necessary to continue to hold the start
button to keep the plug lit until the engine has warmed up.
Note:
The red LED on the EZ-Start will light when the start but-
ton is pressed. This indicates that the glow plug is hot (ignit-
ed). If the LED does not light, make sure that the glow plug
connector (blue wire) is firmly attached to the glow plug. If the
connection is secure, and the LED still does not light, replace
the glow plug with a Traxxas, standard plug #3230.
3)
If the engine did not start in step 2, press the plunger 3 times
and retry. Continue this sequence until the engine starts.
BREAKING-IN THE ENGINE (VERY IMPORTANT!)
Once your engine is running, it must be broken-in. The key to
breaking in your engine is patience.
The break in time will take
about 1 to 1
1
/
2
hours.
During the break-in period, your engine
may appear to malfunction with symptoms such as stalling,
inconsistent performance, and fouled glow plugs. Don’t give up
on it! These are just “break-in pains” that every new engine has
to go through. They will disappear once you get through the
break in period.
Just keep it running, and throttle on and off
as
smoothly as you can.
Sudden bursts or releases of the
throttle can stall your engine.
Resist the temptation to tune the
engine for performance and/or run for extended times at wide
open throttle. Soon, after about the fourth tank of fuel, your
patience will pay off with solid, consistent, performance.
DURING BREAK IN...
• Special break-in fuels are not required.
• Drive the model on a smooth hard surface.
• If possible, avoid running on very hot, humid days.
• Run with the body off for extra engine cooling.
• Do not allow the fuel tank to run completely empty, leading
possibly to a burned plug. An extremely low fuel level causes
the fuel mixture to be too lean.
• Keep extra glow plugs handy. The break-in process, because
of the engine running rich, can cause deposits to form on the
glow plug, leading to failure.
• Turn the mixture screw (needle) clockwise (in) to lean the mix-
ture and counter-clockwise (out) to richen the mixture.
THE FIRST TANK OF FUEL
Once the engine is started, drive the model slowly for the first
few minutes to warm the engine.
Ease in and out of the throttle
slowly.
Vary your speed between low and medium throttle until
the first tank of fuel is almost empty. Do not run at full speed dur-
ing the first tank of fuel.
Do not rev the engine with the wheels
off the ground.
High, no-load RPMs can damage the engine,
usually resulting in a broken connecting rod
. Stop the engine
and allow it to cool for 5-10 minutes before proceeding.
DRIVING PRECAUTIONS
• The radio system is not waterproof. Avoid driving through puddles,
wet grass, or mud. Water could damage the electronics.
• Do not continue to operate the T-Maxx with low batteries. After
the battery power drops below a certain point, the model will
continue with the last command it had from the transmitter.
Indications of low battery power include slow operation and
sluggish servos. On the transmitter, a flashing red light indi-
cates low transmitter batteries.
• Do not drive the T-Maxx at night, on public streets, or in large
crowds of people.
• If the T-Maxx becomes stuck, do not continue to run the
engine. Remove the obstruction before continuing to drive.
• Do not attempt to push or tow objects with the T-Maxx.
• The T-Maxx is controlled by radio. It is subject to radio interfer-
ence from many sources beyond your control. Since radio
interference can cause momentary losses of control, allow a
safety margin around the truck in order to prevent collisions.
• Use common sense whenever you are driving your T-Maxx.
Intentionally driving in an abusive and rough manner will
only result in poor performance and broken parts.
CAUTION:
TRX ENGINES MUST BE BROKEN-IN FOR MAXIMUM LIFE
AND HIGHEST LEVEL OF PERFORMANCE. THIS PROCESS
MUST NOT BE SKIPPED. A SHORTCUT HERE COULD
SHORTEN THE ENGINE LIFE.
Primer Button
Contact Traxxas for assistance: 1-888-TRAXXAS. 972-265-8000 (outside USA). E-mail us at support@Traxxas.com

