x
4
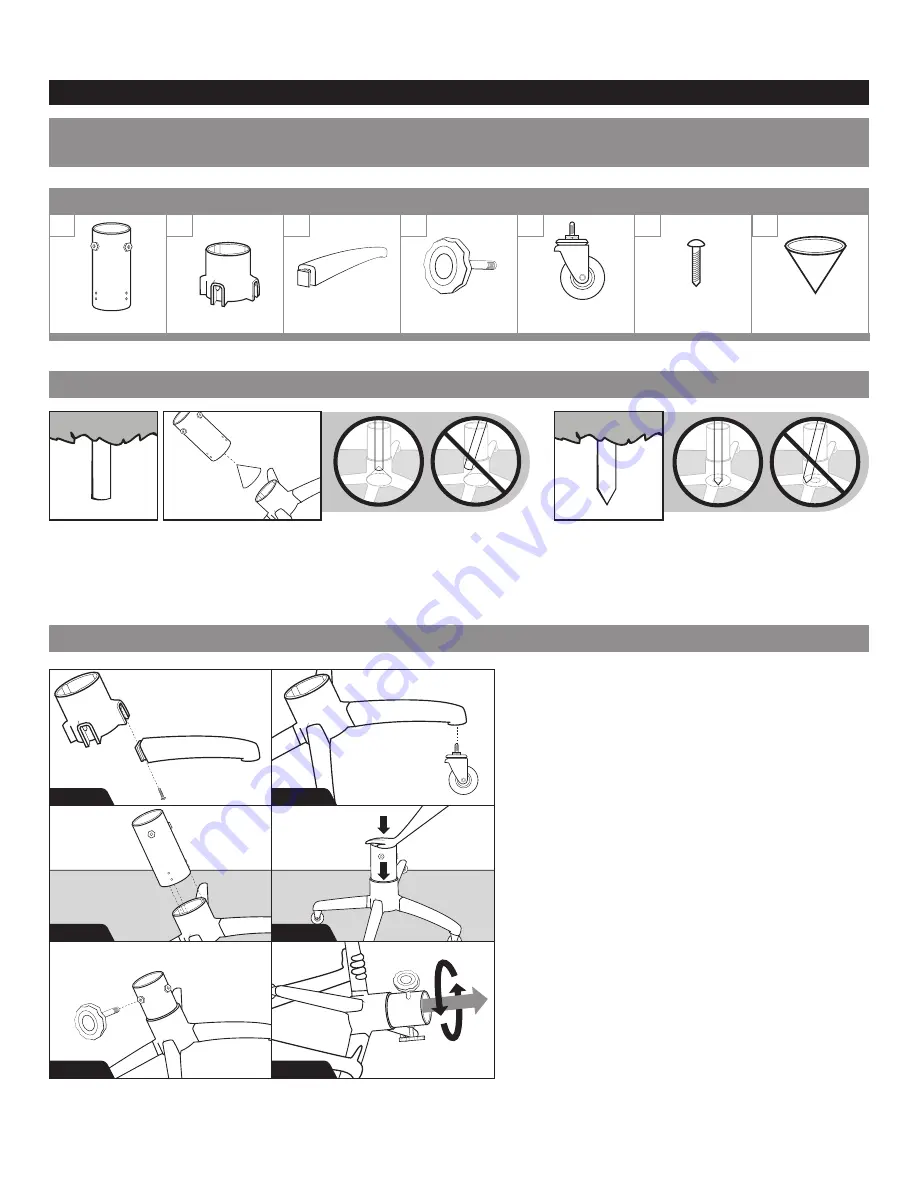
Step 1. Slide a stand leg (C) into the notched section on the base collar (B). Secure
by fastening a screw (F) with the provided screwdriver. Repeat this with all legs.
Step 2. Attach a castor (E) to each of the four legs (C). Tighten with the provided
wrench.
READ IMPORTANT NOTE BELOW BEFORE PROCEEDING.
Step 3. When installing the inner collar (A) make sure the rest of the stand is
sitting on a flat surface. In order to avoid installation problems make sure to align
the inner collar (A) perfectly with the base collar (B) and making sure to align the
rivets with the corresponding indentations in the base before pushing it in.
Step 4. Once perfectly aligned, push straight down with your hand while the
stand rests on a flat surface. Make sure the metal inner collar is completely
inserted all the way into the molded plastic center piece. You may have to exert
some pressure directly down onto the metal collar to completely slide it into
place. Remember to keep the collar aligned while pushing.
Step 5. Screw in all three tension knobs (D) into the stand collar (A) through the
bolt holes. Once you set your tree into the stand. Tighten the knobs (E) equally to
secure the tree trunk.
Step 6 - TROUBLESHOOTING. If you were unable to successfully install the inner
collar in Step 4 due to misalignment then have someone hold the base of the
stand while you use the knobs to get an appropriate grip. Next twist back and
forth to loosen the inner collar from the base collar and pull it out as to allow you
to then properly align it and reinsert it correctly.
assembly instructions
IMPORTANT! PLEASE READ INSTRUCTIONS BEFORE ASSEMBLING!
important note:
WHICH TRUNK DO YOU HAVE?
rolling stand instructions
STEP 1
STEP 2
STEP 4
STEP 6
x
3
STEP 5
x
4
A
B
C
D
E
F
G
QTY: 1
QTY: 1
QTY: 4
QTY: 3
QTY: 4
QTY: 4
QTY: 1
contents
INCLUDED TOOLS: Screwdriver & Wrench
FLAT TRUNK
Before you begin, note the bottom of your tree trunk. If you have a pointed trunk then the below instructions are sufficient. However, if you have a flat trunk then there is one additional step to
ensure your tree’s stability involving the included cone, Part G. Before Step 3, simply rest the cone (G) in the hole on the bottom of the base collar (B). If you have already performed steps three and
four just remove the inner collar and insert the cone (G). Then insert the inner collar (A), which will rest on top of the cone. Proceed onto step 4 as normal.
POINTED TRUNK
MAKE SURE BASE OF TRUNK IS CENTERED IN STAND
MAKE SURE BASE OF TRUNK IS CENTERED IN STAND
PUT CONE IN
BEFORE METAL TUBE
STEP 3
IMPORTANT:
Align rivets to
the corresponding
grooves in the base.


