background image

The installation of this bathtub is simple and immediate, however we advise you to read 

this manual carefully before installing it.


The Treesse team is always available for any information or request for assistance that 

may be required during installation.

GRUPPO TRE S s.p.a.

Tel39 0761 527242

Fax +39 0761 527223

Email info@gruppotres.it

Good luck with your work!

Maximum care has been paid to guarantee the accuracy of this manual.

The Manufacturer reserves the right to modify the equipment or the documentation at any time, without notice. 

Therefore there might be small differences between this manual and the product you have received: we apologise in advance for any inconvenience.

The total or partial reproduction of this manual without the Manufacturer's consent is prohibited. Measurements are purely indicative and not binding. 

The original language of this manual is Italian: the Manufacturer is not responsible for any mistakes in translation/interpretation.

Summary of Contents for Fusion SKI Series

Page 1: ...Fusion SKI bathtub Installation manual...

Page 2: ...been paid to guarantee the accuracy of this manual The Manufacturer reserves the right to modify the equipment or the documentation at any time without notice Therefore there might be small differenc...

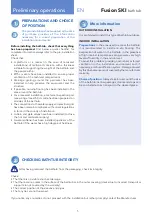
Page 3: ...__________________________________________________8 2 QUALIFICATIONS OF THE INSTALLER ___________________________________________________________8 3 CONNECTIONS REQUIRED_______________________________...

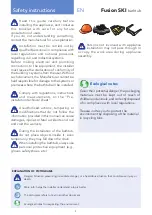
Page 4: ...r modifications that do not follow the information provided in this manual can cause damages injuries or fatal accidents and null and void the warranty During the installation of the bathtub do not pl...

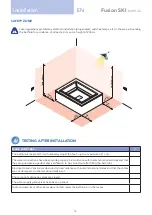
Page 5: ...ge grating around the perimeter has been installed to help preserve the equipment and the structure If possible non slip flooring has been installed in the area around the bathtub For a recessed insta...

Page 6: ...ive equipment e g gloves safety shoes etc and taking all the necessary safety precautions for those involved and to not damage the bathtub During transport lift the bathtub by holding it exclu sively...

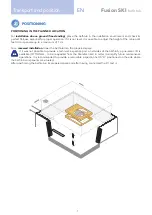
Page 7: ...to a maximum of 1 cm For a recessed installation lower the bathtub into the prepared space If it was not possible to provide a technical inspection port on all sides of the bathtub a pneumatic lift is...

Page 8: ...2 QUALIFICATIONS OF THE INSTALLER Before installation it is recommended to carefully read the safety warnings at the beginning of this manual and to always operate in perfect physical and mental cond...

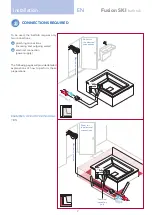
Page 9: ...2 electrical connection power supply The following pages will provide detailed explanations of how to perform these preparations EXAMPLES OF BATHTUB INSTALLA TION IN IN IN IN 40 40 Electrical connect...

Page 10: ...ined by the total content of calcium and magnesium present in the water coming from their soluble salts Water classification up to 7 f Very soft water From 7 f to 14 f Soft water From 14 f to 22 f Sli...

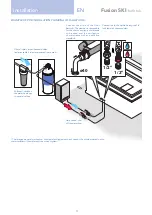
Page 11: ...tion to the bathtub using the 1 2 inch female hoses provided Connect the drain of the floor bathtub The plumber is responsible for the choice and type of materials to be used and the verification of c...

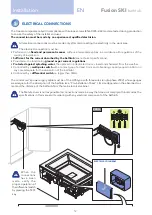
Page 12: ...and sheltered from the weather Controlled by a multi pole switch with a contact gap of at least 3 mm and a breaking capacity equal to 60A or in any case adequate for the absorption of the bathtub Cont...

Page 13: ...olenoid valve For convenience designed as one in the final system there will be two solenoid valves in parallel to increase water drainage speed EV4 bathtub fill solenoid valve EV5 shower head solenoi...

Page 14: ...he feet up to a maximum of 1 cm The water connections have been made properly in accordance with local and national codes and that they can guarantee a perfect seal verification to be carried out afte...

Page 15: ...omatic filling until conditions are restored and for a maximum of 60 minutes If the lack of water is considerable e g two or more people get out of the bathtub Both the minimum and maximum sensors do...

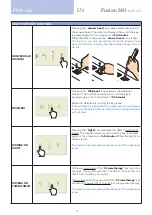
Page 16: ...tive functions except for the drain FILLING Pressing the Fill key starts the automatic filling of the bathtub When pressed the backlight changes from blue to red until the bathtub reaches a sufficien...

Page 17: ...running the key is red If the whirlpool is started but the water level in the minipool is too low the key will flash red three times and the whirlpool will not start TURNING ON LIGHTS Pressing the Lig...

Page 18: ...er the end of the disinfection procedure to al low for the complete emptying of the pipes If the whirlpool is started but the water level in the minipool is too low or there is no disinfectant in the...

Page 19: ...19 Fusion SKI bathtub EN Mount the laminate resin panels as shown in the figure below Decorative panels 1 2 1 1 3 INDOOR INSTALLATION...

Page 20: ...sion SKI installation Edition 12 2017 www gruppotreesse it GRUPPO TRE S s p a 01036 Nepi VT Italy S S Cassia km 36 400 Settevene industrial area tel 39 0761 527242 fax 39 0761 527223 info gruppotres i...

Reviews: