background image

18

Fusion Spa


minipool

EN

2

FIRST RUN


First run

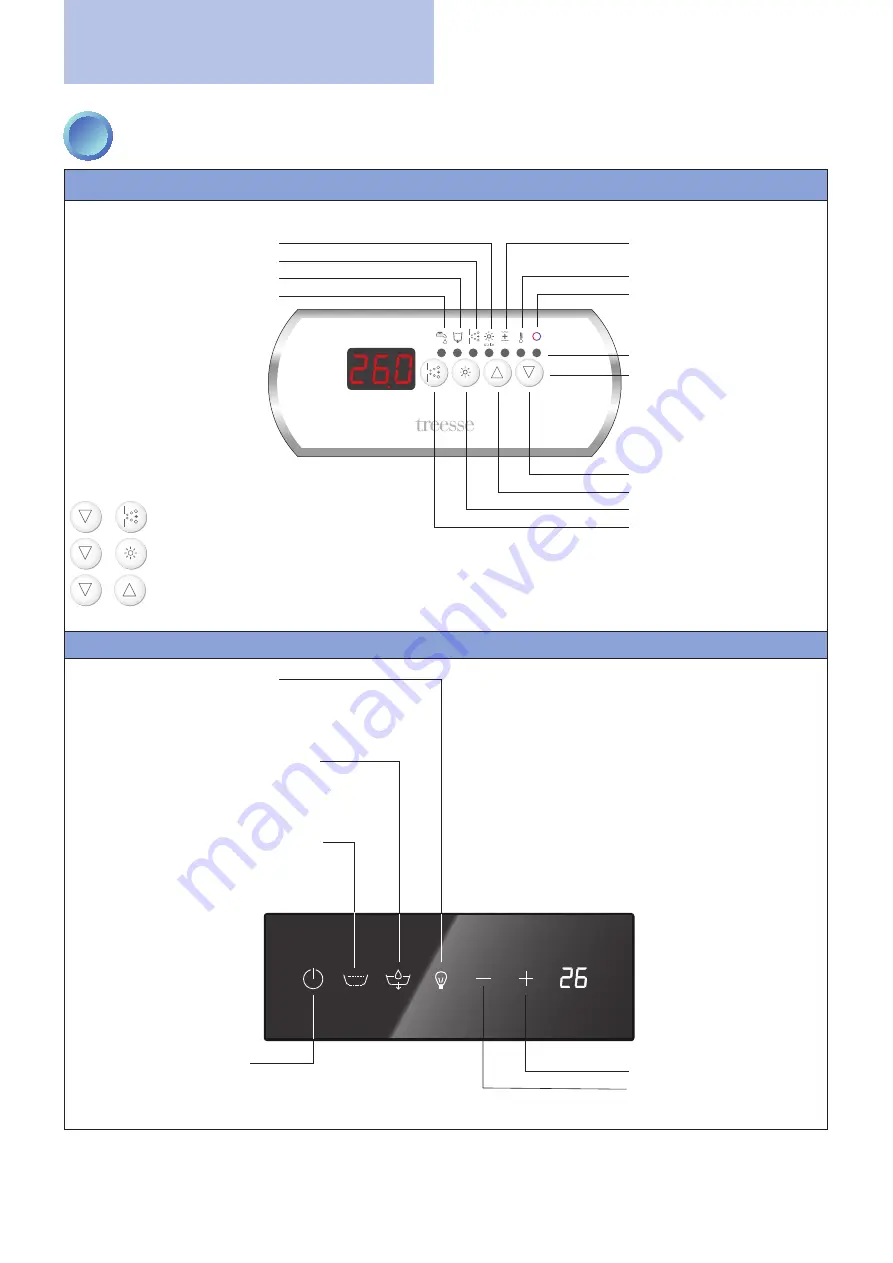
WHITE KEYPAD

BLACK CAPACITIVE KEYPAD

LED filling in progress

LED emptying in progress

LED whirlpool active

LED chromatherapy active

LED temperature adjustment

value increase key (UP)

chromatherapy activation key

whirlpool activation key

LED heating active

value decrease key (DOWN)

LED
KEYS

LED washing/sanitising 

(ozone) active 

KEY COMBINATIONS


+


 =  FILL bathtub


+


 =  EMPTY bathtub


+


 =   change mode from 


ACTIVE to STANDBY

key entry/exit from 

sleep mode

  WHITE: sleep mode NOT active
  BLUE: sleep mode active

whirlpool activation 

(brief press)

  WHITE: NOT active
  BLUE: whirlpool in progress

filter washing 

(press for 2 sec.)

bathtub fill/empty key

  WHITE: NOT active
  BLUE: filling in progress
  FLASHING: emptying in progress

chromatherapy activation key

  WHITE: chromatherapy NOT active
  BLUE: fixed colour
  FLASHING: colours in sequence

value increase key (UP)

value decrease key (DOWN)

Summary of Contents for Fusion Spa 230

Page 1: ...Fusion Spa minipool Installation manual...

Page 2: ...ead this manual carefully before installing it The Treesse team is always available for any information or request for assistance that may be required during installation GRUPPO TRE S s p a Telephone...

Page 3: ...10 3 CONNECTIONS REQUIRED__________________________________________________________ 11 4 PLUMBING CONNECTIONS_________________________________________________________ 13 CHARACTERISTICS OF THE WATER S...

Page 4: ...odifications that do not follow the information provided in this manual can cause damages injuries or fatal accidents and null and void the warranty During the installation of the minipool do not plac...

Page 5: ...de in compliance with current regulations in force in the country of installation A drain a gate valve to shut off the supply water and drain valves have been installed to empty the bathtub at the end...

Page 6: ...personal protective equipment e g gloves safety shoes etc and taking all the necessary safety precau tions for those involved and to not damage the minipool During transport lift the minipool by holdi...

Page 7: ...he height of the minipool s feet to compensate up to a maximum of 1 cm For a recessed installation lower the minipool into the prepared space If it was not possible to provide a technical inspection p...

Page 8: ...water C drain More information WHAT IS THE SAND FILTER The sand filter is an effective minipool filter connected to the recirculation pump s feed line It consists of a large container that is two thir...

Page 9: ...3B 3A 3A 2 3 5 4 6 0 5 1mm 7 10 8 10A 10A 11A 10B 11B 11C 11 12 13 0 5 1mm B 9 Caution Do not inhale Carefully clean and verify that the gaskets are still in place INTERIOR top view Caution Make sure...

Page 10: ...it is recommended to carefully read the safety warnings at the beginning of this manual and to always operate in perfect physical and mental condition The installer qualified and authorised by the Man...

Page 11: ...al and plumbing connection to an exchanger optional if present see following page The following pages will provide detailed explanations of how to perform these preparations EXAMPLES OF OUTDOOR INDOOR...

Page 12: ...rical connections Drain Water supply Technical inspection port IN incoming hot domestic water OUT outgoing cold water 230V C S P in out PR TC EV BS P2 BL 1 BL2 HTR Cromo 230V EVc EVs EVclv 230V heater...

Page 13: ...Ideal values of alkalinity range between 80 mg L and 125 mg L 8 F 12 5 F Values outside of this range can more easily cause variations of the pH Instead alkalinity within the range noted makes it pos...

Page 14: ...male hose provided If the minipool is installed outdoors provide an adequate thermal insulation of the pipes It is the plumber s responsibility to choose the type of materials to be used Connect the d...

Page 15: ...th a contact gap of at least 3 mm and a breaking capacity equal to 60A or in any case adequate for the absorption of the bathtub Controlled by a differential switch no larger than 30mA The control uni...

Page 16: ...ed and properly connected to the pipes The water connections have been made properly in accordance with local and national codes and that they can guarantee a perfect seal verification to be carried o...

Page 17: ...bit of water and a mild detergent Do not use cloths or cleaners that are abrasive aggressive or that contain solvents because they could irreparably damage the surface of the minipool Do not start an...

Page 18: ...ng sanitising ozone active KEY COMBINATIONS FILL bathtub EMPTY bathtub change mode from ACTIVE to STANDBY key entry exit from sleep mode WHITE sleep mode NOT active BLUE sleep mode active whirlpool ac...

Page 19: ...n to stop the function The first time it is recommended to leave the whirlpool in operation for at least 2 3 minutes to expel the air that may be present in the plumbing system CHROMATHERAPY Chromathe...

Page 20: ...hing the LED flashes the key for about 3 seconds during backwashing the letters FLT appear on the display Backwashing disables The recirculation pump The heater The ozonator A backwash cycle can be in...

Page 21: ...lay even if it is not visible it is still active then press the key emptying in progress is indicated by the flashing blue key The emptying of the minipool can be activated at any time Emptying lasts...

Page 22: ...disconnect the power supply to the bathtub and switch it on again after 30 seconds If the problem persists verify that the connection with the control unit is correct and has not been tampered with Ot...

Page 23: ...LL alternating with the temperature the functions remain enabled the system will start filling the bathtub to restore the level see the section on filling the minipool on page 17 The notification is...

Page 24: ...After the first cleaning of the bottom the problem should no longer exist Cleaning the bottom with a minipool cleaner Make sure you have used sand with granularity from 0 5 to 1 mm suitable for this...

Page 25: ...25 Fusion Spa minipool EN Mount the laminate resin panels as shown in the figure below Decorative panels 1 2 1 1 3 3 INDOOR INSTALLATION OUTDOOR INSTALLATION...

Page 26: ...ty Under these conditions or when not used advise the owner to use a fixed or mobile cover to protect the minipool we recommend the optional Treesse covers In addition to preserving the surfaces the c...

Page 27: ...e small differences between this manual and the product you have received we apologise in advance for any inconvenience The total or partial reproduction of this manual without the Manufacturer s cons...

Page 28: ...sion Spa installation Edition 03 2018 www gruppotreesse it GRUPPO TRE S s p a 01036 Nepi VT Italy S S Cassia km 36 400 Settevene industrial area tel 39 0761 527242 fax 39 0761 527223 info gruppotres i...

Reviews: