background image

13

IT

U

minipool


Q

uarz

Utilizzo

IDROMASSAGGIO

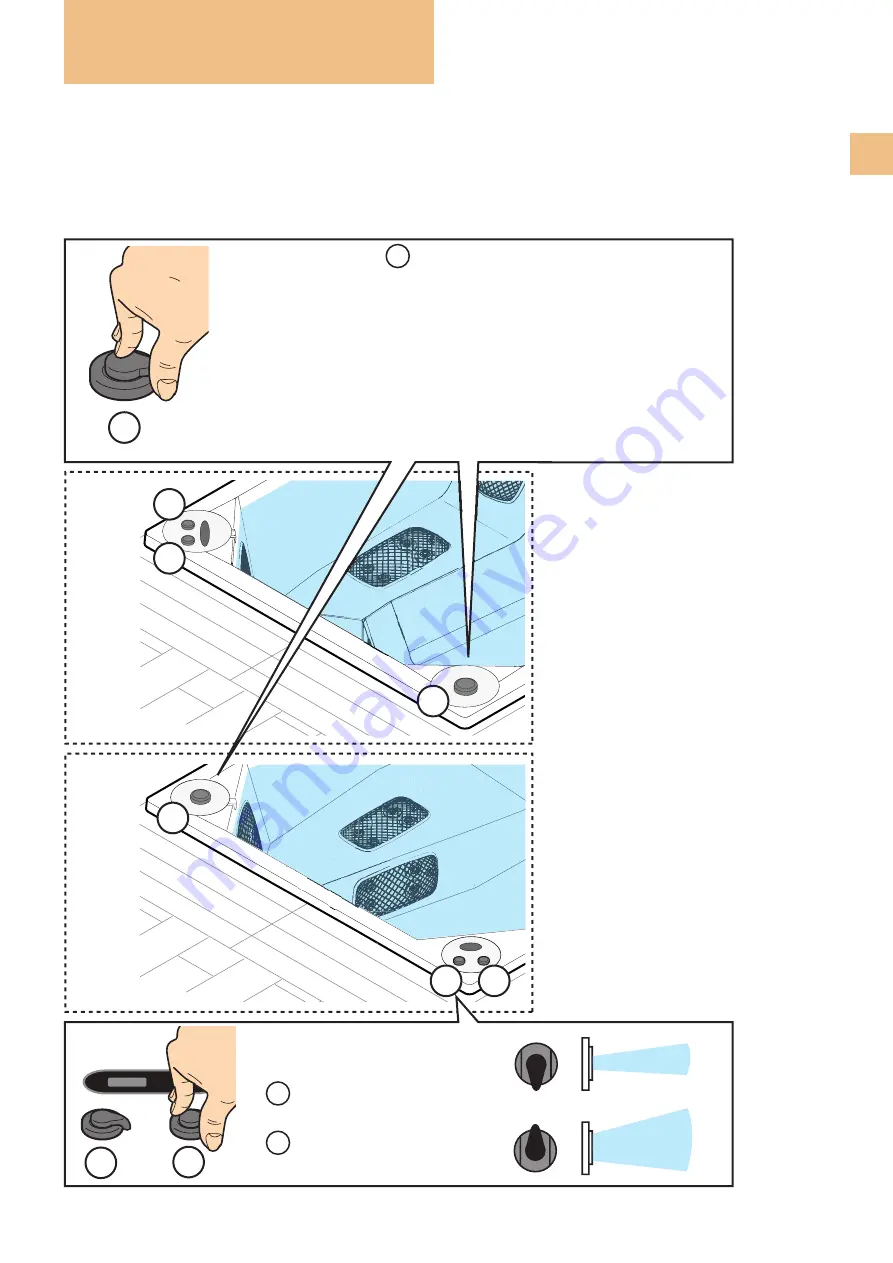
Le minipiscine Quarz si differenziano rispetto ai prodotti classici, dove tutto è a vista, per il posizionamento mirato 

delle bocchette idromassaggio, protette da griglie che rifrangono l’acqua creando un piacevole effetto visivo. Una 

trasformazione che rende le minipiscine ancora più attraenti dal punto di vista estetico e tecnologico.

QU

ARZ 212 

TO

P

QU

ARZ 212

QU

ARZ 235

B

C

C

A

A

B

B

C

QUARZ 212

QUARZ 212 TOP

QUARZ 325

A

Ruotando il 

deviatore 

A

 è possibile avviare:

-  

tutte

 le bocchette (posizione centrale);

- le bocchette 

di una parte dell’impianto

 (deviatore ruotato verso sinistra);

- le bocchette 

di una seconda parte dell’impianto

 (deviatore ruotato verso 

destra).

Ruotando il 

regolatore:

B

  è possibile controllare l’aria 

dei jets GRANDI

C

  è possibile controllare l’aria 

dei jets PICCOLI

MINIMO

MASSIMO

Summary of Contents for minipool Quarz

Page 1: ...Quarz minipool Operating and maintenance manual Manuale d uso e manutenzione ...

Page 2: ...giunge una forte innovazione e un design ricercato Non ci resta che augurarLe un buon relax Gruppo Tre S s p a Dear Customer We thank you for choosing a Treesse minipool and welcome you to our world of total wellness We remind you that our products are manufactured with superb quality materials and are accurately tested in compliance with the provisions of the safety regulations in force Great inn...

Page 3: ...3 utilizzo della minipiscina ...

Page 4: ... 39 0761 527242 fax 39 0761 527223 È obbligatorio conservare la prova d acquisto originale scontrino fattura ecc qualora si rendessero necessari interventi coperti da garanzia Il numero di serie è riportato nel vano apparecchiature Premessa SPIEGAZIONI PITTOGRAMMI Pericolo Situazione di pericolo immediato o situazione pericolosa che potrebbe causare lesioni o decesso Approfondimenti aiutano l inst...

Page 5: ...CONTROLLO DEI PARAMETRI DELL ACQUA_______________________________________________37 ACQUA DI ACQUEDOTTO E ACQUA DI POZZO_____________________________________________________37 DUREZZA DELL ACQUA___________________________________________________________________________37 ALCALINITÀ DELL ACQUA_________________________________________________________________________37 TABELLA DI CONVERSIONE_________...

Page 6: ...per sone con ridotte capacità psichiche e sensoriali o prive di esperienza di utilizzare la minipiscina se non sotto stretta sorveglianza costante Non tuffarsi all interno della minipiscina rischio di gravi lesioni personali e strut turali dell apparecchiatura ATTENZIONE PER RIDURRE IL RISCHIO DI LESIONI L acqua della minipiscina non dovrà mai superare i 40 C per evitare l ipertermia Temperature d...

Page 7: ... la massima igiene e sicurezza nell uso della mi nipiscina Durante la manutenzione della piscina e l utilizzo dei prodotti chimici utilizza re sempre mezzi di protezione personale es guanti e occhiali protettivi Per la manutenzione ordinaria utilizza re soltanto i prodotti indicati dal Co struttore detergenti o disinfettanti di tipo diverso potrebbero rovinare irrimediabilmen te le superfici e i c...

Page 8: ...bagno idromassaggio di 5 8 minuti al massimo a 35 C 37 C Usciti dalla minipi scina distendersi per alcuni minuti così da consentire alla pressione alterata dal calore e dal massaggio di tornare alla normalità Approfondimenti CROMOTERAPIA La luce è composta da 7 colori fondamentali rosso arancione giallo verde blu indaco e viola l esempio classico che troviamo in natura riguardo lo Spettro luminoso...

Page 9: ...meniaca Rosaceae ha profumo delicato e piacevolissimo con effetti calmanti rilassanti e antistress Essenza di eucalyptus L essenza a base di eucalyptus regala un bagno ener gizzante balsamico e fresco Utilizzo ESSENZE E SALI DA BAGNO All interno della minipiscina NON utilizzare detergenti schiumosi saponi olii da bagno lozioni grasse o prodotti non compatibili con la minipiscina l acqua diventereb...

Page 10: ... a proteggerla dai raggi solari evitare che si depositi dello sporco all interno della vasca e che non disperda il calore ottimizzando l efficienza del riscaldatore 7 1 6 4 2 3 4 5 7 8 8 6 7 1 3 4 5 9 7 4 2 1 QUARZ 212 QUARZ 212 TOP QUARZ 235 1 Regolatori d aria 2 Deviatore di flusso 3 Griglie ergonomiche 4 Cuscini 5 Skimmer con filtri a carta 6 Pannello comandi 7 Cover 8 Luci cromoterapia solo mo...

Page 11: ...ipiscina durante il suo inutilizzo serve a proteggerla dai raggi solari evitare che si depositi dello sporco all interno della vasca e che non disperda il calore ottimizzando l efficienza del riscaldatore 1 5 3 2 3 4 6 7 7 5 6 1 3 4 8 6 3 2 1 6 QUARZ 212 LIGHT QUARZ 235 LIGHT 1 Regolatori d aria 2 Deviatore di flusso 3 Cuscini 4 Skimmer con filtri a carta 5 Pannello comandi 6 Cover 7 Luci cromoter...

Page 12: ...o SCARICO E ASPIRAZIONE POMPE Lo scarico della minipiscina è posizionato sul fondo della stessa dalla parte dello skimmer coperto da una griglia L aspirazione invece è collocata in basso all interno della griglia laterale Per il funzionamento vedere pag 15 CROMOTERAPIA La luce della cromoterapia movimenta magicamente l idromassaggio nella vasca La cromoterapia è di serie per tutti i modelli QUARZ ...

Page 13: ...ancora più attraenti dal punto di vista estetico e tecnologico QUARZ 212 TOP QUARZ 212 QUARZ 235 B C C A A B B C QUARZ 212 QUARZ 212 TOP QUARZ 325 A Ruotando il deviatore A è possibile avviare tutte le bocchette posizione centrale le bocchette di una parte dell impianto deviatore ruotato verso sinistra le bocchette di una seconda parte dell impianto deviatore ruotato verso destra Ruotando il regol...

Page 14: ......

Page 15: ...Cool Light Icone sullo schermo A B C D E F G H I J K O N M L A Calore B Modalità Ready C Modalità Rest D bba 2 On E WiFi Connessione al cloud F Luce G Ciclo di pulizia H Getti 1 I Getti 2 J Blower K Ausiliario Getti 3 o MicroSilk L Range di temperatura Massima Minima M Set Programmazione Ciclo di filtraggio 1 o 2 o entrambi N O AM o PM ora ...

Page 16: ...e alcuni secondi il pannello di comando tornerà alla normale modalità Accensione del display Ogni volta che il sistema si accende appaiono una serie si numeri sul display Dopo la sequenza di numeri di accensione il sistema entra in modalità di inizializzazione vedi pag 15 Legenda Indica un cambiamento nel display Indica un messaggio continuo o intermittente ogni 1 2 secondo Un pulsante temperatura...

Page 17: ...dalità di inizializzazione il sistema avvierà automaticamente le normali operazioni di riscaldamento e filtraggio al termine della modalità di inizializzazione Durante la modalità di inizializzazione il riscaldamento è disattivato in modo da evitare che in caso di flusso d acqua basso o assente vi sia un surriscaldamento Non è prevista alcuna attivazione automatica tuttavia le pompe possono essere...

Page 18: ...o brevemente avviati per spurgare i tubi e mantenere una buona qualità dell acqua ANTI GELO Qualora i sensori di temperatura del riscaldatore rilevas sero una temperatura sufficientemente bassa la pompa o le pompe si accenderà automaticamente per fornire protezione dal gelo le pompe lavorano in modo continuo o periodicamente a seconda della necessità Nei climi più freddi è possibile aggiungere un ...

Page 19: ...richiesta In un pannello con un unico tasto di temperatura premendolo la temperatura lampeggia Premendo nuovamente il tasto si modifica la temperatura in una direzione es Una volta che il display smette di lampeggiare il tasto della temperatura porta nuovamente a lampeggiare la temperatura e la successiva pressione modificherà la temperatura in direzione opposta es Tenendo premuto il tasto della t...

Page 20: ...empe ratura con parametri indipendenti tra loro Il Range Alto è rappresentato sullo schermo da un termometro e una freccia verso l alto mentre il Range Basso è rappresentato da un termometro e una freccia verso il basso Questi range possono essere usati per vari motivi spesso sono usati come impostazione pronta all uso contro impostazione vacanza È possibile selezionare i Range seguendo la struttu...

Page 21: ...del menu principale se non si attivato Attendere qualche secondo per tornare a impostazione originale Passare tra Ready indicato da e Rest indicato da Premendo Menu Select si torna alla schermata principale La modalità Ready permetterà alla spa di verificare la necessità di riscaldamento Il pannello manterrà la tem peratura rilevata sul display Legenda Indica un cambiamento nel display Indica un m...

Page 22: ...sistemi che non mantengono l orario una volta spenti Qualora vi sia un interruzione di elettricità al sistema l Orario non sarà memorizzato Il sistema continuerà a funzionare e tutte le altre impostazioni utente saranno memorizzate Qualora sia necessario eseguire i cicli di filtraggio in un orario particolare il reset dell orologio riporterà gli orari di filtraggio ai periodi attualmente programma...

Page 23: ...ssiva nel menu principale Qualche secondo Qualche secondo Qualche secondo Attendere qualche secondo per tornare a impostazione originale F LOCK resterà sullo schermo per 3 secondi per poi tornare alla scher mata normale Temperatura Bloccata qualsiasi pulsante Schermata principale Schermata principale Qualche secondo Qualche secondo F Una volta bloccata la temperatura il pannello mostrerà la temper...

Page 24: ...attiva OPPURE Alcune spa hanno la funzione PUMPING OUT Modalità Drain col pulsante Jets Jets accederà e spegnerà la pompa J Premere più volte Menu Select fino a far comparire HOLD Schermata principale Schermata principale Qualche secondo Schermata principale qualche secondo oppure Alla voce successiva nel menu principale Legenda Indica un cambiamento nel display Indica un messaggio continuo o inter...

Page 25: ... a impostazione originale Attendere qualche secondo per tornare a impostazione originale Attendere per annullare Attendere qualche secondo per tornare a impostazione originale Attendere qualche secondo per annullare Orario di avvio e Ore di durata di Filtraggio 1 e tornare alle impostazioni precedenti di Filtraggio 1 Impostare Attendere qualche secondo per annullare On OFF Orario di avvio e Ore di...

Page 26: ...do per tornare a impostazione originale Attendere per annullare Attendere qualche secondo per tornare a impostazione originale OPPURE OPPURE OPPURE Alla voce successiva nel menu principale Schermata principale Schermata principale Attendere qualche secondo per annullare Timer Orario di avvio e Ore di durata della luce e tornare alle impostazioni precedenti Impostare Legenda Indica un cambiamento n...

Page 27: ... F e C Attendere per annullare Attendere per annullare Attendere per annullare Attendere per annullare Attendere per annullare Impostare Impostare Impostare Impostare Impostare Cambia tra formato 12 e 24 ore Premere Menu Select Per mostrare la prima voce del menu preferenze per 12 24 Premere Menu Select per PROMEMORIA Attendere per annullare Impostare Premere Menu Select Solo con Ciclo di Pulizia ...

Page 28: ... Switch di S1 sulla scheda madre PANL Versione Pannello Mostra un numero del software sul lato superiore del pannello di controllo UTILITIES AGGIUNTIVE Oltre a INFO il menu delle Utilities contiene quanto segue GFCI Test del differenziale Funzionalità non disponibile su sistemi certificati CE Il Test GFCI non è sempre attivo quindi potrebbe non apparire Questa schermata permette di effettuare un t...

Page 29: ...N il Pannello mostrerà in modo alternato i valori del Sensore A e del B Ritorno alla normale operatività DIP Switch 1 Test Mode Off 0 o On 1 N A o Regola Amperaggio speciale 1 o 2 Tensione d entrata a 120 o 240 V rilevata da sistema UL all avvio Wattaggio Riscaldatore 3 6 o 1 3 come programmato Mostrato da sistema CE all avvio Tipologia riscaldatore Visualizza Registro guasti Impostare Mostra Menu...

Page 30: ... volta usciti dalla Modalità di inizializzazione Temperatura dell acqua sconosciuta segnalazione Descrizione problema la pompa dedicata alla circolazione dell ac qua deve lavorare per almeno un minuto perché venga visualizzata la temperatura Protezione antigelo segnalazione Descrizione problema è stata rilevata una potenziale situazione di congelamento oppure lo Switch ausiliare antigelo è stato c...

Page 31: ...scaldatore Ogni funzione della piscina viene disabilitata Dopo aver risolto il problema togliere e ridare corrente per inizializzare la procedura di riscaldamento dell acqua Consultare la sezione problemi connessi al flusso di acqua di seguito Il riscaldatore è troppo caldo OHH M030 Descrizione problema i sensori della temperatura dell acqua hanno rilevato temperature troppo elevate 47 8 C 118 F O...

Page 32: ...sore connesso al rilievo della temperatura o il sensore del circuito non funzionano Chiamare il servizio tecnico MESSAGGI DI VARIO TIPO SCHERMATA VISUALIZZATA DESCRIZIONE DELLE SEGNALAZIONI E SOLUZIONI POSSIBILI Nessun segnale Descrizione problema il pannello di comando non comunica con la centralina elettronica Chiamare il servizio tecnico Software di sviluppo beta Descrizione problema il sistema...

Page 33: ...icabile su BP1500 Consultare l Assistenza Tecnica Errore di configurazione La minipiscina non si avvia Consultare l Assistenza Tecnica Guasto GFCI Il sistema non è collegato al GFCI M036 Descrizione problema ESCLUSIVAMENTE IN NORD AMERICA Potreb be indicare una installazione non sicura Consultare l Assistenza Tecnica Pompa bloccata in modalità ON M034 Descrizione problema l acqua potrebbe essere s...

Page 34: ...trattamento acque e manutenzione ...

Page 35: ...larità due semplici ma fondamentali operazioni 1 Controllo dei parametri fondamentali dell acqua pH durezza alcalinità pag 35 Se i tre parametri non sono perfettamente bilanciati potrebbero essere necessarie quantità maggiori di additivi e disinfettanti e quindi di manutenzione Ad esempio un acqua eccessivamente alcanina rende difficile mantenere stabile il pH a sua volta un pH instabile predispon...

Page 36: ... da una cartuccia a forma di cilindro principalmente a base di cellulosa e poliammide L acqua della minipiscina entra nel filtro da un bocchettone ed esce da un altro filtrata e pulita grazie alla cartuccia presente capace di trattenere anche polveri finissime Ogni quanto la pulizia sostituzione del filtro a carta dipende dalla fre quenza di utilizzo della minipiscina In generale sciacquare la car...

Page 37: ...i equilibrio tra i valori di pH durezza alcalinità essi vanno quindi frequentemente misurati e quindi bilanciati tra di loro Si ricorda che il pH dovrà essere compreso tra 7 4 7 8 per avere la maggior efficacia e duratura dei disinfettati a bromo l alcalinità ottimale è compresa tra valori di 8 12 5 F la durezza non dovrebbe essere superiore a 25 F essa può essere tenuta sotto controllo con l uso ...

Page 38: ...er vallo 7 4 7 8 dare problemi di irritazione agli occhi e alla pelle dei bagnanti avere un acqua con scarso potere sanificante consumo eccessivo di prodotti chimici diminuire la durata dei componenti della minipiscina Il mezzo più semplice per misurare il pH è utilizzare un reagente solitamente si utilizza il rossofenolo in gocce o pastiglie solubili facilmente reperibili in negozi specializzati ...

Page 39: ...izzato e addestrato allo scopo 2A DISINFEZIONE ELIMINAZIONE DELLA CARICA BATTERICA E FUNGINA Per una completa sanificazione dell acqua si consiglia l uso di bromo con riattivazione ad ossigeno granulare Trattamento con ossigeno utilizzo domestico Questo metodo di sanificazione si rivela ideale per l utilizzo domestico cioè quando la minipiscina viene utilizzata da un numero limitato di persone per...

Page 40: ...la scelta della formulazione liquida granuli pastiglie ecc e la frequenza di utilizzo va valutata in base alle proprie esigenze alla posizione della minipiscina esterna o interna e alla qualità dell acqua Eliminazione delle alghe Le alghe sono organismi uni o pluricellulari che si possono formare nelle vasche delle minipiscine se l acqua non viene adeguatamente disinfettata Nascono a partire da sp...

Page 41: ...ro compatibilità leggere le etichette informative o chiedere infor mazioni al Rivenditore dei prodotti TRATTAMENTO DATA DATA DATA DATA DATA DATA Trattamento disinfettante OSSIGENO BROMO SUPER DISINFEZIONE Trattamento antialga Flocculante Trattamento anti schiuma Trattamento anti grasso Sequestrante Controllo parametri Cambio acqua minipiscina TRATTAMENTO DATA DATA DATA DATA DATA DATA Trattamento d...

Page 42: ...alga Flocculante Trattamento anti schiuma Trattamento anti grasso Sequestrante Controllo parametri Cambio acqua minipiscina TRATTAMENTO DATA DATA DATA DATA DATA DATA Trattamento disinfettante OSSIGENO BROMO SUPER DISINFEZIONE Trattamento antialga Flocculante Trattamento anti schiuma Trattamento anti grasso Sequestrante Controllo parametri Cambio acqua minipiscina ...

Page 43: ...ia immersa in una soluzione adatta alla pulizia di questo tipo di filtri possibilmente per tutta la notte Fare comunque riferimento alle istruzioni fornite dal Produttore del prodotto di pulizia utilizzato Al termine della pulizia attendere che la cartuccia sia asciutta e riposizionarla nel vano predisposto In caso di sostituzione si raccomanda di smal tire le cartucce sporche seguendo le normativ...

Page 44: ...è necessario riempire nuovamente la minipisicna consultare il capitolo dedicato a pag 45 Lo scarico dell acqua può avvenire in qualsiasi momento senza persone all interno della mi nipiscina Si consiglia di vuotare sempre la minipiscina durante le operazioni di manutenzione e a fine stagione Prima di svuotare la minipiscina soprattutto se è appena stata eseguita un trattamento shock accertarsi che ...

Page 45: ...acqua che si intende utilizzare ciò è molto importante per il benessere degli utilizzatori e per una lunga durata della minipiscina Per maggiori informazioni consultare cap Tratta mento delle acque a pag 36 RIEMPIMENTO DELLA MINIPISCINA Per procedere al riempimento utilizzare un tubo di gom ma come illustrato in figura L acqua utilizzata deve possedere i requisiti indicati in dettaglio nelle pagin...

Page 46: ...qua e all impianto domestico Per il risciacquo non utilizzare tubi da giardino per non riempire nuovamente d acqua il circuito idraulico 6 asciugare la minipiscina con una pelle di daino e proteggerla con la copertura optional RIAVVIO DELLA MINIPISCINA DOPO UN INUTILIZZO PROLUNGATO Effettuare una rapida pulizia della minipiscina utiliz zando un po d acqua e del detergente per superfici acriliche N...

Page 47: ...ilmente con pelle di daino Evitare nel modo più assoluto panni e detergenti abrasivi aggressivi es solventi o acetone o a base alcolica Non utilizzare prodotti anticalcare in quanto troppo aggressivi Per la pulizia del telo di copertura utilizzare panni mor bidi e prodotti neutri essi sono facilmente reperibili in qualsiasi negozio specializzato o facendone richiesta al Costruttore Per la pulizia ...

Page 48: ...il funzionamento del prodotto anche se vendute a corredo dello stesso 2 anni sulle restanti parti vendute a corredo del prodotto La garanzia inizierà a decorrere dalla data di acquisto tale data sarà attestata dallo scontrino fiscale ricevuta o qualsiasi altro documento comprovante l acquisto della merce SMALTIMENTO A FINE VITA Ai sensi dell art 13 del Decreto Legislativo n 49 del 2014 Attuazione ...

Page 49: ...n cor retto o poco frequente Consultare i capitoli 1 pag 35 2 pag 39 Cattivi odori o muffe Acqua con valori durezza pH alca linità non bilanciati e in equilibrio tra di loro Trattamento delle acque non cor retto o poco frequente Acqua cambiata troppo raramente Telo di copertura non pulito in modo ottimale Consultare i capitoli 1 pag 35 2 pag 39 Per la pulizia del telo di copertura vedere pag 47 Va...

Page 50: ...Minipool use ...

Page 51: ...industrial area tel 39 0761 527242 fax 39 0761 527223 It is mandatory to keep the original proof of purchase receipt invoice etc in case servicing is required under warranty The serial number is indicated in the equipment compartment Introduction EXPLANATION OF PICTOGRAMS Danger Situation presenting immediate danger or a hazardous situation that could cause injury or death More info helps the inst...

Page 52: ..._______83 1 CHECKING THE WATER PARAMETERS_____________________________________________________86 TAP WATER AND WELL WATER____________________________________________________________________86 WATER HARDNESS_______________________________________________________________________________86 WATER ALKALINITY_______________________________________________________________________________86 CONVERSION TAB...

Page 53: ...sensory abilities or those who are inexperienced to use the minipool without close constant surveillance Do not dive into the minipool risk of serious personal injury and structural damage to the equipment WARNING TO REDUCE THE RISK OF INJURY The minipool water must never exceed 40 C in order to avoid hyperthermia Water temperatures between 38 and 40 C are still considered safe for a healthy adult...

Page 54: ...lar basis as this will maintain the surfaces and functional parts in optimal condition and also ensure maximum hygiene and safety when using the minipool During the maintenance of the pool and the use of chemicals always use per sonal protection e g protective gloves and glasses For routine maintenance use only the products specified by the Manufacturer other types of detergents or disinfectants c...

Page 55: ...or 5 8 minutes at a maximum of 35 37 C After leaving the minipool relax for a few minutes to allow the pressure altered by the heat and massage to return to normal More information CHROMATHERAPY Light is made up of seven basic colours red orange yellow green blue indigo and violet The classic ex ample of the colour spectrum that we find in nature is the rainbow The Egyptians Greeks and Romans prac...

Page 56: ...ess Apricot essence Apricot essence is derived from Prunus armeniaca Rosaceae it has a delicate and pleasant scent with calming relaxing and anti stress effects Eucalyptus essence The essence made from eucalyptus provides an experi ence that is energising balsamic and fresh Use ESSENCES AND BATH SALTS Inside the minipool DO NOT use foaming detergents soaps bath oils greasy lotions or products that...

Page 57: ...un s rays prevents dirt from accumulating inside the bathtub and keeps it from losing heat thus optimising the efficiency of the heater 7 1 6 4 2 3 4 5 7 8 8 6 7 1 3 4 5 9 7 4 2 1 QUARZ 212 QUARZ 212 TOP QUARZ 235 1 Air regulators 2 Flow diverter 3 Ergonomic grilles 4 Pillows 5 Skimmers with paper filters 6 Control Panel 7 Cover 8 Chromotherapy lights only models QUARZ 212 TOP and QUARZ 235 9 Chro...

Page 58: ... s water temperature ALWAYS cover the minipool when inactive This protects it from the sun s rays prevents dirt from accumulating inside the bathtub and keeps it from losing heat thus optimising the efficiency of the heater QUARZ 212 LIGHT QUARZ 235 LIGHT 1 Air regulators 2 Flow diverter 3 Pillows 4 Skimmers with paper filters 5 Control Panel 6 Cover 7 Chromotherapy lights 8 Chromotherapy RGB spot...

Page 59: ...UCTION PUMPS The minipool drain is positioned on the bottom of the same on the side of the skimmer covered by a grille The suction instead is placed at the bottom inside the lateral grille For this operation see page 15 CHROMATHERAPY The cromotherapy light moves the hydromassage in the pool magically Chromotherapy comes as standard for all QUARZ models in the Quarz 212 the function is performed th...

Page 60: ...active from an aesthetic and technological point of view QUARZ 212 TOP QUARZ 212 QUARZ 235 B C C A A B B C QUARZ 212 QUARZ 212 TOP QUARZ 325 A Rotating the diverter A it is possible to activate all the jets central position the jets of one part of the system diverter turned to the left the jets of a second part of the system diverter turned to the right Rotating the regulator B it is possible to c...

Page 61: ...61 ...

Page 62: ......

Page 63: ...Jets 2 menu select Cool Light Display Icons A B C D E F G H I J K O N M L A Heat B Ready Mode C Rest Mode D bba 2 On E WiFi Cloud Connection F Light G Cleanup Cycle H Jets 1 I Jets 2 J Blower K Auxiliary Jets 3 or L Temperature Range High Low M Set Programming N Filter Cycle 1 or 2 or Both O AM or PM Time ...

Page 64: ...y waiting a few seconds the control panel will return to normal mode Power up Screens Each time the System powers up a series of numbers is displayed After the startup sequence of numbers the system will enter priming mode see page 3 Key Indicates a change in the display Indicates a continuous or intermittent message every 1 2 second A temperature button used for Action Menu Select button Waiting ...

Page 65: ...t it the system will automatically start normal heating and filtering at the end of the priming mode During the priming mode the heater is disabled to allow the priming process to be completed without the pos sibility of energizing the heater under low flow or no flow conditions Nothing comes on automatically but the pumps can be energized by pushing the Jets buttons If the spa has a Circ Pump it ...

Page 66: ...sors detect a sufficiently low temperature the pump s will automatically turn on to provide frost protection The pumps work continuously or periodically as required In colder climates an optional freeze sensor may be added to protect against freeze conditions that may not be sensed by the standard sensors Auxiliary freeze sen sor protection acts as the standard sensor and is based on the temperatu...

Page 67: ...e button pressing the button will cause the temperature to flash Pressing the button again will cause the temperature to change in one direction e g After allowing the display to stop flashing pressing the Temperature Button will cause the temperature to flash and the next press will change the temperature in the opposite direction e g If a Temperature button is pressed and held when the temperatu...

Page 68: ...ettings with independent set temperatures The High Range is identified in the display by a thermometer and an up arrow and the Low Range is identified in the display by a thermometer and down arrow These ranges can be used for various reasons with a common use being a ready to use setting vs a holiday setting The Ranges are chosen using the menu structure below Each range maintains its own set tem...

Page 69: ...ew seconds to return to the original setting Switch between Ready indicated by and Rest indi cated by Pressing the Menu Select button will allow the display to revert the Main Screen Ready Mode will allow the spa to check the need for heat The panel will maintain the temperature shown in the display Key Indicates a change in the display Indicates a continuous or intermittent message every 1 2 seco...

Page 70: ...is note refers to systems that do not keep track of Time of Day when powered down If power to such a system is interrupted Time of Day is not stored The system will still operate and all other user settings will be stored If filter cycles are required to run at a particular time of day resetting the clock will return the filter times to the actual programmed periods When such a system starts up it...

Page 71: ... few seconds Wait a few seconds to return to the original setting F LOCK will remain on the display for 3 seconds and then revert to the normal display Temperature Locked button Main Screen Main Screen A few seconds A few seconds F When the Temperature is locked the panel will display the Set Temperature by pressing a Temperature Button as usual LOCK will appear if an attempt to reset the temperat...

Page 72: ...odeisenabled OR Some spas have the PUMPING OUT function Drain Mode with the Jets button Jets will toggle pump on and off J PressMenu Select repeatedlyuntil HOLDappears Main Screen Main Screen A few seconds Main Screen a few seconds or To next item in Main Menu Key Indicates a change in the display Indicates a continuous or intermittent message every 1 2 second A temperature button used for Action ...

Page 73: ...conds to return to the original setting Wait to Revert Wait a few seconds to return to the original setting Wait a few seconds to cancel the Filtration 1 Start Time and Hours and return to the previous Filtration 1 settings Set Wait a few seconds to cancel the ON OFF Filtration 2 Start Time and Hours and return to the previous Filtration 2 settings Wait to Revert 2X 2X 00 Key Indicates a change in...

Page 74: ...ts 2X Wait a few seconds to return to the original setting Wait to Revert Wait a few seconds to return to the original setting OR OR OR To next item in Main Menu Main Screen Main Screen Wait a few seconds to cancel Timer Start time and Hours of light duration and return to the previous settings Set Key Indicates a change in the display Indicates a continuous or intermittent message every 1 2 secon...

Page 75: ... the Dolphin manual for details Changes between Yes and No Changes between F and C Wait to Revert Wait to Revert Wait to Revert Wait to Revert Wait to Revert Set Set Set Set Set Changes the clock between 12 hr and 24 hr display PressMenu Select Toshowthefirstiteminthepreferencemenu for 12 24 PressMenu Select for REMINDER Wait to Revert Set PressMenu Select Only with Cleaning Cycle activated Only RF...

Page 76: ...ositions of S1 on the main circuit board PANL Panel Version Displays a number of the software in the topside control panel ADDITIONAL UTILITIES In addition to INFO The Utilities Menu contains the following GFCI GFCI Test Feature not available on CE rated systems GFCI Test is not always enabled so it may not appear This screen allows the GFCI to be tested manually from the panel and can be used to ...

Page 77: ...e Panel will display alternate readings from Sensor A and Sensor B Back to normal operation DIP Switch 1 Test Mode Off 0 or On 1 N A or Special Amperage Rule 1 or 2 120or240V inputvoltage detectedbythe ULsystematstartup Heater wattage 3 6 or 1 3 as programmed Shown by the CE system at startup Heater Type Displays Fault Log Set Displays GFCI Test Menu differential OR DIP Switch 2 3 4 the number of ...

Page 78: ... Mode is exited Water Temperature is Unknown notification Problem description the temperature will be displayed after the pump has been running for 1 minute Frost protection notification Problem description a potential freezing situation has been detected or the Auxiliary frost protection switch has been closed All pumps are activated one at a time or all together depending on the system configura...

Page 79: ...enough water in the heater All minipool functions are disabled After solving the problem remove and restore the power to initialize the water heating procedure See Flow Related Checks below The heater is too hot OHH M030 Problem description the water temperature sensors have detected too high temperatures 47 8 C 118 F All minipool functions are disabled Press any button on the control panel to re ...

Page 80: ...31 Sensor B M032 Problem description A temperature sensor or sensor circuit has failed Call for Service VARIOUS TYPES OF MESSAGES DISPLAY SCREEN DESCRIPTION OF SIGNALS AND POSSIBLE SOLUTIONS No signal Problem description the control panel is not communicating with the control unit Call for Service Development software beta Problem description the control system is operating with test software Call...

Page 81: ...pplicable on BP1500 Contact Technical Service Configuration error The minipool doesn t start Contact Technical Service GFCI fault The system is not connected to the GFCI M036 Problem description ONLY IN NORTH AMERICA It may indicate an unsafe installation Contact Technical Service Pump blocked in ON mode M034 Problem description the water may have overheated POWER DOWN THE SPA DO NOT ENTER THE WAT...

Page 82: ...Use ...

Page 83: ...water treatment and maintenance ...

Page 84: ...tal operations should be carried out on a regular basis 1 Check the fundamental water parameters pH hardness alkalinity page 84 If the three parameters are not perfectly balanced larger quantities of additives and disinfectants may be needed followed by maintenance For example an excessively alkaline water makes it difficult to keep the pH stable In turn an unstable pH fosters the formation of alg...

Page 85: ...e and polyamide The water in the minipool enters the filter through a hole and comes out from another filtered and cleaned thanks to the cartridge within capable of retaining even very fine dust How often Cleaning replacing the paper filter depends on how often the minipool is used In general rinse the cartridge every 2 3 weeks and replace it with every change of water Which products to use for cl...

Page 86: ...on of equilibrium among the values of pH hardness alkalinity they must therefore be measured frequently and then balanced Remember that The pH must be between 7 4 7 8 to allow the bromine disinfectants to be most effective and long lasting The optimal alkalinity is in the range of 8 12 5 F The hardness should not exceed 25 F It can be kept under control with sequestering agents specific or limesca...

Page 87: ...keep the pH in the range 7 4 to 7 8 irritation of the eyes and skin of people in the water water with little sanitising power excessive consumption of chemicals decrease in the duration of the minipool components The simplest way to measure pH is to use a reagent usually rossophenol is used in drops or soluble tablets readily available in specialised stores When placed in contact with the water to...

Page 88: ...el 2A DISINFECTION ELIMINATION OF THE BACTERIAL AND FUNGAL LOAD For a complete sanitisation of the water we recommend the use of bromine with reactivation using granular oxygen Oxygen treatment domestic use This method of sanitisation is ideal for domestic use i e when the minipool is used by a limited number of people for non prolonged periods It naturally creates crystalline water and is less ag...

Page 89: ...le treatments the choice of formulation liquid granules tablets etc and the frequency of use should depend on your needs the position of the minipool outdoor or indoor and the water quality Elimination of algae Algae are single or multi celled organisms that can form in minipools if the water is not properly disinfected They are born from spores introduced by the environment and if they enter wate...

Page 90: ... read the information labels or request information from the product dealer TREATMENT DATE DATE DATE DATE DATE DATE Disinfectant treatment OXYGEN BROMINE SUPER DISINFECTION Anti algae treatment Flocculant Anti foam treatment Anti fat treatment Sequestering agent Parameter check Minipool water change TREATMENT DATE DATE DATE DATE DATE DATE Disinfectant treatment OXYGEN BROMINE SUPER DISINFECTION An...

Page 91: ...gae treatment Flocculant Anti foam treatment Anti fat treatment Sequestering agent Parameter check Minipool water change TREATMENT DATE DATE DATE DATE DATE DATE Disinfectant treatment OXYGEN BROMINE SUPER DISINFECTION Anti algae treatment Flocculant Anti foam treatment Anti fat treatment Sequestering agent Parameter check Minipool water change ...

Page 92: ...lution suitable for clean ing this type of filter possibly overnight In any case refer to the instructions provided by the manufacturer of the cleaning product used When cleaning is complete wait until the car tridge is dry and then place it in its compartment For replacement it is recommended to dispose of the dirty filters according to the regulations in force in the country of use More informat...

Page 93: ...d in the figure on the side If it is necessary to refill the minipool see the pertinent chapter on page 45 The water can be drained at any time without people inside the minipool It is advisable to always empty the minipool dur ing maintenance and at the end of the season Before emptying the minipool especially if a shock treatment has just been performed make sure that the values of disinfectants...

Page 94: ...eck the quality of the water supply This is very important for the well being of the users and for the long life of the minipool For more information see chapter Water treat ment on page 85 FILLING THE MINIPOOL For filling use a rubber hose as shown in the figure The water used must meet the requirements detailed in the previous pages and summarised here Potability Hardness TH between 10 F and 25 ...

Page 95: ...he characteristics of the water and the current system Do not use garden hoses for rinsing so as not to fill the plumbing circuit with water again 6 Dry the minipool with deerskin and protect it with the optional cover RESTARTING THE MINIPOOL AFTER PROLONGED INACTIVITY Perform a rapid cleaning of the minipool using a bit of water and a detergent for acrylic surfaces Do not use cloths or cleaners t...

Page 96: ...er skin Absolutely avoid abrasive aggressive e g solvents or acetone or alcohol based cleaners and cloths Do not use descaling products as they are too aggressive To clean the canvas cover use a soft cloth and mild prod ucts They are readily available at any specialised store or upon request to the Manufacturer For the cleaning of the wooden panels optional use a soft cloth dampened with water tre...

Page 97: ... and plumbing equipment that guarantee the operation of the product even if sold together with it 2 years on the remaining parts sold with the product The warranty starts from the date of purchase Such date will be demonstrated by the receipt or any other docu ment proving the purchase of the goods DISPOSAL AT END OF LIFE As per Legislative Decree no 49 art 13 dated 2014 Im plementation of WEEE Di...

Page 98: ... water treat ment Refer to the chapters 1 page 84 2 page 88 Bad odour or mould Water with unbalanced values hardness pH alkalinity Incorrect or infrequent water treat ment Water changed too infrequently Canvas cover not cleaned well Refer to the chapters 1 page 84 2 page 88 For the cleaning of the canvas cover see page 96 Unstable pH value A very unstable pH could be caused by a bad balance of tot...

Page 99: ... La lingua di stesura originale è l italiano il Costruttore non si ritiene responsabile per eventuali errori di traduzione interpretazione Maximum care has been paid to guarantee the accuracy of this manual The Manufacturer reserves the right to modify the equipment or the documentation at any time without notice Therefore there might be small differences between this manual and the product you ha...

Page 100: ...www gruppotreesse it GRUPPO TRE S s p a 01036 Nepi VT Italia S S Cassia km 36 400 zona ind Settevene tel 39 0761 527242 fax 39 0761 527223 info gruppotres it Quarz use Edition 06 2020 ...

Reviews: