9-8 Replacing the Cutter Blade
WARNING:
Ensure air and power supply is off and
disconnected before proceeding. Please follow your
facility's lockout / tagout procedures.
A. To Remove the Cutter Blade
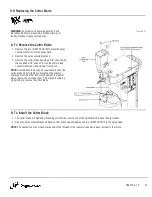
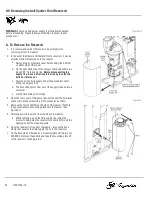
1. Remove the two (2) M5 SCHS that secure the spray
containment unit onto the spray head.
2. Remove the spray containment unit.
3. Remove the cutter blade by using a 5/8” wrench and
the supplied 9/16” wrench to turn the cutter blade
counterclockwise when viewed from above.
NOTE:
Considerable force may be required to loosen the
cutter blade since it tightens naturally as the reamer
operates. Rest the 9/16” flat wrench against the reamer
frame (below the air connection). This prevents slipping
while trying to remove the cutter blade.
Figure 9-G
B. To Install the Cutter Blade
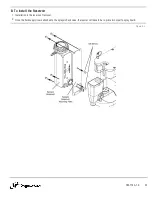
1. The cutter blade is installed by threading it clockwise into the top of the spindle shaft. Reuse the old washer.
2. Place the spray containment unit back on the spray head and tighten the two (2) M5 SHCS onto the spray head.
NOTE:
The application of anti-seize compound to the threads of the reamer will assist in easy removal in the future.
OM-TT4A-1.0
31

