OPERATION
General Information
Thank you for your purchase of the SF11
DECK SCALER.
Before operating the SF11 Deck Scaler, this
manual must be read and understood by the
operator, if in any doubt ask your supervisor
before using this equipment. Failure to follow
these instructions could result in damage to the
Scaler and/or personal injury.
Trelawny SPT Ltd disclaims all responsibility for
damage to persons or objects arising as a
consequence of incorrect handling of the tool,
failure to inspect the tool prior to starting work
for damage or other faults that may influence
the operation or safe working of the tool, or
failure to follow the safety regulations listed or
applicable to the job site.
The tool is primarily designed for the removal of
heavy rust, paint and scale from ships decks or
heavy steel surfaces.
This tool must not be used in a fixture.
The SF11 Deck Scaler is also available fitted
with economy hardened steel one-piece
pistons or can subsequently be fitted with other
types of cutter heads.
A vacuum shroud attachment is also available
for the containment of air-borne dust.
All versions can be used both indoors and out.
Operators should be familiar with the data
given in the specification section.
Please keep these instructions in a safe and
accessible place.
Safety Precautions
Do wear Personal Protective Equipment
including
safety
goggles,
footwear,
ear
defenders and gloves. In some environments it
will be necessary to wear facemasks or
breathing apparatus.
Do be aware that this tool is not electrically
insulated.
Do ensure that this tool is lubricated daily.
Do be aware that this tool can create dust and
flying debris.
Do be aware of others working around you.
Do keep hands and clothing away from moving
parts.
Do store this tool in a secure and dry
environment.
Always observe safe working practices and
local safety regulations at all times.
Do not allow the tool to run unattended.
Do not allow the tool to run continuously whilst
not in contact with the surface being prepared.
Do not modify this tool in any way, as this will
invalidate the warranty and could lead to
serious injury.
Do not use this tool in potentially explosive
environments.
Do not drag this tool by the air hose.
Do not use petrol (gasoline), thinners or any
other high flash point solvent to clean the tool.
Please note: Unrestrained hoses can whip if
they become detached.
Ensure that the work place is well ventilated.
Avoid operating engine-powered compressors
in an enclosed area, since engine exhaust
gases are poisonous.
Risk of Hand-arm
Vibration injury
These tools may cause Hand-arm Vibration
Syndrome injury if their use is not adequately
managed. We advise you to carry out a risk
assessment and to implement measures such
as; limiting exposure time [i.e. actual trigger
time, not total time at work], job rotation,
ensuring the tools are used correctly, ensuring
the tools are maintained according to our
recommendations, and ensuring that the
operators wear personal protective equipment
[PPE] particularly gloves and clothing to keep
them warm and dry. Employers should
consider setting up a programme of health
surveillance to establish a benchmark for
each operator and to detect early symptoms
of vibration injury.
We are not aware of any PPE that provides
protection
against
vibration
injury
by
attenuating vibration emissions.
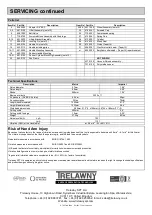
See ‘Technical Specifications’ section for
vibration emission data.
Further advice is available from our Technical
Department.
We strongly advise you to visit the
Health
&
Safety
Executive
website
http://www.hse.gov.uk/vibration
This site provides excellent advice and
information on HAV and it includes a Hand-
arm Vibration Exposure Calculator that is
easy to use to work out the daily vibration
exposure for each of your operators
Pre-Start Check
Air Supply:
The compressed air must be free from water or
contamination. Always clear the air hose before
connection to the tool.
Ensure that no moisture (condensation) is
present. Ensure that a minimum 19mm (3/4")
bore airline is used and that all couplings are
tight and secure. If possible try to limit the
length of airline to 33 ft. (10 metres)
(Air consumption is shown under
Technical
Specifications
at
the
end
of
these
instructions).
Where extra length airline is necessary, each
additional 50 ft. (15 metres) of airline used, will
drop the pressure at the tool by approximately
3 psi.
Correct operating pressure for this tool is 6.2
bar (90psi)
Do not let the operating pressure fall below
5.5bar (80p.s.i.) or rise above 6.9bar (100 psi)
absolute maximum.
The compressor must be able to supply a
minimum of 47 lps (100cfm)
In particularly cold weather it is recommended
that a proprietary anti-freeze lubricating oil is
used.
Note: A vacuum shroud is not available on the
standard SF11. This can only be fitted to Heavy
Duty version.
Starting work
Prior to operating the tool check: -
That all fittings are secure, free from leaks and
that air hoses are in good condition.
That all parts of the tool are fully screwed
together and secure, if in any doubt ask
your
supervisor
before
using
this
equipment.
That a liberal amount of lubricant has been put
into the air inlet of the tool. (See
recommended lubricants)
Safe use of this tool requires a solid stance and
secure foothold; the operator must adopt a
firm and stable position at all times.
Remove the lifting pin from the bottom of the
handle to release the handle, refit in to the
block-lifting bracket to prevent its loss. Never
run the tool with the handle fastened to the
main body. The most efficient scaling action is
to move the tool back and forth until the desired
finish has been achieved. Never run the tool
continuously in the same place as this will
severely mark the surface and may cause
cutter head damage.
To operate the tool simply turn the ball valve so
that he lever is in line with the handle. If the tool
is new, optimum performance will be achieved
after 15mins “running in” of the brush seals
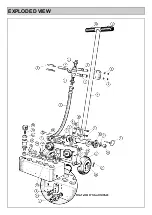
(29). Complete a small area noting the
performance; stop the machine, inspect the
finish produced.
To switch off,
simply return
the ball valve lever to 90° to the handle whilst
continuing to move the tool back and forth.
Handled correctly the SF11 Deck Scaler will
work quickly and efficiently. Gloves and
personal protective equipment must be worn
when using this tool. The tool will ride
irregularities of up to 5mm (1/4”). Anything
greater will risk cutterhead damage. Care must
be taken to avoid damaging or tripping over the
air hose. Once the task is completed, return
handle to the upright position and insert the
handle-locking pin (11) for transportation.
Servicing
Only a competent person, in a suitably
equipped
workshop,
must
carry
out
maintenance.
Disconnect the tool from the air supply
before carrying out any of the following
operations.
Dismantling
Clean all debris from the exterior of the tool.
Head Removal – Taper Fit Pistons
Lay the machine down on its side. Unscrew
and remove screwed cap (25). Remove spring
cap (27) and spring (26). From the bottom of
the unit push on the cutter head and remove
the piston assembly. Repeat for all other
cylinders. Place the head removal washer
between the cutter head and the cylinder, place
cylinder assembly on a flat solid surface with
the cutter head upper most, insert the removal
pin into the cutter head hole so that it rests on
the end of the piston. Wearing safety glasses,
deliver a sharp blow to the head of the pin with
a medium sized hammer and the cutter head
will be released from the piston.
Piston and Cylinder removal One Piece
Pistons
Unscrew and remove screwed cap (25).
Remove spring cap (27) and spring (26) from
the bottom of the scaling head push up and
remove the piston (30) cylinder (28) and brush
seal (29) as an assembly. Repeat for all other
cylinders.
Summary of Contents for SF11
Page 1: ...SF11 DECK SCALER OPERATION MAINTENANCE ...
Page 4: ...EXPLODED VIEW ...


