background image

LOCK/JIG

-11-

11

CL

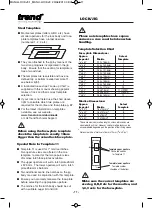
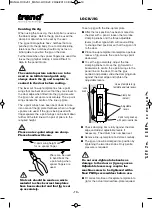
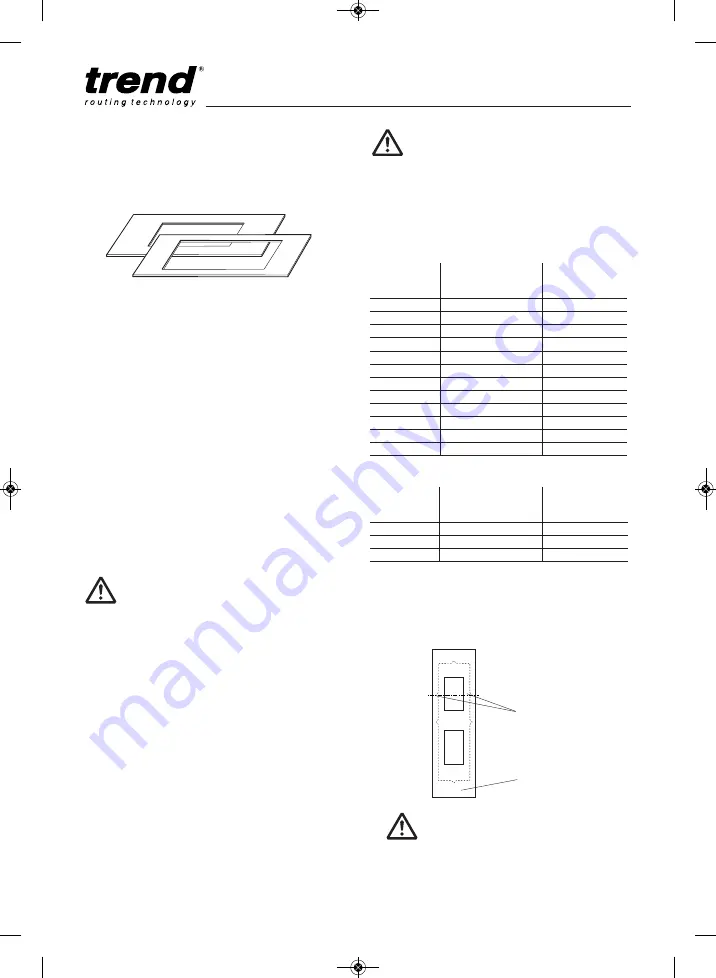
Special Note for Template 11

Template 11 is used for 1" mortise latches.  

Two aperture sizes are offered in the one

template, to cater for the two popular sizes 

of mortise latch face-plates available.

The upper aperture will suit a latch plate 25mm

x 57.5mm.  The lower aperture will suit a latch

plate 25.6mm x 56.5mm.

Two additional centre line notches on the jig

body are used in conjunction with this template.

Ensure you accurately measure the face-plate

before selecting the appropriate aperture.

The mortise for the latch body should be cut

with a suitable auger bit and drill.

Steel Templates

Mortise templates (letters A,B,C etc.) have

smaller apertures for the lock body and face-

plate templates have a larger aperture

(numbered 1, 2, 3 etc.).  

They are attached to the jig by means of the

two strong magnets incorporated in the jig

body.  Ensure that the seating for template is

free of wood dust. 

The templates are reversible and have no

defined top or bottom (except template 11,

see below right).

A laminated loose sheet ‘Look-up Chart’ is

supplied with this manual showing popular

makes of lock and their correct template

selection.

If your lock is not listed use the chart above

right to calculate which two plates are

required for the mortise and face-plate eg. B7.

For the latest information on templates

available, see our website -  

www.trend-uk.com/downloads

or call Trend Technical Support.

Template number

should be at the bottom

Face-plate Dimensions:

Approx.

Select

Imperial

Metric

Template

7

8

" x 6

1

8

"

22.2 x 156mm

1

7

8

" x 6"

22.5 x 152.5mm

2

1" x 4

3

4

"

25.4 x 121mm

3

1" x 5"

25.4 x 127.5mm

4

1" x 5

1

4

"

25.4 x 133.5mm

5

1" x 5

3

4

"

25.4 x 145mm

6

1" x 6"

25.4 x 153mm

7

1" x 6

1

8

"

25.4 x 156mm

8

1" x 6

1

2

"

25.4 x 165.5mm

9

1" x 7"

25.4 x 177mm

10

1" x 2

1

4

"

25 x 57.5mm

11 UPPER

1" x 2

1

4

"

26 x 56.5mm

11 LOWER

1” x 6

3

8

25.6 x 162mm

12

These are maximum mortise lengths, unless radius ends are
squared with a chisel.  However, smaller mortise locks can be
accommodated depending on the position of their fixing screws.

Template Selection Chart

Mortise Dimensions:

Approx.

Select

Imperial

Metric

Template

5

8

" x 2

7

8

"

16 x 72mm

A

5

8

" x 4

1

4

"

16 x 107mm

B

3

4

" x 3

1

8

"

19 x 79mm

C

3

4

" x 4

1

4

"

19 x 109mm

D

A

7

Centre line notches

for Template 11

Template upper aperture

*

*

+

*

*

*

Please note templates have square
corners so care must be taken when
handling.

Make sure the correct templates are
used eg A,B,C etc for the mortise, and
1,2,3 eetc for the face-plate.

Before using the face-plate template
check the template is exactly 18mm
bigger than the actual lock face plate.

+

Note actual size of mortise is 16mm x 79mm (

5

8

” x 3

7

64

”).

Template lower aperture

MANU-LOCK v9.1_MANU-LOCK v9  20/06/2013  09:05  Page 11

Summary of Contents for LOCK/JIG

Page 1: ...LOCK JIG Please read these instructions before use Aluminium Adjustable Lever Type Batch EB MANU LOCK v9 1_MANU LOCK v9 20 06 2013 09 05 Page 19 ...

Page 2: ...__________________15 Cutting Key Spindle Hole ____________15 MAINTENANCE ______________________15 ENVIRONMENTAL PROTECTION________15 GUARANTEE ________________________15 SPARE PARTS Spare Parts List _____________________16 Spare Parts Diagram__________________IB If you require further safety advice technical information or spare parts please call Trend Technical Support or visit www trend uk com T...

Page 3: ...and attachment Keep both hands away from cutting area Always wait for the spindle and cutter to stop rotating before making any adjustments 10 Always keep guards in place and in good working order 11 Remove any nails staples and other metal parts from the workpiece 12 Maintain tools and cutters with care Keep cutters sharp and clean for better and safer performance Do not use damaged cutters Follo...

Page 4: ...tall the router 15 In case of excessive vibrations whilst using the router stop immediately and have the eccentricity of the router router cutter and clamping system checked by competent personnel 15 All fastening screws and nuts should be tightened using the appropriate spanner or key and to the torque value provided by the manufacturer 16 Extension of the spanner or tightening using hammer blows...

Page 5: ...3 x3 x6 x2 x2 x1 x1 x1 x1 ITEMS REQUIRED 1 2 collet plunge router or 1 4 collet plunge router for face plate only 30mm guide bush or 16mm plus collar 12mm diameter router cutter with suitable shank size Door clamping device Hand tools No 2 Phillips Screwdriver MANU LOCK v9 1_MANU LOCK v9 20 06 2013 09 04 Page 4 ...

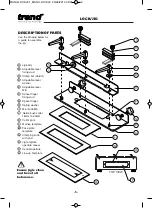
Page 6: ...table lever washer E Adjustable lever M8 F Spacer finger fixing stud G Spacer finger H Spring washer I Mini knob M5 J Guide bush collar 16mm to 30mm K Collar park L Mortise template M Face plate template N Clamping knob with pad O Jig template aperture recess P Central aperture Q Line up Template Ensure jig is clean and free of oil before use MANU LOCK v9 1_MANU LOCK v9 20 06 2013 09 04 Page 5 ...

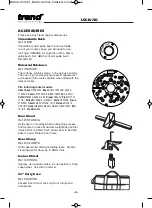
Page 7: ... 1875U1 Wadkin R500 UNIBASE t r e n d 30mm R Door Stand Ref D STAND A Holds door on it s edge whilst routing hinge recess and mortise for locks Maximum weight 50kg and for doors 32mm to 55mm thick Allows door to be tilted back to assist fitting to door frame Door Clamp Ref D CLAMP A Holds door whilst drilling and fitting locks Ratchet clamp design for doors up to 55mm thick Corner Chisel Ref C CHI...

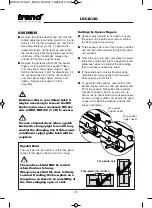
Page 8: ...e used to ensure the spigot of the guide bush will not contact the door edge when routing Three spacers per end of the jig are provided and can be parked against the jig body when not required Clamp the jig to the door and place the router fitted with guide bush into the aperture If the guide bush does not contact the door edge then no spacers need to be used If the guide bush contacts the door ed...

Page 9: ...t and drill required for 3 deep locks for all routers Due to the extra long length of this cutter extra care should be taken to avoid damage The cutter should be used to plunge rout a series of overlapping holes See page 13 Fit sufficient length of the shank into the collet Ideally at maximum plunge only as much of the cutter should protrude below the base as is required to reach the depth of the ...

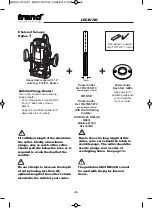
Page 10: ... Supplied with Lock Jig 12mm Medium duty router with 1 4 collet e g T5 Router Router Cutter Ref TR12X1 4TC or 3 8LX1 4TC 16mm Guide Bush Ref GB160 Supplied with Hinge Jig Deepening of mortise with auger bit and drill will be required Option 2 12mm Deepening of mortise with auger bit and drill will be required Medium duty router with 1 4 collet e g T5 Router 30mm Guide Bush Ref GB30 Router Cutter R...

Page 11: ...an be stored on the spigot fixed to the outside of the clamp bar when not in use Ref GB160 Ref GB30 Ref GB30 Guide bush collar Make sure guide bush collar is fitted with chamfered edge facing the jig when parked This will make it easier to remove If there is any doubt about the concentricity of cutter relevant to the guide bush then a sub base should be used in order to ensure an accurate fit of f...

Page 12: ... for the mortise and face plate eg B7 For the latest information on templates available see our website www trend uk com downloads or call Trend Technical Support Template number should be at the bottom Face plate Dimensions Approx Select Imperial Metric Template 7 8 x 61 8 22 2 x 156mm 1 7 8 x 6 22 5 x 152 5mm 2 1 x 43 4 25 4 x 121mm 3 1 x 5 25 4 x 127 5mm 4 1 x 51 4 25 4 x 133 5mm 5 1 x 53 4 25 ...

Page 13: ...e notches on the jig body Mark a horizontal line across the edge at the centre of your lock position You now have two centre lines to line up with the notches on the jig body Please note the centre of the mortise may not be on the centre line of the spindle hole Mark out the spindle and keyhole position on the face of the door as normal using a paper template or the lock body as shown with a brada...

Page 14: ...hat jig is set up accurately Do not over tighten lobe knobs as damage to the door or jig may occur To set up jig with the line up template After the lock position has been marked on the door with a pencil loosen the two lobe clamping knobs and the three adjustable levers ratchet type which will require lifting to change their position so that the jig can fit to the door Place line up template into...

Page 15: ...ure recess to fit Zero the depth of the cutter by lowering it until it touches the door edge Insert the lock fixing plate together with the face plate between the revolving depth guide and the fine adjuster screw Lower the fine adjuster 1 and lock it off 2 see picture Release the plunge locking lever To rout the face plate plunge cutter to full depth of face plate in the middle of the template and...

Page 16: ...l indicate the position of the recess for the lock striking TIP Before testing fit of the lock engage the lock bolt in the locked position to enable the lock to be removed easily MAINTENANCE Please use only Trend original spare parts and accessories The jig has been designed to operate over a long period of time with a minimum of maintenance Continual satisfactory operation depends upon proper too...

Page 17: ...mplate D 37 x 134mm WP LOCK T D 13 1 Face Plate Template 1 40 4 x 174mm WP LOCK T 1 1 Face Plate Template 2 40 7 x 170 5mm WP LOCK T 2 1 Face Plate Template 3 43 6 x 139mm WP LOCK T 3 1 Face Plate Template 4 43 6 x 145mm WP LOCK T 4 1 Face Plate Template 5 43 6 x 151 5mm WP LOCK T 5 1 Face Plate Template 6 43 6 x 163mm WP LOCK T 6 1 Face Plate Template 7 43 6 x 171mm WP LOCK T 7 1 Face Plate Templ...

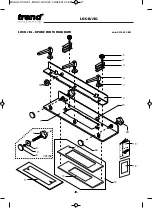
Page 18: ...LOCK JIG IB 16 10 9 7 6A 5 4 3 2 1 11 8A 15 19 12 13 14 LOCK JIG 18 8 6 07 02 17 LOCK JIG SPARE PARTS DIAGRAM v4 0 07 2013 EB MANU LOCK v9 1_MANU LOCK v9 20 06 2013 09 05 Page 17 ...

Page 19: ...ons may change without notice Trend Machinery and Cutting Tools cannot be held liable for any material rendered unusable or any form of consequential loss E OE All trademarks acknowledged RECYCLABLE Trend Machinery Cutting Tools Ltd Odhams Trading Estate St Albans Road Watford WD24 7TR England Tel 0044 0 1923 249911 technical trendm co uk www trend uk com MANU LOCK v9 1_MANU LOCK v9 20 06 2013 09 ...

Reviews: