EN - T18S/BJ
EN - T18S/BJ
-19-
-18-
• Place your product on the workpiece, the marking on
the workpiece facing the marking on the moving fence
(if applicable). Make sure that the disc cutter does not
yet touch the surface.
• Switch the product on and wait until it runs at full
speed before cutting into the workpiece.
• Push the product slowly forward at an even speed until
the desired depth is reached.
• Pull the product backward from the workpiece before
switching it off.
IMPORTANT:
Only apply as much pressure as necessary to keep the
product flat on the workpiece. Higher pressure will not
increase but lower the performance of the product and
leads to uneven results.
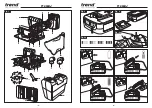
Changing the Disc Cutter - (Fig. 9)
Danger of injury!
Never adjust the appliance when the mains plug is
in the socket.
• Loosen the clamping knob (Q) and open base cap (K).
• Press spindle catch (E) in and keep it pressed. At the
same time insert two-pin spanner (N) into flange (1)
and loosen the disc cutter by turning the flange anti-
clockwise.
• Remove the disc cutter In doing so, ensure that flange
(2) does not become misplaced.
• Insert the new disc cutter and reassemble the
appliance by reversing the above steps. When doing
so, tighten flange (1) firmly.
• Fit base and securely tighten the clamping knob (Q).
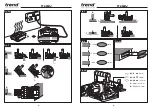
Attachment Plate - (Fig. 10)
For cutting work pieces with a thickness below 16
mm, place the attachment plate on the angle stop (G) .
This ensures that the groove is not cut too close to the
upper surface of the work piece. When calculating the
horizontal cutting position, consider the 4 mm thickness
of the attachment plate. Also use the attachment plate
for mitre joints in thin work pieces so that the groove is
not cut too deep.
Dust Extraction Bag - (Fig. 11a)
• Fit the dust adaptor by opening the base cap (K) and
inserting the adaptor in to the machine dust extraction
outlet, close the base cap and secure the clamping
knob.
• To fit dust bag, attach the bag to the dust bag adaptor.
Attaching the Dust Spout - (Fig. 11b)
• Fit the dust adaptor by opening the base cap (K) and
inserting the adaptor in to the machine dust extraction
outlet, close the base cap and secure the clamping
knob.
• Connect to a suitable dust extractor via the dust
extractor dust hose and a power tool adaptor.
MAINTENANCE
Please use only Trend original spare parts and
accessories.
The power tool has been designed to operate over a
long period of time with a minimum of maintenance.
Continuous satisfactory operation depends upon proper
tool care and regular cleaning.
WARNING:
To reduce the risk of serious
personal injury, turn tool off and disconnect battery pack
before making any adjustments or removing/ installing
attachments or accessories. An accidental start-up can
cause injury.
The charger and battery pack are not serviceable.
Avoid using solvents when cleaning plastic parts. Most
plastics are susceptible to damage from various types of
commercial solvents and may be damaged by their use.
Use clean cloths to remove dirt, dust, oil, grease, etc.
WARNING:
Do not at any time let brake
fluids, gasoline, petroleum based products, penetrating
oils, etc., come in contact with plastic parts. Chemicals
can damage, weaken or destroy plastic which may result
in serious personal injury.
Electric tools used on fiberglass material, wallboard,
spackling compounds, or plaster are subject to
accelerated wear and possible premature failure because
the fiberglass chips and grindings are highly abrasive to
bearings, brushes, commutators, etc. Consequently, we
do not recommended using this tool for extended work
on these types of materials. However, if you do work with
any of these materials, it is extremely important to clean
the tool using compressed air.
Lubrication
• Your power tool requires no additional lubrication.
Cleaning
WARNING:
Blow dirt and dust out of
the main housing with dry air as often as dirt is seen
collecting in and around the air vents. Wear approved
eye protection and approved dust mask when
performing this procedure.
WARNING:
Never use solvents or other
harsh chemicals for cleaning the non-metallic parts of
the tool. These chemicals may weaken the materials
used in these parts. Use a cloth dampened only with
water and mild soap. Never let any liquid get inside the
tool; never immerse any part of the tool into a liquid.
Storage
• After use return the tool to its packaging.
ENVIRONMENTAL PROTECTION
Recycle raw materials instead of disposing as
waste.
Accessories and packaging should be sorted for
environmental-friendly recycling.
Separate collection. This product must not be disposed
of with normal household waste.
Batteries and the Environment
This unit uses Lithium Ion (Li-Ion) batteries.
When battery pack needs replacing, we
recommend the following: Discharge the energy
from the batteries by running them down
completely and then remove from the tool.
Li-Ion cells are recyclable so do not throw them away
with household waste. They may end up in an incinerator
or landfill, which must be avoided.
Instead, take the batteries to a Trend Service Agent,
your local Trend Stockist or a local recycling station. If
necessary contact your local municipality for disposal
information. The collected batteries will be disposed of
properly and/or used for recycling purposes.
Household User
Local regulations may provide for separate collection
of electrical products from the household, at municipal
waste sites or by retailer when you purchase a new
product. Please call Trend Customer Services for advice
as to how to dispose of unwanted Trend electrical
products in an environmentally safe way or visit
www.trend-uk.com
Business Users
Please call Trend Customer Services for disposal of
unwanted Trend electrical products.
GUARANTEE
The unit carries a manufacturers guarantee in
accordance with the conditions on the enclosed
guarantee card.
For the location of your nearest Trend Service Agent,
please call Trend Customer Services or see our stockist
locator at
www.trend-uk.com


