background image


© Copyright 2017 TRENDnet. All Rights Reserved. 


TRENDnet User’s Guide


TEW-WLC100P 

7


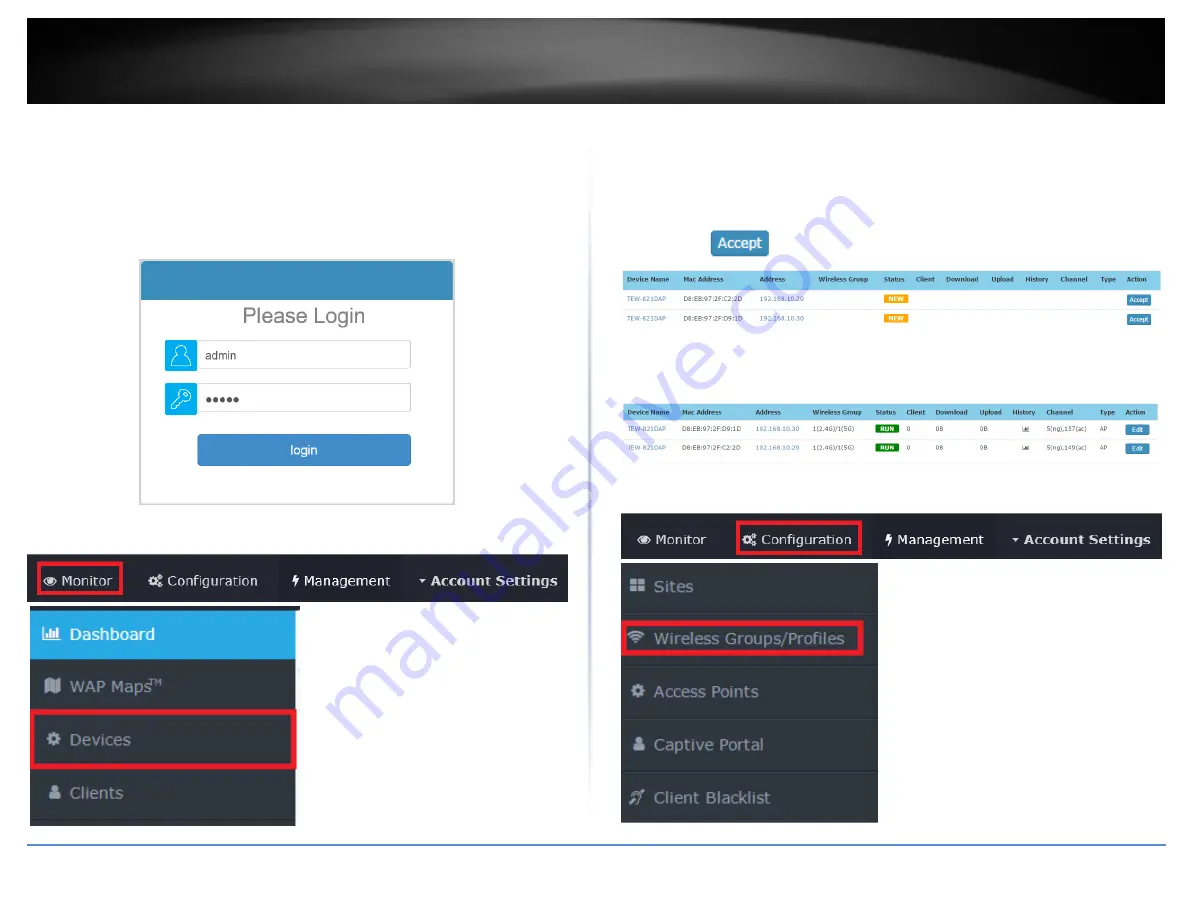
C. Initial Wireless Setup 


1. Using your computer and web browser, access the wireless controller management 
page using the newly assigned IP address settings (configured in Section A) and login. 

Note: If the IP address settings were not changed in Section A, the IP address settings for 
the controller are 192.168.10.200 / 255.255.255.0. 


2. Click Monitor and click Devices


3. The access points will be discovered automatically and appear in the Device List. 

Note: If the access points do not appear, make sure the access points are powered by 
checking the physical LEDs and physical cable connections and refresh the page. 


4. After the access points are discovered and appear in the Device List, under the Action 

column, click 

 on each access point to add them to the wireless controller. 


5. Once the access points have been added to the wireless controller, the Status will 
change from NEW to RUN


6. Click Configuration and click Wireless Groups/Profiles


Summary of Contents for TEW-WLC100P

Page 1: ...TRENDnet User s Guide Cover Page ...

Page 2: ...oller default settings 17 Create additional users to access controller management 18 Set your controller date and time settings 18 Power over Ethernet PoE Settings 19 Power over Ethernet PoE Scheduling 20 Access point management and configuration 21 Access Point Compatibility 21 Manage and configure access points 21 Discover and add access points 21 Configuring controller managed access points 22 ...

Page 3: ...s for your mobile WiFi clients Simultaneously manage up to 128 access points perform batch firmware upgrades and monitor network connection status It supports both PoE and PoE devices with a 60W PoE power budget Centralized AP Management Easily manage up to 128 access points AP across your wireless network Gigabit PoE Four gigabit PoE ports lets users power access points directly from the controll...

Page 4: ...eously upgrade firmware on multiple access points Rack Mount Design Sturdy metal housing with rack mount hardware included Disclaimer For wireless controller compatibility access points must have the corresponding firmware versions listed below TEW 755AP Firmware Version 1 04 or above TEW 821DAP Firmware Version 1 06 or above TEW 825DAP Firmware Version 1 02 or above Product Hardware Features Fron...

Page 5: ... the USB LED is off this indicates there is no USB device plugged into the USB port or the USB device is not recognized Port LEDs Top Row LEDs On Green Indicates that a network device router switch access point computer etc has been physically connected to one of the five Gigabit ports 1 5 Off Indicates no physical Ethernet connection or no network devices physically connected to any of the Gigabi...

Page 6: ... PoE Access Point 1 02 or above Important Note Make sure your existing network is using a DHCP server to distribute IP addresses to the access points By default TRENDnet access points listed below will obtain an IP address automatically through DHCP or otherwise default back to 192 168 10 100 255 255 255 0 if a DHCP server is not available on your network Each access point must be assigned a uniqu...

Page 7: ... and password are case sensitive 6 To change the controller administrator password click Account Settings and click Edit 7 In the New Password and Confirm Password fields enter the new administrator password and click OK to save the new password settings You will be prompted immediately afterwards to login to the controller management page with the password 8 Click Management and click on LAN ...

Page 8: ...ion on configuring your computer s network adapter to obtain IP address settings automatically please refer to the Troubleshooting section B Connect your wireless access points Important Note Please make sure your access points have met the requirements in the Access Point Compatibility section 1 Using an Ethernet cable connect each wireless access point to PoE ports 1 4 green located on the back ...

Page 9: ... 0 2 Click Monitor and click Devices 3 The access points will be discovered automatically and appear in the Device List Note If the access points do not appear make sure the access points are powered by checking the physical LEDs and physical cable connections and refresh the page 4 After the access points are discovered and appear in the Device List under the Action column click on each access po...

Page 10: ...wireless connectivity for client devices when roaming between multiple access points 10 For Authentication method select WPA WPA2 PSK For the Security Mode select WPA2 Personal For the WPA Cipher select AES and enter the Pre Shared Key required to connect to your wireless network Click OK Note The pre shared key is the key password 8 63 alphanumeric characters client devices will be required to en...

Page 11: ...on Install the controller on a sturdy level surface that can support its weight or in an EIA standard size equipment rack For information on rack installation see the next section Rack Mounting When installing the Controller on a level surface attach the rubber feet to the bottom of each device The rubber feet cushion the hub and protect the hub case from scratching Rack Mount Hardware Installatio...

Page 12: ...ser name and password By default User Name admin Password admin Note User Name and Password are case sensitive Change your controller administrative login password Account Settings 1 Log into your controller management page see Access you wireless controller management page on page 10 2 Click on Account Settings and click on Edit 3 In the New Password and Confirm Password fields enter the new pass...

Page 13: ...s Enter the new controller IP address e g 192 168 200 200 Netmask Enter the new controller subnet mask e g 255 255 255 0 Gateway Enter the default gateway IP address e g 192 168 200 1 or typically your router gateway to the Internet DNS1 DNS2 Enter the primary and secondary DNS servers IP address in order to resolve domain or host names e g 192 168 200 20 Management VLAN ID By default the manageme...

Page 14: ... charged Disable sleep mode on your computer as this may interrupt the firmware upgrade process Do not upgrade the firmware using a wireless connection only use a wired network connection Any interruptions during the firmware upgrade process may permanently damage your controller Upgrade firmware from computer hard drive 1 If a firmware upgrade is available http www trendnet com support download t...

Page 15: ...e upgrade process If a USB storage device is plugged into the controller s USB port the external storage device will appear as an available storage location to download the firmware files for the firmware upgrade process Please note the following Do not interrupt the firmware upgrade process Do not turn off the device or push the reset button during the firmware upgrade Rebooting or resetting duri...

Page 16: ...you to enter a custom filter keyword to search in system logging for example AP or client MAC address etc Backup and restore your controller configuration settings Management Maintenance You may have added many customized settings to your controller and in the case that you need to reset your controller to default all your customized settings would be lost and would require you to manually reconfi...

Page 17: ...not enter the correct encryption key 8 alphanumeric characters max assigned to the backup configuration file and click Apply 4 Click Browse 5 A separate file navigation window should open 6 Select the controller configuration file to restore and click Restore Configuration Default Filename backup_cfg_WLC100 cfg If prompted click Yes or OK 7 Wait for the controller to restore settings Restore confi...

Page 18: ...r Management Page This is also known as a soft reboot or restart and steps are shown below 1 Log into your controller management page see Access you wireless controller management page on page 10 2 Click on Management and click on Maintenance 3 In the Backup Restore System Configuration section click Reboot Controller 4 Wait for the device to reboot Set idle timeout for users logged into controlle...

Page 19: ...set your controller to factory defaults Reset Button Located on the rear panel of your controller see Product Hardware Features on page 2 Use this method if you are encountering difficulties with accessing your controller management page OR Controller Management Page 1 Log into your controller management page see Access you wireless controller management page on page 10 2 Click on Management and c...

Page 20: ...ettings Full access normal restricted users can access controller management and view configuration but cannot modify any controller configuration settings Restricted access Set your controller date and time settings Configuration Sites 1 Log into your controller management page see Access you wireless controller management page on page 10 2 Click on Configuration and click on Sites 3 Review the s...

Page 21: ...by click the drop down menus and selecting the correct date and time parameters Power over Ethernet PoE Settings Management PoE The controller allows you to manually enable or disable PoE per port PoE ports 1 4 set power priority per port and also scheduling when PoE should be enabled or disabled This section also displays PoE status information per port such as power voltage current total power b...

Page 22: ...defined within the schedule range and turned off anytime outside of the schedule range 1 Log into your controller management page see Access you wireless controller management page on page 10 2 Click on Management and click on PoE Scheduling 3 Review the settings below Click Apply to create the new schedule After the new PoE schedule is created the PoE schedule will be available under the Manageme...

Page 23: ...APs access points and how to add remove them to the wireless LAN controller Note Once APs are added to the controller they must be managed and configured through the controller and can no longer be managed individually APs must be removed disconnected from the controller or reset to default in order to regain individual AP management access Although APs individually offer multiple modes the contro...

Page 24: ...Clicking this link will reboot the AP Channel Displays the current wireless channels the AP is operating on each band Example 1 ng 161 ac means 2 4G band is operating on channel 1 and 5G band is operating on channel 161 First number 2 4G channel Second number 5G channel Type Displays the device type AP means Access Point Action Displays an available action for the AP if it is available to add or m...

Page 25: ...z This mode operates using a single 20MHz channel for wireless devices connecting at 2 4G 802 11b g n This setting may provide more stability than Auto 20 40 MHz for connectivity in busy wireless environments where there are several neighboring wireless networks in the area Auto 20 40 MHz Recommended Default When this setting is active this mode is capable of providing higher performance only if t...

Page 26: ...de is capable of providing higher performance only if the wireless devices support the higher 40MHz or 80Mhz channel width settings Enabling this setting typically results in substantial performance increases when connecting 802 11n wireless clients and the AP can dynamically choose whether to operate in 20MHz 40MHz or 80MHz depending on the wireless environment conditions 40 MHz or 80 MHz This mo...

Page 27: ...clients to completely data transfers before utilizing WiFi bandwidth Note Airtime Fairness priority highest to lowest 802 11ac 802 11n 802 11a g 802 11b Device IP Settings Allows you to set the AP individual IPv4 and IPv6 address settings You can statically manually Manual assign the AP IP address settings or set the AP to automatically obtain IP address settings from an existing DHCP server on yo...

Page 28: ... settings otherwise modify the desired parameters first Remove access points from the controller Configuration Access Points Once APs are added to the controller they must be managed and configured through the controller and can no longer be managed individually APs must be removed disconnected from the controller or reset to default in order to regain individual AP management access When APs are ...

Page 29: ...l display a notification if the new firmware upgrade is available for your access points and provide you with the option to upgrade the firmware via online through the controller management page Note Online upgrade feature available in controller firmware 2 02 and above The online firmware upgrade feature using the controller is available on only the access point firmware versions in the table bel...

Page 30: ...ot turn off the device or push the reset button during the firmware upgrade Rebooting or resetting during the firmware upgrade process may permanently damage your access point 6 During the online upgrade messages will be displayed next to the current firmware version to indicate the firmware upgrade status After the firmware upgrade has completed successfully the new firmware version will be displ...

Page 31: ...oller IP settings must be configured to be on the same IP network as the APs 2 you must use the administrator password configured on the APs from the previous controller same as the admin management password of previous controller to reassign the APs to the new controller 3 after you have reassigned APs to the new controller successfully you can restore your controller configuration from a previou...

Page 32: ...Profiles Note By default the wireless group Default group has already been created This group cannot be deleted The number next to the name 1 indicated the internal group assignment which is used for identification purposes under the Monitor Devices section 3 To create a new wireless profile for Default group in the list below click Create 4 Enter and select the parameters for the wireless profile...

Page 33: ...this option to assign a specific 802 1q VLAN tag or ID to the SSID or wireless profile By assigning a specific VLAN tag or ID client devices that connect to the profile will be placed in the specified VLAN Note 802 1q VLAN should be configured on your switch router and network infrastructure to support use this feature RSSI Threshold Enable this option set a signal strength limit on wireless clien...

Page 34: ...rprise Requires the configuration use of an external RAIDIUS server for authentication through EAP Extensible Authentication Protocol Depending on the EAP protocol configured on the external RADIUS server client devices will need to be configured with the same authentication and credentials in order to connect to the wireless network WPA2 Personal AES is the recommended setting Note WPA2 Personal ...

Page 35: ... in the wireless group drop down list Note Each group will automatically be assigned the new number in the order the group was created The number next to the name 2 indicated the internal group assignment which is used for identification purposes under the Monitor Devices section e g Next group created would be assigned 3 next 4 and so on Assigning access points to a wireless group Configuration A...

Page 36: ... e g R D 8 To create a new wireless profile for the new group e g R D in the list below click Create For details on wireless profile settings you can refer to the section Creating a wireless profile on page 24 Below is an example of 2 wireless groups with multiple wireless profiles from each group 2 x APs assigned to wireless group Default group 2 x APs assigned to wireless group R D 3 x wireless ...

Page 37: ...be used multiple modes cannot be used at the same time A To Internal Portal URL This mode allows you to authenticate requests through the built in user account database and apply basic customization to the captive port user login page This option is recommended and does not require an external authentication server B To Advertisement URL This mode requires no authentication and allows redirection ...

Page 38: ... minutes allows users to be authenticated and connected to your captive portal WiFi network without any time restrictions c Click Apply at the bottom of the page to save the initial captive portal authentication settings Add an advertisement or redirect URL address website After your users authenticate and connect to your captive portal WiFi network you may want to redirect your users to a specifi...

Page 39: ...ers on the captive portal page A preview of the page and text will also be displayed After you have finished entering your message click Apply Note Aside from text you can enter HTML tags for text formatting and styles Below is an example of a greeting message formatted in html br br br p style color white font family verdana text align center Welcome to TRENDnet WiFi access Please enter your acco...

Page 40: ...y scaled when uploaded The recommended image formats are JPEG PNG GIF Maximum file size for images is 250KB After you have uploaded your images you can add a welcome or greeting message to display to your guest users on the captive portal page A preview of the page and text will also be displayed After you have finished entering your message click Apply Note Aside from text you can enter HTML tags...

Page 41: ...13 G RADIUS Shared Secret Enter the shared secret used to allow the CoovaChilli server to allow the access point to authentication RADIUS authentication requests H RADIUS NAS ID Enter the NAS ID required by the CoovaChilli server to allow the access point to authentication RADIUS authentication requests I UAM Portal URL Enter the UAM portal web URL address of the login authentication page provided...

Page 42: ...s located on the left side to the area where the APs will be located on your floor plan The APs are listed by MAC address When hovering over an AP with your cursor the MAC address and Device Name will be displayed The color of the AP icon indicates the current AP status as below which can also be seen on the Monitor Devices page Status Displays the current AP status o NEW The AP has not been added...

Page 43: ...nt of data downloaded received by the AP over the last 5 minutes in graph form o Locate If the AP has been marked on a previously uploaded WAP Map floorplan clicking this link will reopen the floorplan o Reboot Clicking this link will reboot the AP Click this option will remove the AP from the location on the floorplan and the AP will be moved back to the list of available APs on the left side Del...

Page 44: ... section will display a list top 5 wireless profile SSIDs with highest amount of data usage activity When hovering over with your cursor the SSID name and total number of data transmitted received will be displayed B Current Usage Top Access Points This section will display the top 5 access points with the highest amount of data usage activity When hovering over with your cursor the AP MAC address...

Page 45: ...d by the client device in bytes B Upload Displays the current total of data downloaded transmitted by the client device in bytes B History Clicking this option displays a brief snapshot of the total amount of data downloaded received by the client device over the last 5 minutes in graph form o Blacklist Clicking this option will add the client device to the client blacklist To view the client blac...

Page 46: ...er SSID broadcast Bandwidth control download limit per SSID client upload limit per client Set RSSI scanning threshold Seamless WiFi roaming using 802 11r and OKC opportunistic key caching protocols 802 11k radio resource management Band steering Airtime Fairness Access point client statistics monitoring Batch firmware upgrade deployment Captive portal Client blacklist 802 1Q VLAN Create multiple ...

Page 47: ... corresponding firmware versions listed below TEW 755AP Firmware Version 1 04 or above TEW 821DAP Firmware Version 1 06 or above TEW 825DAP Firmware Version 1 02 or above Maximum wireless signal rates are referenced from IEEE 802 11 theoretical specifications Actual data throughput and coverage will vary depending on interference network traffic building materials and other conditions Due to regul...

Page 48: ...thernet icon click Properties and double click Internet Protocol Version 4 TCP IPv4 d Then click Use the following IP address and assign your network adapter a static IP address See example static IP address settings below IP address 192 168 10 25 Subnet mask 255 255 255 0 e Click OK on both TCP IPv4 Properties and Local Area Connection Properties windows MAC OS X a From the Apple drop down list s...

Page 49: ...drop down list select Using DHCP and click the Apply or Apply Now button f You may be prompted to restart your computer to apply the new IP address settings Q3 I typed http 192 168 10 200 in my Internet Browser Address Bar but an error message says The page cannot be displayed How can I access the wireless controller management page Answer a Double check all physical cable and port connections b M...

Page 50: ...ngs Note en0 is typically the wired Ethernet and en1 is typically the wireless Airport interface Graphical Method Windows XP Vista 7 8 8 1 10 a On your keyboard press Windows Logo R keys simultaneously to bring up the Run dialog box b In the dialog box type ncpa cpl to bring up the Network Connections window c Double click the Local Area Connection icon and click the Details button to view the cur...

Page 51: ...int with the ability to detect wireless devices using either WPA or WPA2 encryption Your wireless network will automatically change the encryption setting based on the first wireless device connected For example if the first wireless client that connects to your wireless network uses WPA encryption your wireless network will use WPA encryption Only when all wireless clients disconnect to the netwo...

Page 52: ...uency noise can also impact your signal Position your wireless devices away from anything that generates RF noise such as microwaves radios and baby monitors If possible upgrade wireless network interfaces such as wireless cards in computers from older wireless standards to 802 11n or 802 11ac If a wirelessly networked device uses an older standard the performance of the entire wireless network ma...

Page 53: ...ce How to find your MAC address In Windows 2000 XP Vista 7 8 1 10 Your computer MAC addresses are also displayed in this window however you can type getmac v to display the MAC addresses only In MAC OS 10 4 1 Apple Menu System Preferences Network 2 From the Show menu select Built in Ethernet 3 On the Ethernet tab the Ethernet ID is your MAC Address In MAC OS 10 5 10 6 1 Apple Menu System Preferenc...

Page 54: ...es or modifications not expressly approved by the party responsible for compliance could void the user s authority to operate this equipment This device complies with Part 15 of the FCC Rules Operation is subject to the following two conditions 1 This device may not cause harmful interference and 2 this device must accept any interference received including interference that may cause undesired op...

Page 55: ...lace the defective product or there is no comparable model available we will refund the depreciated value of the product If a product does not operate as warranted during the applicable warranty period TRENDnet shall reserve the right at its expense to repair or replace the defective product or part and deliver an equivalent product or part to the customer The repair replacement unit s warranty co...

Page 56: ...SE NEGLECT IMPROPER INSTALLATION OR TESTING UNAUTHORIZED ATTEMPTS TO REPAIR OR MODIFY OR ANY OTHER CAUSE BEYOND THE RANGE OF THE INTENDED USE OR BY ACCIDENT FIRE LIGHTNING OR OTHER HAZARD LIMITATION OF LIABILITY TO THE FULL EXTENT ALLOWED BY LAW TRENDNET ALSO EXCLUDES FOR ITSELF AND ITS SUPPLIERS ANY LIABILITY WHETHER BASED IN CONTRACT OR TORT INCLUDING NEGLIGENCE FOR INCIDENTAL CONSEQUENTIAL INDI...

Page 57: ......

Reviews: