background image

Adapters B, D, and E 

by assigning 

Adapter B’s

 network name/security key to match the 

network name/security key of 

Adapters D and E

.  

4. To verify connectivity between the powerline adapters, make sure that the PL LED on each 

powerline adapter is on solid (Green, Amber, Red). Please refer to the LED section 1.5 for 

details on the LED indicator.   


Chapter 4: Powerline Configuration Utility


The Powerline Configuration Utility is an additional tool that allows you to centrally 

manage the powerline adapters that are connected to your network. Instead of using a 
randomly generated key with the Sync button, the utility allows you to manually configure the 
network name/security key for a single powerline adapter or multiple adapters simultaneously. 
This tool allows for easy management for multiple powerline adapters in your network.  

Note:  

1.  Before installing and using the utility, write down the 16-digit Device Password (DPW) and MAC Address of 

each TPL-305E powerline adapter as this will be required to apply changes to remote devices discovered 
in the utility. This is located on the Device Label, please refer to Section 1.4. 

2.  Before installing and using the utility, make sure your computer in which you are installing the utility is 

connected to your network and your TPL-305E adapters are also connected to your network. 

3.  Make sure all of the TPL-305E powerline adapters are already connected to each other using the 

procedures in Chapter 2: Product Installation. 

4.  The utility is only compatible with Windows operating systems. For details, please refer to Section 1.3. 


4.1 Software Installation 

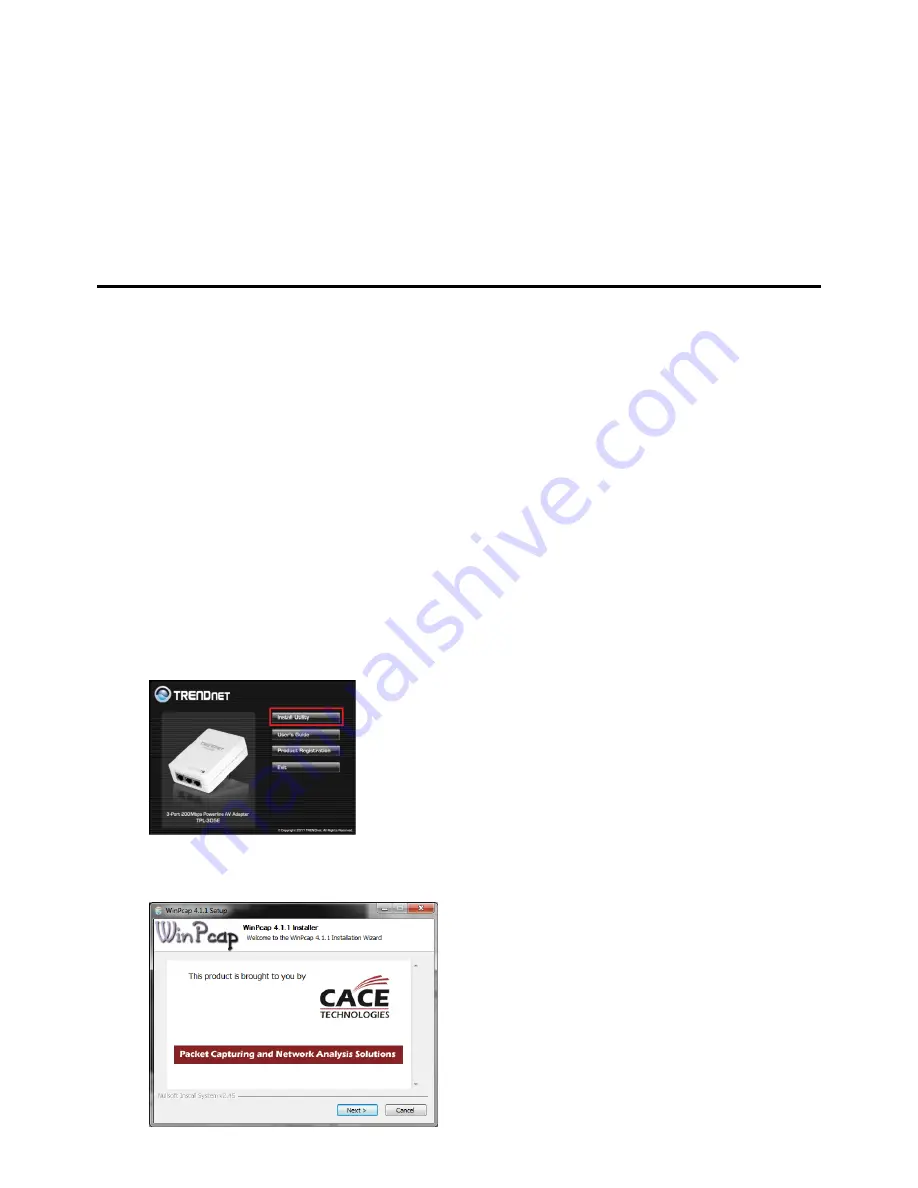
1.  Insert the included CD-

ROM into your computer’s CD-ROM drive.


2.  At the CD Autorun Prompt window, click 

Run Autorun.exe


3.  At the CD-ROM menu window, click 

Install Utility


4.  At the WinPcap installer window, click 

Next

.


Note: The Powerline Configuration Utility requires the use of the WinPcap application. If this prompt does 
not appear, you may already have the WinPcap application installed. If so, please skip over to Step 10. 


Summary of Contents for TPL-305E

Page 1: ......

Page 2: ...2 2 Securing your Powerline Network 9 2 3 Changing the Network Name Security Key using the Sync Button 10 2 4 Adding the Powerline Adapter to an Existing Powerline Network 11 Chapter 3 Overlapping Powerline Networks 12 3 1 Move Powerline Adapters between different Powerline Networks 12 Chapter 4 Powerline Configuration Utility 13 4 1 Software Installation 13 4 2 Using the Utility 16 Chapter 5 Trou...

Page 3: ...ta between the Ethernet port and the powerline network Any Ethernet enabled device may be connected to one of the three integrated 10 100Mbps Auto MDIX Ethernet ports 1 1 Powerline Network Solution Add high speed Internet access to any room in your home with this 3 Port 200Mbps Powerline AV Adapter You can stream HD movies and music play online multi player games and much more The TPL 305E has thr...

Page 4: ...e Configuration Utility System Requirements Supported Operating Systems CPU Memory Windows 7 32 64 bit 1GHz or above 1GB RAM or above Windows Vista 32 64 bit 800MHz or above 512MB RAM or above Windows XP 32 64 bit 300MHz or above 256MB RAM or above 1 4 Device Label The device label can be located on the back of the device where the power prong is found Product Firmware Version Product Hardware Ver...

Page 5: ...wer LED PWR 1 5 LEDs The LED panel located on the front of the device consists of the status LEDs Sync button and Reset button Sync Button Powerline Link Act LED PL Ethernet Link Act LED 1 3 Reset Button ...

Page 6: ...ing Receiving per port N A Off Port Disconnected No Ethernet Link Button Action Function Sync Push Hold for 2 sec Initiate Sync Connection and generate random network name key on first adapter PWR LED will start blinking Match network name key on secondary or additional adapter and connect to first adapter PWR LED will start blinking Note The secondary or additional powerline adapter s Sync button...

Page 7: ...e of your router s LAN ports via Ethernet Any additional powerline adapters that are installed and connected in other rooms will then share Internet connectivity through your router Once the powerline adapters are connected to each other through the electrical system any additional devices such as computers or network appliances e g Game Console Blu ray player IP Set Top Box network enabled TV etc...

Page 8: ...nect the other end of the Ethernet cable into one of the router s LAN ports 3 Plug the second TPL 305E powerline adapter into an available wall power outlet in another room where your computer or network appliance e g Game Console Blu ray player IP Set Top Box network enabled TV etc is located 4 Connect one end of the Ethernet Cable into one of the Ethernet ports located at the bottom of the secon...

Page 9: ...work name security key can be modified using the TPL 305E Sync button covered in the following section or through the use of the Powerline Configuration Utility in Chapter 4 Note The default network name security key assigned to the TPL 305E is HomePlugAV All powerline adapters in the same powerline network must have the same network name security key in order to establish connectivity If the netw...

Page 10: ...ine adapter for 10 seconds and release it All LEDs will turn off and turn back on This will erase the current network name security key assigned to the second powerline adapter 3 Push and hold the Sync button on the first TPL 305E powerline adapter for 2 seconds and release it The PWR LED will start blinking This will initiate sync connection and generate a random network name security key assignm...

Page 11: ...ne adapter 2 Push and hold the Sync button on one of the two TPL 305E powerline adapters that are currently connected to each other for 2 seconds The PWR LED will start blinking 3 Within 2 minutes 120 sec push and hold the Sync button on the additional TPL 305E for 2 seconds and release it The PWR LED will start blinking This will establish connectivity between the three powerline adapters by assi...

Page 12: ...ct one group of adapters then you can carry out the procedures on another group of adapters to create multiple overlapping powerline networks This procedure describes how to disconnect a powerline adapter from one powerline network and connect the adapter to a different powerline network Assuming all powerline adapters are TPL 305E adapters and for reference in the diagram and this procedure the a...

Page 13: ...ssword DPW and MAC Address of each TPL 305E powerline adapter as this will be required to apply changes to remote devices discovered in the utility This is located on the Device Label please refer to Section 1 4 2 Before installing and using the utility make sure your computer in which you are installing the utility is connected to your network and your TPL 305E adapters are also connected to your...

Page 14: ...5 In the Setup Wizard window click Next 6 In the License Agreement window click I Agree 7 In the Install Options window click Install ...

Page 15: ...indow click Finish 9 The TRENDnet Powerline Configuration Utility installation window will appear automatically At the Setup Wizard window click Next 10 In the License Agreement window check the radio button I Agree and then click Next ...

Page 16: ...Folder window click Next 12 In the Confirm Installation window click Next 13 At the Installation Complete window click Close 4 2 Using the Utility Double click the desktop icon to open the Powerline Configuration Utility application ...

Page 17: ... Device Password DPW for each Remote Device in the utility 1 Click one of the Remote Devices in the list 2 Click Enter Password 3 Type in the Device Password according to the corresponding MAC address Then click OK Remote Devices Powerline adapters that are connected to the selected Local Device across the electrical system Local Device The closest powerline adapter s that connects your computer t...

Page 18: ...Privacy tab 2 Under Private Network Name enter the desired network name security key and click Set All Devices 3 At the Network Name Setting prompt window click OK The current network name security key assignment of the powerline adapter s Note If you had previously used the Sync button procedure in generating a random network name security key This will display Unknown Networkname Applies changes...

Page 19: ...utlets as some outlets will filter out powerline signals The TPL 305E should not be used in areas with excessive heat Certain florescent or incandescent lights are noise sources on the electrical and can degrade powerline performance If your building has more than one circuit breaker box the TPL 305E may not be able to establish connectivity between different circuit breaker boxes In this case con...

Page 20: ...D Power PWR Ethernet Link Act 1 3 Powerline PL with Connection Quality Indication Best Green Better Amber Good Red Buttons Sync Reset Dimension L x W X H A 103 x 74 x 57 mm 4 1 x 2 9 x 2 2 in EU 103 x 74 x 72 mm 4 1 x 2 9 x 2 8 in Weight A 165 g 5 8 oz EU 170 g 6 0 oz Power Source A 100 230V AC 50 60Hz EU 220 240V 5A AC 50Hz Consumption Active mode 3 2 Watts max Standby mode 0 9 Watts max Temperat...

Page 21: ...ts Products that are sent to TRENDnet for RMA service must have the RMA number marked on the outside of return packages and sent to TRENDnet prepaid insured and packaged appropriately for safe shipment Customers shipping from outside of the USA and Canada are responsible for return shipping fees Customers shipping from outside of the USA are responsible for custom charges including but not limited...

Page 22: ...se codes are subject to the GNU General Public License GPL or GNU Lesser General Public License LGPL Go to http www trendnet com gpl or http www trendnet com Download section and look for the desired TRENDnet product to access to the GPL Code or LGPL Code These codes are distributed WITHOUT WARRANTY and are subject to the copyrights of the developers TRENDnet does not provide technical support for...

Page 23: ......

Reviews: