background image

6

15. 

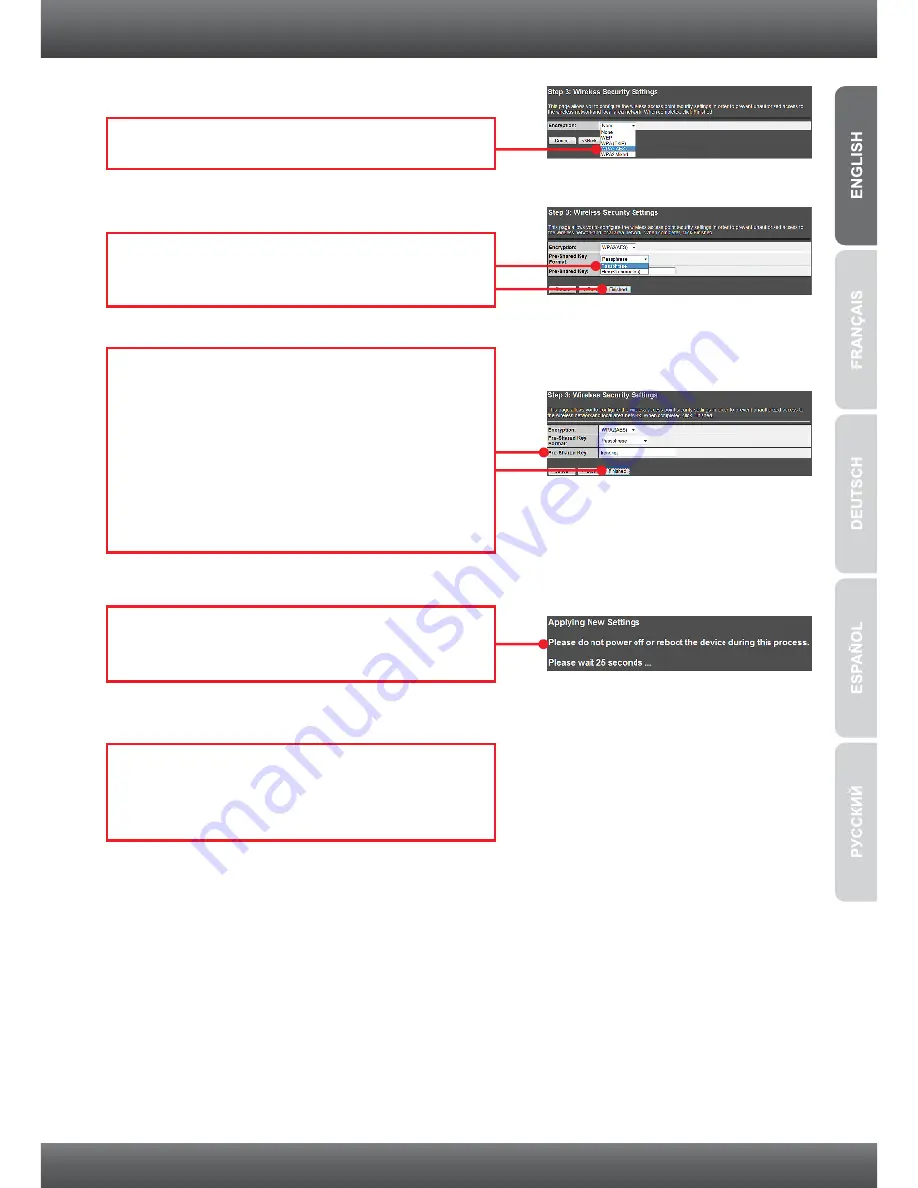
After the settings are applied and the device 

has rebooted, disconnect the TPL-310AP from 
the power outlet.

11. 

Select 

WPA2(AES)

.

12. 

Select 

Passphrase 

or 

Hex (64 characters) 

for Pre-Shared Key Format.

13. 

Enter characters for your Pre-Shared key and 

then click 

Next

. For WPA-PSK or WPA2-PSK, 

the Pre-Shared Key must be between 8 and 
63 ASCII (Passphrase) or 64 (HEX 0-9 & A-F) 
characters. Make sure to copy down the 
Pre-Shared Key. Use the same encryption key 
on your wireless computer or other wireless 
device to connect to the TPL-310AP wirelessly.

14. 

Please wait 25 seconds while the TPL-310AP 

reboots.

Summary of Contents for TPL-310AP

Page 1: ...Quick Installation Guide TPL 310AP 1 01 ...

Page 2: ...Table of Contents Version 01 07 2011 English 1 1 Before You Start 2 Configure the TPL 310AP 3 3 Create a powerline network 7 4 LEDs and Buttons 9 1 Troubleshooting 11 Wireless Tips 15 ...

Page 3: ...allow you to add security to your powerline network by providing you with the ability to change the default network name and create your own personal network name for your powerline network The utility can also help you to troubleshoot connectivity between powerline adapters by verifying the network name Please refer to the User s Guide on the TPL 310AP CD ROM for instructions on installing and us...

Page 4: ...router and modem The orange line represents the powerline connectivity established through your home s electrical system and the blue lines represent Cat 5 5e 6 Ethernet connectivity to your network enabled appliances such as a computer router or IP set top box connected to your television The green lines represent the wireless connectivity from your wireless device e g laptop computer media bridg...

Page 5: ...PL 310AP s network port into your computer s network port 4 Assign a Static IP address to your computer s network adapter in the subnet of 192 168 10 x Refer to Troubleshooting section on how to configure TCP IP settings on your PC Outlet 1 Plug the TPL 310AP into an available power outlet The TPL 310AP should be within reach of your computer s network cable 2 Configure the TPL 310AP 3 Move the Po...

Page 6: ...need to configure the following IP address The assigned IP address should match your network e g 192 168 10 x 192 168 0 x 192 168 1 x This IP address should not be used by any other network device on your network Subnet Mask In most cases the default Subnet Mask 255 255 255 0 should be fine Then click Next Note It is recommended to manually configure the LAN Interface Settings IP address and Subne...

Page 7: ...ng only applies if the Channel Width is set to 40MHz In most cases the default setting should be fine Enable Mac Clone Single Ethernet Client In most cases the default setting should be fine Then click Next Note 1 To protect your network from any unauthorized access it is recommended to enable wireless encryption 2 Once encryption is enabled on the Wireless Access Point each wireless computer or d...

Page 8: ...mat 13 Enter characters for your Pre Shared key and then click Next For WPA PSK or WPA2 PSK the Pre Shared Key must be between 8 and 63 ASCII Passphrase or 64 HEX 0 9 A F characters Make sure to copy down the Pre Shared Key Use the same encryption key on your wireless computer or other wireless device to connect to the TPL 310AP wirelessly 14 Please wait 25 seconds while the TPL 310AP reboots ...

Page 9: ...igerators washer and dryer plugged in 6 This TPL 310AP 200Mbps Powerline AV Wireless N Access Point needs to pair with at least one other HomePlug AV compatible powerline device e g TRENDnet Powerline AV products TPL 303E TPL 304E TPL 305E or another TPL 310AP 7 In order for the TPL 310AP to link to your other TRENDnet Powerline AV devices each unit must be on the same electrical system 8 A maximu...

Page 10: ...in your desired location to extend wireless connectivity Please refer to the Wireless Tips section for optimal placement of the TPL 310AP Your installation is now complete Register Your Product To ensure the highest level of customer service and support please take a moment to register your product Online at www trendnet com register Thank you for choosing TRENDnet For detailed information regardi...

Page 11: ...9 4 LEDs and Buttons WPS Wi Fi Protected Setup ETH NetworkPort WIFI Wireless PWR Power PL Powerline ...

Page 12: ...igh power consumption requirements e g Microwaves ovens blow dryer iron dishwasher etc The quality of your household electrical wiring may also cause additional noise on your electrical system Distance Long lengths of electrical wiring through your electrical system between connected powerline adapters The Power switch is located at the top of the device Network Port WPS Reset 1 Hold for 1 second ...

Page 13: ... TCP IPv4 and then click Properties Then click on Use the following IP address and make sure you assign your network adapter an IP address in the subnet of 192 168 10 x 2 Click Internet Protocol Version 4 TCP IPv4 and then click Properties Then click on Use the following IP address and make sure you assign your network adapter an IP address in the subnet of 192 168 10 x 2 Click Internet Protocol T...

Page 14: ...line device and the router s network port LED for positive connection status Make sure the TCP IP setting for your computer s network adapter is set to Obtain an IP address automatically see the steps below I have verified that my Powerline device is connected to my workstation but I cannot detect other Powerline devices What should I do Verify that you are using Cat 5 Cat 5e or Cat 6 Ethernet net...

Page 15: ...guration page 1 Check your hardware settings again by following the instructions in section 2 2 Make sure the ETH and WIFI lights are lit 3 Make sure the TCP IP settings are configured properly see question 1 4 Since the Access Point s default IP address is 192 168 10 100 make sure that no other network devices are assigned an IP address of 192 168 10 100 5 Reset the Access Point Take a pin or pap...

Page 16: ...the Access Point is lit 2 Power cycle the TPL 310AP Move the power switch to the off position Wait 15 seconds and then move the switch to the on position 3 Contact the manufacturer of your wireless network adapter Make sure the wireless network adapter is configured with the proper SSID The default SSID of the Access Point is TRENDnet310 If you have enabled encryption on the Access Point make sure...

Page 17: ... type of shelving or enclosures Avoid stacking hardware on top of each other to prevent overheating issues Maintain enough free space around the hardware for good ventilation and airflow There should also be plenty of free space around the antennas to allow the wireless signal to propagate There are a number of other environmental factors that can impact the range of wireless devices 1 Adjust your...

Page 18: ...pact your signal Position your wireless devices away from anything that generates RF noise such as microwaves HAM radios Walkie Talkies and baby monitors 6 Any device operating on the 2 4GHz frequency will cause interference Devices such as 2 4GHz cordless phones or other wireless remotes operating on the 2 4GHz frequency can potentially drop the wireless signal Although the phone may not be in us...

Page 19: ......

Page 20: ...y modes Disconnect the Ethernet cables from the device Ethernet ports and after 3 minutes the device will enter standby mode The Power PWR LED will flash every 15 seconds to indicate that the device is currently in standby mode To return to active mode reconnect the Ethernet cables to the device Ethernet ports and the device will re enter active mode ...

Page 21: ...Copyright 2011 All Rights Reserved TRENDnet ...

Reviews: