background image

Summary of Contents for TPL-310AP

Page 1: ......

Page 2: ...cate the receiving antenna Increase the separation between the equipment and receiver Connect the equipment into an outlet on a circuit different from that to which the receiver is con nected Consult the dealer or an experienced radio TV technician for help This device complies with Part 15 of the FCC Rules Operation is subject to the following two condi tions 1 This device may not cause harmful i...

Page 3: ...etic compatibility and R TTE Directive 1999 5 EC to meet the regulation of the radio equipment and telecommunications terminal equipment Company has an on going policy of upgrading its products and it may be possible that information in this document is not up to date Please check with your local distributors for the latest information No part of this document can be copied or reproduced in any fo...

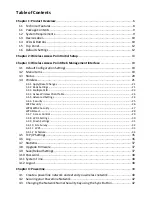
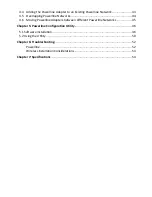
Page 4: ...ettings 21 3 4 3 Multiple SSID 23 3 4 4 Active Wireless Client Table 24 3 4 5 Advanced Settings 24 3 4 6 Security 25 WEP Security 26 WPA WPA2 Security 27 WPA Mixed 28 3 4 7 Access Control 29 3 4 8 WDS Settings 30 3 4 9 Mesh Settings 31 3 4 10 Site Survey 32 3 4 11 WPS 33 3 4 12 Schedule 34 3 5 TCP IP Settings 35 3 6 Log 36 3 7 Statistics 37 3 8 Upgrade Firmware 37 3 9 Save Reload Settings 37 3 10 ...

Page 5: ...ne Networks 44 4 6 Moving Powerline Adapters between different Powerline Networks 45 Chapter 5 Powerline Configuration Utility 46 5 1 Software Installation 46 5 2 Using the Utility 50 Chapter 6 Troubleshooting 52 Powerline 52 Wireless Installation Considerations 53 Chapter 7 Specifications 54 ...

Page 6: ...thest corner of a wireless network Multiple TPL 310AP adapters can be used to cover larger areas without increasing wireless radiation and through the use of powerline as your network backbone with no additional wiring required In addition any Ethernet enabled device may be connected to the 10 100Mbps Auto MIDX Fast Ethernet port The TPL 310AP coverage is provided by sending data signals through t...

Page 7: ...vered in the past Expanding a Wired Network If you have an existing wired router and would like to create both a wireless and a Powerline network simply connect TRENDnet s TPL 310AP to your wired router and plug it into an electrical outlet To further expand the Powerline network plug in up to 15 additional TRENDnet Powerline AV adapters into any outlet on your electrical system If you have an exi...

Page 8: ...ccess Point mode expand a wireless network using Repeater mode listed as AP Mode Sup port Wireless Distribution System WDS or Mesh mode bridging MAC filter feature for added security AP mode only Wireless security up to WPA WPA2 RADIUS Create a weekly schedule to enable or disable wireless network Wi Fi Multimedia WMM Quality of Service QoS support Broadcast up to 4 SSIDs with different wireless e...

Page 9: ... Existing 10 100Mbps wired network when TPL 310AP is used as a bridge device Web Browser Internet Explorer 6 0 or higher Additional HomePlug AV powerline adapter e g TRENDnet TPL 303E TPL 304E TPL 305E or another TPL 310AP Note You will need at least 2 powerline adapters to establish a powerline network Please ensure that you have an additional powerline adapter before following the installation p...

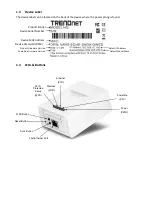
Page 10: ...r prong is found 1 4 LEDs Buttons Ethernet ETH Wi Fi Protected Setup WPS Powerline Firmware Version Product Hardware Version Device Password DPW Device MAC Address Device Serial Number Product Model Default IP Address Wireless WIFI Powerline PLC Power PWR Fast Ethernet Port Reset Button WPS Button Sync Button ...

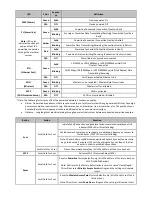
Page 11: ...x Connected Blinking 10 20Mbps 100 200Mbps or 1000 2000Mbps Half Full Duplex Data Transmitting Receiving N A Off Port Disconnected No Ethernet Link WIFI Wireless Green Blinking Wireless is on or enabled Wireless Data Transmission N A Off Wireless is off or disabled WPS WiFi Protected Setup Green Blinking WPS is activated N A Off WPS is not activated or disabled Button Action Function Sync Push Hol...

Page 12: ...faults Settings Wireless AP Setting IP Address Subnet Mask 192 168 10 100 255 255 255 0 SSID TRENDnet310 SSID Broadcast Enabled Mode Access Point AP Channel Auto Channel Width 20MHz 802 11 Mode 802 11b g n Mixed Security Disabled Username Password admin admin Powerline Setting Network Name Security Key HomePlugAV On Off Power Switch ...

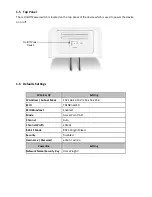
Page 13: ... the computer s network port 3 Move the power switch located at the top of the device to the On position 4 Assign a static IP address to your computer s network adapter to 192 168 10 10 and subnet mask 255 255 255 0 Windows 7 Click on the Start Button select Control Panel click Network and Internet click on Network and Sharing Center and click Change Adapter Settings Then right click the Local Are...

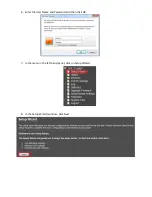
Page 14: ...6 Enter the User Name and Password and then click OK 7 In the menu in the left hand panel click on Setup Wizard 8 In the Setup Wizard window click Next ...

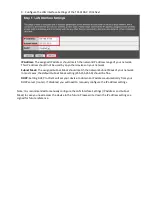
Page 15: ...ask of your network In most cases the default Subnet Mask setting 255 255 255 0 should be fine DHCP Setting DHCP to Client will set your device to obtain an IP address automatically from your DHCP server router If Disabled you will need to manually configure the IP address settings Note It is recommended to manually configure the LAN Interface Settings IP Address and Subnet Mask in case you need a...

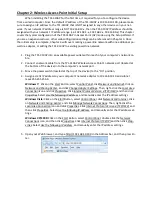
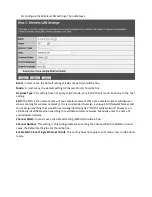
Page 16: ...or wireless networks It is recommended to assign a unique SSID Network Name and to not assign anything that would be personally identifying like Smith Family Network however an SSID easily identifiable when searching for available wireless networks Manually enter the name of your wireless network Channel Width In most cases the default setting 20MHz should be fine Channel Number This setting is on...

Page 17: ...Once wireless security is enabled on the TPL 310AP each wireless computer or device must be configured to use the same protocol WEP WPA WPA2 and configured with the same security key Make sure your wireless devices support the security protocol configured on the TPL 310AP If you are unsure of the security protocols supported please refer the manuals for your wireless devices or contact the manufac...

Page 18: ...er 3 for any additional wireless settings 16 Change your computer s network adapter settings back to obtain an IP address automatically Windows 7 Click on the Start Button select Control Panel click Network and Internet click on Network and Sharing Center and click Change Adapter Settings Then right click the Local Area Connection icon and click Properties Click Internet Protocol Version 4 TCP IPv...

Page 19: ...t port Log Displays the device internal system log or configure the device to send system logs to a remote log server Syslog Statistics Displays the number of packets transmitted and eceived on the wireless and wired interfaces Upgrade Firmware Upgrade the device firmware Save Reload Settings Backup configuration restore from configuration file and reset the wireless access point settings to facto...

Page 20: ... using Encryption The security encryption type that the wireless network using BSSID The Basic Service Set Identity of this AP This parameter is the same as the MAC address of LAN port Associated Clients The number of members who is currently connected with this AP Attain IP Protocol Displays whether the IP address is set statically Fixed IP or obtained automatically DHCP IP Address The current IP...

Page 21: ...hanges and allow you to make more configuration changes before applying all the changes and reboot the device Clicking the button will discard all of the current changes in the current page 3 4 2 Basic Settings This page is used to configure the wireless point parameters for wireless LAN clients to discover and establish wireless connectivity This page is also used to set the wireless access point...

Page 22: ...ess bridge to other WDS supported wireless access points simultaneously Mesh Allows the device to establish a wireless mesh network with other mesh supported wireless access points AP Mesh Access Point Mesh Allows wireless clients or devices to establish connectivity and allows the device to establish a wireless mesh network with other mesh supported wireless access points simultaneously Network T...

Page 23: ...button then an Active Wireless Client Table pops up You can see the status of all active wireless stations that are connecting to the access point Enable MAC clone Mark the checkbox to clone the MAC address of the device This function is only available when you set this AP as Client mode You can also manually set the MAC address in LAN setting Enable Universal Repeater Mode Mark this checkbox to e...

Page 24: ...e wireless access point functionality and performance as a result of these changes Items Information Fragment Threshold This value should remain at its default setting of 2346 If you experience a high packet error rate you may slightly increase your fragmentation threshold within the value range of 256 to 2346 Setting the fragmentation threshold too low may result in poor performance RTS Threshold...

Page 25: ...e configuration 3 4 6 Security To protect your network from any unauthorized access it is recommended to enable wireless security Once wireless security is enabled on the Wireless Access Point each wireless computer or device must be configured with the same encryption and key If you select WPA or WPA2 sure your wireless adapters support WPA or WPA2 If your wireless adapters do not support WPA or ...

Page 26: ...r connecting to an open wireless network please skip this part Please configure the settings in accordance with the Certificated Server Please click on the Apply Changes button or the Reset button to save reset the configuration WEP Security Items Information Encryption Select a security encryption mode for this AP 802 1x Authentication Check this option if to use an external 802 1x RADIUS server ...

Page 27: ...rding to the key format you select Please click on the Apply Changes button or the Reset button to save reset the configuration WPA WPA2 Security Items Information Authentication Mode There are two items Enterprise RADIUS and Personal Pre Shared Key You can select the mode by clicking the item WPA Cipher Suite Select the WPA Cipher Suite to be TKIP or AES Pre Shared Key Format To decide the format...

Page 28: ...ult value is 1234567890ab Please click on the Apply Changes button or the Reset button to save reset the configuration WPA Mixed Items Information Authentication Mode There are two items Enterprise WPA Radius and Personal Pre Shared Key You can select the mode by clicking the item WPA WPA2 Cipher Suite Select the WPA WPA2 Cipher Suite to be TKIP or AES Pre Shared Key Format To decide the format se...

Page 29: ...he Current Access Control List will not be able to connect to the wireless access point and all other clients will be allowed access This fea ture is only available when using AP AP WDS or AP Mesh modes located under Wireless Basic Clicking Delete Selected will delete the checked entries in the list Clicking Delete All will delete all of the entries listed Items Information Wireless Access Control...

Page 30: ...ints that support WDS Note WDS is not a wireless standard and connectivity may or may not be estab lished between different wireless access point devices that support this feature It is recommended to use the same device model when using this feature Items Information MAC Address Comment Fill in the MAC address that you wish to control and give a definition to it MAC Address Format xxxxxxxxxxxx Da...

Page 31: ...less access points using wireless mesh mode must be configured to use the same channel number Mesh ID wireless security type and wireless security key This feature is only availa ble when using Mesh or AP Mesh modes located under Wireless Basic Settings To use Mesh you will require at least 2 or more wireless access points that support Mesh It is ideal to have at least 3 wire less access points It...

Page 32: ...er Wireless Basic Settings this page will allow you to scan and establish wireless connectivity to available wireless networks access points or wireless routers To establish wireless connectivity in Client mode 1 Click on Wireless and then click Basic Settings For Mode select Client Click Apply Changes Click Reboot Later 2 If the wireless network you will connect uses wireless security click on Wi...

Page 33: ... you enable WPS function and setup a wireless security key for this device Self PIN Number If you use this device as a client you can use this code when trying to connect this device to other AP by using the PIN method Push Button Configuration Push Button Communication PBC method use a simple action of pushing a button on both the AP and the new STA to reach the function of easy setup WPS connect...

Page 34: ...edule function Days Everyday Checking this option will select all days Sun Mon Tue Wed Thu Fri Sat Check the days you want the wireless schedule to be active Time 24 Hours Checking this option will select all hours of the days you have selected From Click the drop down menus to set the time the wireless functionality will be turned on The options are in 5 minutes increments To Click the drop down ...

Page 35: ...ing up your client IP is necessary when you want to use the AP as your client s default gateway 802 1d Spanning Tree STP Enabled Suitable for office environment for exam ple there are over 3 Ethernet switches or Routers or APs are being used at the same time Because STP Spanning Tree Protocol needs 2 49 seconds to take effect Disabled Suitable for ordinary application when there are less than 3 Et...

Page 36: ... Logs only information related to the wireless functionality of the device 11s Logs only information about wireless mesh Applies only when using Mesh AP Mesh modes Enable Remote Log Sends or forwards logging information to an external log server Syslog server Log Server IP Address Enter the IP address of the external log server Syslog server Please click on the Apply Changes button to save the con...

Page 37: ...ck on the button navigate to the extracted firmware file location on your computer and then click the button to start the firmware upgrade 3 9 Save Reload Settings This page allows you to save your current wireless access point configuration to a file and restore the wireless access point settings from a previously saved configuration file on this device This page also allows you to reset the wire...

Page 38: ...ply Changes button to save the changes 3 11 System Time This page allows you to set the device system time and also displays the current device time Click Re fresh to update the device time displayed To set the device time you can manually enter edit the time displayed or you can click on Copy Computer Time to copy your computer s current time settings Click Apply Change to save the changes Note T...

Page 39: ...oms will then share Internet connectivity through your router Once the powerline adapters are connected to each other through the electrical system any additional devices such as computers or network appliances e g Game Console Blu ray player IP Set Top Box network enabled TV etc connected to any of your powerline adapters via Ethernet can then communicate to each other as well as share Internet c...

Page 40: ...lowing You have one additional TRENDnet HomePlug AV powerline adapter models TPL 303E TPL 304E TPL 305E TPL 401E and the powerline settings are set to factory defaults If you have an existing powerline network 2 or 3 other TRENDnet powerlines adapters already plugged in and connected and you are adding the TPL 310AP please refer to section 4 5 The TPL 310AP has already been initially configured in...

Page 41: ...ated or the room where you would like to extend your wireless network 4 To verify connectivity between the TPL 310AP and the TPL 303E or TPL 304E TPL 305E TPL 401E make sure that the PL P Link on TPL 303E 304E LED is on solid Green Amber Red Green only TPL 303E 304E Please refer to the LED section 1 4 for details on the TPL 310AP LED indicator 5 You have successfully created a basic powerline netw...

Page 42: ... the network name security keys are not the same for all powerline adapters on the same powerline network the adapter will NOT establish connectivity TRENDnet Powerline AV models TPL 303E TPL 304E TPL 305E TPL 310AP and TPL 401E all have the same default network name security key assignment of HomePlugAV 4 3 Changing the Network Name Security Key using the Sync Button The procedure describes how t...

Page 43: ...ton on the other TRENDnet powerline adapter i e TPL 303E for 2 seconds and release it The PWR LED will start blinking This will establish connectivity between the two powerline adapters by assigning the second powerline adapter s i e TPL 303E network name security key to match the network name security key of the first powerline adapter i e TPL 310AP 5 To verify connectivity between the two powerl...

Page 44: ...fy connectivity between the three powerline adapters make sure that the PL LED P Link on TPL 303E 304E on each powerline adapter is on solid Green Amber Red Green only TPL 303E 304E Please refer to the LED section 1 4 for details on the LED indicator 4 5 Overlapping Powerline Networks It is possible to create multiple powerline networks on the same electrical system separated and grouped by differ...

Page 45: ...isconnected from Adapters A and C and connected to Adapters D and E 1 Push and hold the Sync button on Adapter B i e TPL 310AP for 10 seconds and release it All LEDs will turn off and turn back on This will erase the current network name security key assigned to Adapter B i e TPL 310AP and disconnect from Adapters A and C 2 Push and hold the Sync button on Adapter D for 2 seconds and release it Th...

Page 46: ...ed in the utility This is located on the Device Label please refer to Section 1 3 2 Before installing and using the utility make sure the computer in which you are installing the utility is connected to your network and your TRENDnet HomePlug AV adapters are also connected to your network 3 Make sure all of the TRENDnet HomePlug AV powerline adapters are already connected to each other using the p...

Page 47: ...5 In the Setup Wizard window click Next 6 In the License Agreement window click I Agree 7 In the Install Options window click Install ...

Page 48: ...indow click Finish 9 The TRENDnet Powerline Configuration Utility installation window will appear automatically At the Setup Wizard window click Next 10 In the License Agreement window check the radio button I Agree and then click Next ...

Page 49: ...11 In the Select Installation Folder window click Next 12 In the Confirm Installation window click Next 13 At the Installation Complete window click Close ...

Page 50: ...he 16 digit Device Password DPW for each Remote Device in the utility 1 Click one of the Remote Devices in the list 2 Click Enter Password 3 Type in the Device Password according to the corresponding MAC address Then click OK Remote Devices Powerline adapters that are connected to the selected Local Device across the electrical system Local Device The closest powerline adapter s that connects your...

Page 51: ...Privacy tab 2 Under Private Network Name enter the desired network name security key and click Set All Devices 3 At the Network Name Setting prompt window click OK The current network name security key assignment of the powerline adapter s Note If you had previously used the Sync button procedure in generating a random network name security key This will display Unknown Networkname Applies changes...

Page 52: ...e when plugged directly into the wall power outlet instead of a power strip or surge protector Connecting the TPL 401E to a power strip or surge protector may degrade network performance or completely stop network signals The TPL 401E should not be used on GFI protected outlets as some outlets will filter out powerline signals The TPL 401E should not be used in areas with excessive heat Certain fl...

Page 53: ... 4 Antenna orientation can also have a large impact on your wireless signal Use the wireless adapter s site survey tool to determine the best antenna orientation for your wireless devices 5 Interference from devices that produce RF radio frequency noise can also impact your signal Position your wireless devices away from anything that generates RF noise such as microwaves radios and baby monitors ...

Page 54: ... 64 max Recommended Up to 16 per powerline network Overlapping Powerline Net works Up to 4 per electrical system Powerline Coverage Up to 300m 984ft Powerline Security 128 bit AES Advanced Encryption Standard LED Power PWR Ethernet Link Act ETH Wireless WLAN Powerline PL with Connection Quality Indication Best Green Better Amber Good Red Power Switch On Off power switch Buttons Sync WPS Reset Dime...

Page 55: ...ceiver Sensitivity 802 11n Typical 68 dBm 802 11g Typical 73 dBm 802 11b Typical 84 dBm Maximum of 16 adapters nodes recommended for streaming video across your network Additional adapters may decrease performance 200Mbps is the maximum theoretical Powerline data rate Actual throughput will vary depending on environment Maximum wireless signal rates are referenced from IEEE 802 11 theoretical spec...

Page 56: ...applicable warranty period and providing a copy of the dated proof of the purchase Upon proper submission of required documentation a Return Materi al Authorization RMA number will be issued An RMA number is required in order to initiate warranty service support for all TRENDnet products Products that are sent to TRENDnet for RMA service must have the RMA number marked on the outside of return pac...

Page 57: ... LIABILITY FOR DAMAGES WILL NOT BE AFFECTED IF ANY REMEDY PROVIDED HEREIN SHALL FAIL OF ITS ESSENTIAL PURPOSE Governing Law This Limited Warranty shall be governed by the laws of the state of California Some TRENDnet products include software code written by third party developers These codes are subject to the GNU General Public License GPL or GNU Lesser General Public License LGPL Go to http www...

Page 58: ......

Reviews: