background image

6

3.

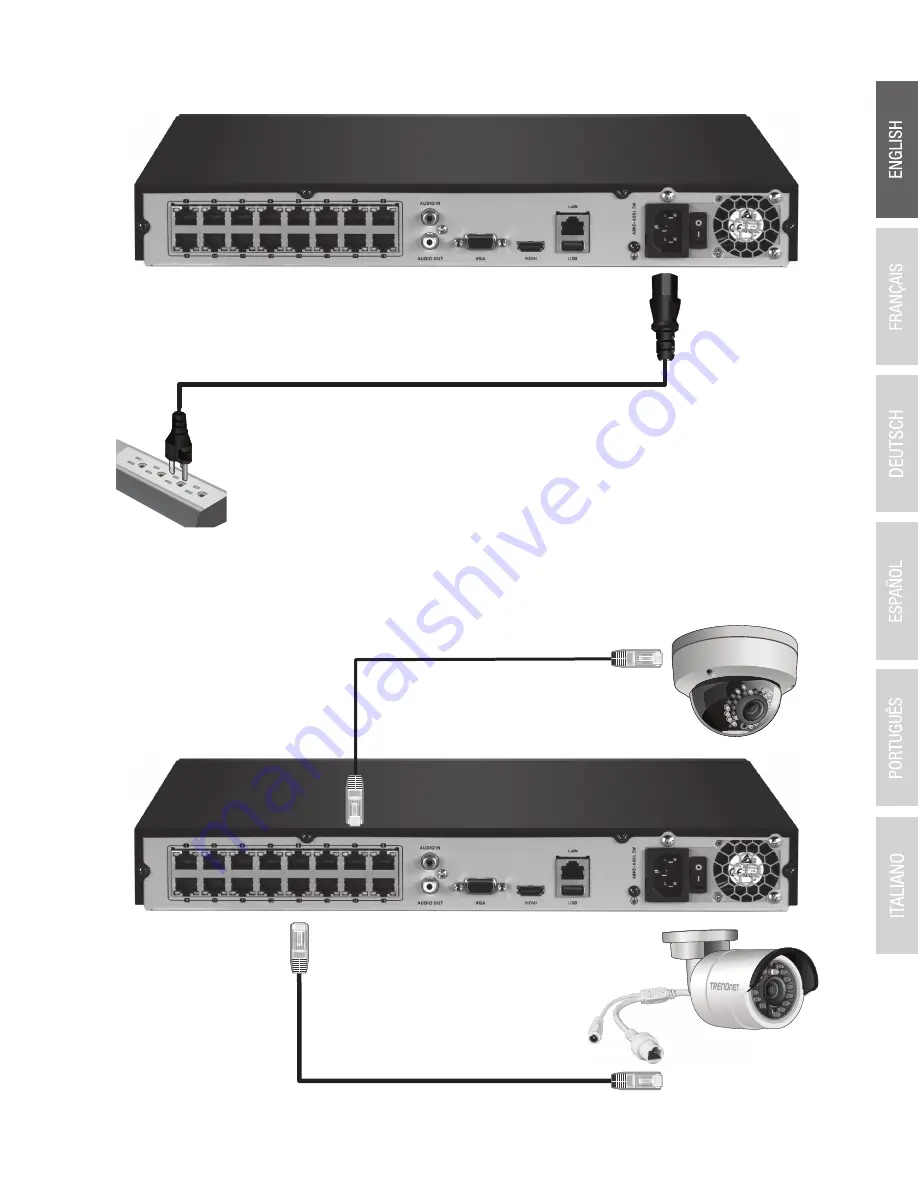
 Attach the power cord (rear panel) and plug the unit into an electrical outlet.

4.

 Turn the power switch on, connect a TRENDnet PoE camera (i.e. TV-IP320PI) to any of the PoE network ports on the back of the 

  TV-NVR216 / TV-NVR216D4. 

5.

 Toggle the power switch located on the rear panel to the 

On

 position.

PoE network port

Summary of Contents for TV-NVR216

Page 1: ...Quick Installation Guide TV NVR216 TV NVR216D4 ...

Page 2: ...Table of Content 1 English 1 Installation 2 Hardware Installation 3 Start Recording 4 Instant Playback ...

Page 3: ...16 TV NVR216D4 ŸSATA Data Cable ŸSATA Power Cable ŸOptical Mouse ŸRemote Control ŸCD ROM User s Guide ŸQuick Installation Guide ŸPower Cord 1 83m 6ft ŸHDMI Cable 1 8m 6ft ŸNetwork Cable 1 8m 6ft VGA port HDMI port USB port for mouse or video exporting Audio Out Grounding point Camera ports PoE Power Network port Audio In ...

Page 4: ... network connection for remote access to NVR over the internet proceed to the User s Guide for the appropriate setup steps do not continue with this quick setup Sold separately Display Display USB port for mouse or external storage VGA IN HDMI or VGA cable not included HDMI cable is included Sold separately Audio out Power Grounding point Audio in Network Port Camera ports PoE ...

Page 5: ...tatic Electricity can damage the TV NVR216 TV NVR216D4 Before handling the unit discharge any static electricity or use an anti static wrist strap ŸThe TV NVR216 TV NVR216D4 supports SATA I and II drives 1 Remove the retaining screws from the panel of the TV NVR216 TV NVR216D4 2 Slide the cover off the unit by pulling the top cover towards the rear panel ...

Page 6: ...ect or the control board 4 Mount the hard drives to the drive bays of the TV NVR216 TV NVR216D4 using the 4 mounting screws screwing from the underside of the TV NVR216 TV NVR216D4 into the hard drive case 5 Slide the top cover back on the TV NVR216 TV NVR216D4 and reinstall the screws holding the panel in place ...

Page 7: ...y from your display to the TV NVR216 TV NVR216D4 s HDMI or VGA port on the rear panel 2 Connect the included mouse to the front or rear USB port on the TV NVR216 TV NVR216D4 Sold separately VGA IN Sold separately HDMI or Display Display VGA cable not included HDMI cable is included ...

Page 8: ...nto an electrical outlet 4 Turn the power switch on connect a TRENDnet PoE camera i e TV IP320PI to any of the PoE network ports on the back of the TV NVR216 TV NVR216D4 5 Toggle the power switch located on the rear panel to the On position PoE network port ...

Page 9: ...he dropdown then click Apply 2 Uncheck Start wizard when device starts to skip the setup process each time the TV NVR216 TV NVR216D4 is powered up optional then click Next Systerm Language Language English Apply Exit Start wizard when device starts Wizard Next Exit ...

Page 10: ... Canada GMT 06 00 Central Time U S Canada GMT 05 00 Eastern Time U S Canada GMT 04 30 Caracas GMT 04 00 Atlantic Time Canada GMT 03 30 Newfoundland GMT 03 00 Georgetown Brasilia GMT 02 00 Mid Atlantic GMT 01 00 Cape Verde Islands Azores GMT 00 00 Dublin Edinburgh London GMT 01 00 Amsterdam Berlin Rome Paris Time Zone Date Format System Date System Time Exit Previous Next Time Zone 3 Click on the p...

Page 11: ...ect the month by clicking on left or right arrow next to the month ŸSelect the day by clicking on the date System Date 8 Click Date Format to choose a format GMT 08 00 Pacific Time U S Cananda Time Zone Exit Previous Next YYYY MM DD MM DD YYYY DD MM YYYY DD MM YYYY Date Format System Date System Time Date Format ...

Page 12: ...rd to Initialize and format if necessary then click OK Note For further information about recording to a secondary hard drive please refer to the User s Guide 10 Click System Time to set the time Use the up and down arrows to adjust the hours minutes and seconds using a 24 hour format 11 Click Next System Time ...

Page 13: ... and right click anywhere on the screen 2 A short menu will show up Choose Start Recording and click Continuous Record 3 Click Yes to confirm continuous recording For more advanced video recording features please see the User s Guide for more details ...

Page 14: ...ayback 1 In Live View click left button on the display you want to playback 2 Click on Instant Playback to playback the last 5 minutes of recording Please see the User s Guide for more advanced video playback features ...

Page 15: ...irmed to comply with the Directives Product Information Product Name Model Number Trade Name TRENDnet Safety EN 60950 1 2006 A11 2009 A1 2010 A12 2011 A2 2013 EMC EN 55022 2010 Class B EN 50130 4 2011 EN 6100 3 2 2006 A1 2009 A2 2009 EN 61000 3 3 20008 Person responsible for this declaration Date December 18 2015 Title Director of Technology Place of Issue Torrance California USA Name Sonny Su Sig...

Page 16: ...using a mains power supply To disconnect devices from the mains supply remove the device itself or its mains plug from the power outlet The power outlet and all connected network devices should be easily accessible so that you can pull the mains plug quickly if needed TRENDnet devices are designed for indoor use only and in a dry location except those that are rated for outdoor applications To cle...

Page 17: ... terceros Estos códigos están sujetos a la Licencia pública general de GNU GPL o la Licencia pública general limitada de GNU LGPL Estos códigos son distribuidos SIN GARANTÍA y están sujetos a las leyes de propiedad intelectual de sus desarrolladores TRENDnet no ofrece servicio técnico para estos códigos Los detalles sobre las licencias GPL y LGPL de GNU se incluyen en el CD ROM del producto Consul...

Page 18: ...e garantia para adaptador de tensão fonte e componentes de ventoinhas Visite TRENDnet com para conhecer a política de garantia completa direitos e restriçõesparaesteproduto Piiratudgarantii TRENDneti tavatingimustes kasutatavatel ja hooldatavatel toodetel on järgmise ajavahemiku jooksul alates ostukuupäevast tootmis ja materjalidefektide garantii garantii 2 aastane piiratud garantii Garantii kohal...

Reviews: