background image

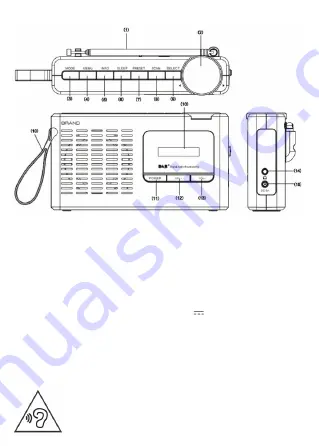
BESCHREIBUNG LINKS UND STEUERELEMENTEN

1.  Teleskopantenne

2.  PREV / NEXT / SELECT-Knopf 

Taste

3.  MODE-Taste

4.  MENU-Taste

5.  INFO-Taste

6.  SLEEP-Taste

7.  PRESET-Taste

8.  SCAN-Taste

9.  SELECT-Taste

10. Display

11. POWER-Taste

12. VOL- Taste

13. VOL + Taste

14. Kopfhöreranschluss

15. 5V 1A Steckdose

Um Hörschäden zu vermeiden, begrenzen Sie die Zeit bei hoher 

Lautstärke zu hören.

DEUTSCH

Summary of Contents for DAB 7F94 R

Page 1: ...evi it For additional information and updates of this device visit the website www trevi it ita DAB 7F94 R Guida d uso User Guide RADIO CON SISTEMA DAB DAB FM RADIO WITH DAB DAB FM SYSTEM RADIO AVEC SYSTÈME DAB DAB FM RADIO MIT DAB DAB FM SYSTEM RADIO CON SISTEMA DAB DAB FM eng fra deu esp ...

Page 2: ...site Web www trevi it de le trouver DE Wenn Sie Ihre Sprache auf die Bedienungsanleitung nicht finden gehen Sie bitte auf unsere Webseite www trevi it zu finden ES Si no encuentras tu idioma en el manual de instrucciones por favor vaya a nuestra página web www trevi it se encuentra PT Se você não vai encontrar sua língua sobre o manual de instruções por favor vá em nosso site www trevi it para enc...

Page 3: ...pparecchio al più vicino centro assistenza autorizato TREVI Nessuna sorgente di fiamma nuda quali candele accese dovrebbe essere posta sull apparecchio L apparecchio non deve essere esposto a stillicidio o a spruzzi d ac qua e nessun oggetto pieno di liquido quali vasi deve essere posto sull apparecchio Conservare il presente manuale per futuri riferimenti CURA E MANUTENZIONE Per la pulizia si con...

Page 4: ...scolto a volumi elevati ITALIANO 1 Antenna telescopica 2 Tasto manopola PREV NEXT SELECT 3 Tasto MODE 4 Tasto MENU 5 Tasto INFO 6 Tasto SLEEP 7 Tasto PRESET 8 Tasto SCAN 9 Tasto SELECT 10 Display 11 Tasto POWER 12 Tasto VOL 13 Tasto VOL 14 Presa cuffie 15 Presa alimentazione 5V 1A ...

Page 5: ...ità USB in un alimentatore USB 5V 1A non in dotazione ACCENSIONE SPEGNIMENTO 1 Estendere l antenna telescopica 1 2 Premere il tasto POWER 11 una volta per portare l apparecchio in modalità Stand by premerlo nuovamente per avviare la modalità radio 3 Durante l ascolto della radio premere il tasto POWER 11 per attivare la modalità Stand by premerlo per altri 3 secondi per spegnere com pletamente l a...

Page 6: ...are 7 Per commutare l ascolto da STEREO a MONO e viceversa Premere il tasto MENU 5 e selezionare AUDIO SETTING tramite la manopola 2 Premere il tasto SELECT 9 per confermare Utilizzare la manopola 2 per selezionare STEREO ALLOWED o FORCED MONO Premere il tasto SELECT 9 per confermare RADIO DAB DAB Scansione automatica 1 Accendere l unità e avviare la modalità radio 2 Premere il tasto MODE 3 per se...

Page 7: ... tasto SELECT 9 una volta per confermare e salvare la stazione selezionata 5 Per ascoltare una stazione preimpostata Premere PRESET 7 una volta Ruotare la manopola 2 per selezionare la stazione desiderata Premere il tasto SELECT 9 per confermare Nota Si possono salvare 10 stazioni in funzione DAB DAB e 10 stazioni in Radio FM Una frequenza memorizzata può essere cancellata dalla memoria memorizzan...

Page 8: ...Setting Audio Setting System 3 Premere il tasto SELECT 9 per entrare nelle impostazioni della voce selezionata Full scan Ricerca completa permette di scansionare l intera banda DAB DAB e memorizzare automaticamente le stazioni trovate Manual tune Sintonizzazione manuale permette di scansionare ma nualmente una singola frequenza DAB DAB Ruotare la manopola 2 per selezionare il numero del canale rel...

Page 9: ...data e ora automatico Backlight regolazione tempo illuminazione display 10sec 20sec 30sec 45sec 60sec 90sec 120sec 180sec ON e il livello di luminosità alto medio basso Language e possibile scegliere la lingua dei menu sono disponibili Italiano Inglese default Deutsch Francais Factory Reset Ripristino valori di fabbrica permette di ripristinare le impostazioni di fabbrica dell apparecchio Al termi...

Page 10: ...ività possono ridurne la durata La batteria ricaricabile è soggetta ad usura e la sua capacità diminuisce gradualmente Perprolungareladuratadellabatteria utilizzarlaquandoècompletamente carica fino al completo scaricamento quindi ricaricarla completamente dinuovoprimadiutilizzarlanuovamente Mettendoincaricaunabatteria non completamente esaurita la sua durata risulterà ridotta In questo caso ripete...

Page 11: ...ettronici ed elettrotecnici oppure riconsegnarla al rivenditore al momento dell acquisto di nuova apparecchiatura di tipo equivalente in ragione di uno a uno oppure 1 a zero per le apparecchiature aventi lato maggiore inferiore a 25cm L adeguata raccolta differenziata per l avvio successivo dell apparecchiatura dimessa al riciclaggio al trattamento e allo smaltimento ambientale compatibile contrib...

Page 12: ...iance to the nearest authorized TREVI service center No naked flame sources such as lighted candles should be placed on the appliance The appliance must not be exposed to dripping or splashing water and no objects filled with liquids such as vases must be placed on the appliance Keep this manual for future reference CARE AND MAINTENANCE For cleaning it is recommended to use a soft slightly damp cl...

Page 13: ...3 MODE button 4 MENU button 5 INFO button 6 SLEEP button 7 PRESET button 8 SCAN button 9 SELECT button 10 Display 11 POWER button 12 VOL button 13 VOL button 14 Headphone jack 15 5V 1A power socket To avoid possible hearing damage limit the time listening at high volume ENGLISH ...

Page 14: ... the telescopic antenna 1 2 Press the POWER button 11 once to bring the appliance into Stand by mode press it again to start the radio mode 3 While listening to the radio press the POWER button 11 to activate the Stand by mode press it for another 3 seconds to completely switch off the appliance Note It is advisable to always switch off the appliance completely in order to avoid continuous battery...

Page 15: ... Press the MENU button 5 and select AUDIO SETTING using the knob 2 Press the SELECT button 9 to confirm Use the knob 2 to select STEREO ALLOWED or FORCED MONO Press the SELECT button 9 to confirm DAB DAB RADIO Automatic scanning 1 Turn on the unit and start the radio mode 2 Press the MODE button 3 to select the DAB radio mode the message Switch to DAB appears on the display 3 Press the SCAN button...

Page 16: ... select the desired station Press the SELECT button 9 to confirm Note 10 stations can be saved in DAB DAB and 10 stations in FM Radio A stored frequency can be erased from the memory by storing another frequency in its place DAB DAB TRANSMISSION INFORMATION In DAB mode the display will show a series of information relating to the station being listened to 1 PresstheINFObutton 4 repeatedlytochanget...

Page 17: ...channel number for the frequency to be scanned and then press the SELECT button 9 to start scanning The stations found will be automatically memorized At the end press the MENU key 3 to return to the previous DAB menu DRC allows you to enable disable the DRC function to improve the sound when listening in noisy environments You can set the DRC level up high low low or OFF off Prune allows you to d...

Page 18: ... of the DAB DAB stations will be performed Move the knob 2 to YES and confirm with the SELECT button 9 SW version Software version allows you to view the version of the device software SLEEP FUNCTION To set the auto switch off Sleep off 15min 30min 45min 60min and 90min press the SLEEP button 6 and turn the knob 2 to the desired value confirm with the SELECT button 9 Once the set time has elapsed ...

Page 19: ...HE BATTERY 1 Remove the cover in the rear cabinet 2 Locate the battery 3 Remove it Whatever the type of exhausted battery it must not be thrown in the household waste in the fire or in the water Each type of exhausted battery must be recycled or disposed of in the appropriate dedicated collection centers Precautions for correct disposal of the product The symbol shown on the equipment indicates th...

Page 20: ...ment et amenez le au centre d assistance agréé TREVI le plus proche Aucune source de flamme nue telle que des bougies allumées ne doit être placée sur l appareil L appareil ne doit pas être exposé à des gouttes d eau ni à des écla boussures d eau et aucun objet contenant des liquides tels que des vases ne doit être placé sur l appareil Conservez ce manuel pour référence future MANIEMENT ET ENTRETI...

Page 21: ...n MODE 4 Bouton MENU 5 Bouton INFO 6 Bouton SLEEP 7 Bouton PRESET 8 Bouton SCAN 9 Bouton SELECT 10 Display 11 Bouton d alimentation 12 Bouton VOL 13 Bouton Vol 14 Prise casque 15 Prise d alimentation 5V 1A Pour éviter d éventuels dommages auditifs limiter le temps d écouter à volume élevé FRANÇAISE ...

Page 22: ...aptateur d alimentation USB 5V 1A non fourni POWER ON OFF STANDBY 1 déployez l antenne télescopique 1 2 Appuyez une fois sur le bouton POWER 11 pour mettre l appareil en mode veille appuyez à nouveau pour activer le mode radio 3 Toutenécoutantlaradio appuyezsurleboutonPOWER 11 pouractiverle modeveille maintenez leenfoncépendant3secondessupplémentaires pour éteindre complètement l appareil Remarque...

Page 23: ...pour sélectionnez le numéro de mémoire à écouter Appuyez sur le bouton SELECT 19 pour confirmer 7 Pour passer l écoute de STEREO à MONO et inversement Appuyez sur le bouton MENU 5 et sélectionnez AUDIO SETTING en utilisant le bouton 2 Appuyez sur le bouton SELECT 9 pour confirmer Utilisez le bouton 2 pour sélectionner STEREO MONO PERMIS ou FORCÉ Appuyez sur le bouton SELECT 9 pour confirmer DAB DA...

Page 24: ... pour sélectionner la position de mémoire souhaitée 4 Appuyez une fois sur le bouton SELECT 9 pour confirmer et enregistrer la station sélectionnée 5 Pour écouter une station préréglée Appuyez une fois sur PRESET 7 Tournez le bouton 2 pour sélectionner la station souhaitée Appuyez sur le bouton SELECT 9 pour confirmer Remarque 10 stations peuvent être enregistrées dans DAB DAB et 10 stations dans ...

Page 25: ...uhaité parmi En mode DAB balayage complet réglage manuel DRC élagage système En mode FM Réglage de numérisation Réglage audio Système 3 Appuyez sur le bouton SELECT 9 pour entrer les paramètres de l élément sélectionné Full scan recherche complète permet d analyser la totalité de la bande DAB DAB et d enregistrer automatiquement les stations trouvées Manualtune vouspermetdebalayermanuellementunese...

Page 26: ... hebdomadairement ou seulement weekend Définir la date Réglez le volume Time régler la date et l heure le format de l heure 12 24 le format de la date la mise à jour automatique de la date et de l heure Backlight réglage du temps d éclairage de l écran 10s 20s 30s 45s 60s 90s 120s 180s ON et du niveau de luminosité élevé moyen faible Language il est possible de choisir la langue du menu Italien an...

Page 27: ...e comprise entre 5 C et 35 C Lorsque la recharge est terminée un message apparaît Ne prolongez pas la charge au delà des délais indiqués pour éviter le risque de surchauffe et éclatement Chargementdelabatterieau delàdesduréesindiquéesoud unepériode prolongée de l inactivité peut réduire sa durée La batterie rechargeable est sujette à l usure et sa capacité diminue peu à peu Pourprolongerlaviedelab...

Page 28: ...e séparée C est pourquoi le produit ne doit pas être éliminé avec les déchets urbains L utilisateur doit remettre le produit auprès de décharges spécialisées de collecte séparée prévues par les autorités locales ou bien le rendre au revendeur quand il achètera un nouvel appareil équivalent La collecte séparée du produit et les opérations successives de traitement recyclage et élimination favorisen...

Page 29: ...ker un verzüglich von der Steckdose abziehen und das Gerät zur nächstgele genen autorisierten TREVI Kundendienststelle bringen Keine offenen Flammenquellen wie z B brennende Kerzen sollten auf dem Gerät platziert werden Das Gerät darf keinem tropfenden oder spritzenden Wasser ausgesetzt werden und es dürfen keine mit Flüssigkeiten gefüllten Gegenstände wie Vasen auf dem Gerät stehen Bewahren Sie d...

Page 30: ... Taste 3 MODE Taste 4 MENU Taste 5 INFO Taste 6 SLEEP Taste 7 PRESET Taste 8 SCAN Taste 9 SELECT Taste 10 Display 11 POWER Taste 12 VOL Taste 13 VOL Taste 14 Kopfhöreranschluss 15 5V 1A Steckdose Um Hörschäden zu vermeiden begrenzen Sie die Zeit bei hoher Lautstärke zu hören DEUTSCH ...

Page 31: ...IN AUS STANDBY 1 Ziehen Sie die Teleskopantenne 1 heraus 2 Drücken Sie die POWER Taste 11 einmal um das Gerät in den Standby Modus zu versetzen Drücken Sie sie erneut um den Radiomodus zu starten 3 Während Sie Radio hören drücken Sie die POWER Taste 11 um den Standby Modus zu aktivieren und halten Sie sie weitere 3 Sekunden lang gedrückt um das Gerät vollständig auszuschalten Hinweis Esistratsam d...

Page 32: ...die Speichernummer die Sie hören möchten Drücken Sie die SELECT Taste 19 zur Bestätigung 7 SoschaltenSiedieWiedergabevonSTEREOaufMONOundumgekehrtum Drücken Sie die Taste MENU 5 und wählen Sie AUDIO SETTING mit dem Knopf 2 Drücken Sie zur Bestätigung die SELECT Taste 9 Mit dem Drehknopf 2 STEREO auswählen ALLOWED oder FORCED MONO Drücken Sie zur Bestätigung die SELECT Taste 9 DAB DAB RADIO Automati...

Page 33: ...peicherpositionauszuwählen 4 Drücken Sie die SELECT Taste 9 einmal um den ausgewählten Sender zu bestätigen und zu speichern 5 So hören Sie einen voreingestellten Sender Drücken Sie einmal PRESET 7 Drehen Sie den Knopf 2 um den gewünschten Sender auszuwählen Drücken Sie zur Bestätigung die SELECT Taste 9 Hinweis 10 Sender können in DAB DAB und 10 Sender in UKW Radio gespeichert werden Eine gespeic...

Page 34: ...ckenSiedieSELECT Taste 9 umdieEinstellungendesausgewählten Elements einzugeben Full scan Vollständige Suche Damit können Sie das gesamte DAB DAB Band durchsuchen und die gefundenen Sender automatisch speichern Manual tune Damit können Sie manuell eine einzelne DAB DAB Frequenz suchen Drehen Sie den Knopf 2 um die Kanalnummer für die zu durchsuchende Frequenz auszuwählen und drücken Sie dann die SE...

Page 35: ...tomatische Aktualisierung von Datum und Uhrzeit Backlight EinstellenderBeleuchtungsdauer 10Sekunden 20Sekunden 30Sekunden 45Sekunden 60Sekunden 90Sekunden 120Sekunden 180 Sekunden EIN und der Helligkeit hoch mittel niedrig Language Es ist möglich die Menüsprache zu wählen Italienisch Englisch Standard Deutsch Französisch sind verfügbar Factory reset Mit dieser Option können Sie die Werkseinstellun...

Page 36: ...ung angezeigt Verlängern Sie die Ladung nicht über die angegebenen Zeiten hinaus um das Risiko von Überhitzung und Platzen Laden des Akkus über die angegebenen Zeiten oder über einen längeren Zeitraum von Inaktivität kann die Dauer verkürzen Der Akku unterliegt einem Verschleiß und seine Kapazität nimmt ab nach und nach Verwenden Sie den Akku wenn er vollständig aufgeladen ist um die Lebensdauer z...

Page 37: ... Alt gerät getrennt zu sammeln ist und das Produkt daher nicht zusammen mit dem Gemeindeabfall entsorgt werden darf Der Benutzer muss das Produkt zu den entsprechenden von der Gemein deverwaltung eingerichteten Wertstoffsammelstellen bringen oder dem Händler beim Kauf eines neuen Produkts übergeben Die getrennte Müllsammlung und anschließende Aufbereitung Wieder verwertung und Entsorgung fördern d...

Page 38: ... aparato al centro de asistencia autorizado TREVI más cercano No se deben colocar fuentes de llamas como velas encendidas sobre el aparato El aparato no debe exponerse a goteo o salpicaduras de agua y no se deben colocar objetos llenos de líquidos como jarrones sobre el aparato Guarde este manual para futuras referencias CUIDADO Y MANTENIMIENTO Para efectuar la limpieza se aconseja utilizar un pañ...

Page 39: ...E 4 Botón de MENU 5 Botón INFO 6 Botón SLEEP 7 Botón PRESET 8 Botón SCAN 9 Botón SELECCIONAR 10 Display 11 Botón de encendido 12 VOL botón 13 VOL botón 14 Toma para auricular 15 Toma de corriente 5V 1A Para evitar posibles daños a la audición limitar el tiempo de escuchar a un volumen alto ...

Page 40: ...able suministrado a la unidad a la toma de DC5V 15 e inserte el extremo USB en un adaptador de alimentación USB de 5V 1A no suministrado ENCENDIDO APAGADO STANDBY 1 Extienda la antena telescópica 1 2 Presione el botón POWER 11 una vez para poner el aparato en modo de espera presiónelo nuevamente para iniciar el modo de radio 3 Mientras escucha la radio presione el botón POWER 11 para activar el mo...

Page 41: ...nada Presione la tecla PRESET 7 y use la perilla 2 para seleccione el número de memoria para escuchar Presione el botón SELECT 9 para confirmar 7 Para cambiar la escucha de STEREO a MONO y viceversa Presione el botón MENÚ 5 y seleccione CONFIGURACIÓN DE AUDIO usando la perilla 2 Presione el botón SELECT 9 para confirmar Use el mando 2 para seleccionar MONO STÉREO Presione el botón SELECT 9 para co...

Page 42: ...posición de memoria deseada 4 Presione el botón SELECT 9 una vez para confirmar y guardar la estación seleccionada 5 Para escuchar una emisora presintonizada Presione PRESET 7 una vez Gire la perilla 2 para seleccionar la estación deseada Presione el botón SELECT 9 para confirmar Nota se pueden guardar 10 estaciones en DAB DAB y 10 estaciones en Radio FM Una frecuencia almacenada se puede borrar d...

Page 43: ...En modo DAB Escaneo completo Sintonización manual DRC Poda Sistema En modo FM Configuración de escaneo Configuración de audio Sistema 3 PresioneelbotónSELECT 9 paraingresarlaconfiguracióndelelemento seleccionado Full scan búsqueda completa le permite explorar toda la banda DAB DAB y almacenar automáticamente las estaciones encontradas Manual tune le permite escanear manualmente una sola frecuencia...

Page 44: ... vez diariamente semanalmente o solo en fin de semana Establecer la fecha Ajusta el volumen Time ajuste la fecha hora formato de hora 12 24 formato de fecha actualización automática de fecha y hora Backlight ajuste del tiempo de iluminación de la pantalla 10 segundos 20 segundos 30 segundos 45 segundos 60 segundos 90 segundos 120 segundos 180 segundos encendido y el nivel de brillo alto medio bajo...

Page 45: ...RA EL USO CORRECTO DE LA BATERÍA RECARGABLE Cargue la batería a una temperatura entre 5 C y 35 C Cuando se completa la recarga se indica con un mensaje No extienda la carga más allá de los tiempos indicados para evitar el riesgo de sobrecalentamiento y estallido Carga de la batería más allá de los tiempos indicados o un período prolongado de la inactividad puede reducir su duración La batería reca...

Page 46: ...debe ser objeto de recogida selectiva por tanto el producto no se debe eliminar junto con residuos urbanos El usuario deberá entregar el producto a los centros de recogida selec tiva creados por las administraciones municipales o bien al distribuidor cuando adquiera un nuevo producto La recogida selectiva del residuo y las sucesivas operaciones de trata miento recuperación y eliminación favorecen ...

Page 47: ......

Page 48: ... alla direttiva 2014 53 UE Il testo completo della dichiarazione di conformità EU è disponibile al seguente indirizzo Internet https www trevi it dms zidi TREVI DOCDAB7F94R pdf SIMPLIFIED EU DECLARATION OF CONFORMITY Hereby TREVI Spa declares that the radio equipment type DAB 7F94 R is in compliance with directive 2014 53 EU The full text of the EU declaration of conformity is available at the fol...

Reviews: