Trevi Spa User Guide
17
Step 3: Assembly of the lower section
▪
Insert the ends of
(F)
in
(E)
. Place the shorter end
(E)
on the
conic nose tapered end of
(D)
. To adjust the width, slide the
other end of the tubes
(D)
onto the upper section
(C)
tubes.
▪
Center
(F)
in
(E)
using a tape measure and the center mark.
Connect the different parts of the lower section using the 3/4''
long self-drilling screws (3 at each end). The screw heads
should be on the outside of the frame.
▪
Connect
(D)
and
(E)
using the 5/16" x 1 5/8" long screws and nuts
(2 per side). The nuts must be facing towards the ground.
Step 4: Section assembly
▪
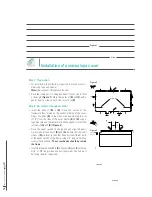
Place the assembled lower section of the frame
(DEF)
at the
bottom of the spa. Install the frame’s 2 mounting brackets
(g)
50 cm (20") from each end of the spa. Attach the mounting
brackets
(g)
to the spa with 1 ¼’’ long wood screws and flat
washers (4 per support). Do not screw into the joints of the
skirt
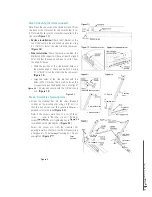
(Figure 3)
.
Step 5: Section assembly
▪
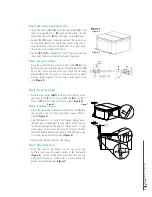
Place the top section
(ABC)
on the central stitching of the
spa cover. Insert
(C)
in (D). Connect
(C)
and
(D)
using the 2
holes of
(D)
with 3/4'' long self-drilling screws
(Figure 4)
.
Step 6: Installation of belts
▪
Attach the belt which is already inserted into section
(D)
into
the top hole using 3/4" long self-drilling screws of the flat
washer
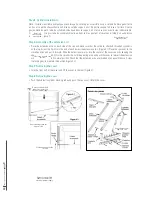
(Figure 5)
.
▪
Hold the frame so it is 13 cm (5") from the spa. Tighten one of
the belts against the edge of the spa. Mark the spot. Fasten
the belt bracket against the edge of the spa with 3 1" long
wood screws. Do not screw into the joints of the skirt. Attach
the belt through the hole in the center of the belt holder using
1¼" wood screws and flat washers
(Figure 5)
.
▪
Do the same thing on the other side the spa.
Step 7: Removal of cover
▪
Place the removal mechanism on the spa cover and
fold the cover over the upper section of the framework
(Figure 6)
. Lift the folded cover away from the spa; the
withdrawal mechanism should hold it in place above the
ground in a vertical position
(Figure 7)
.
Figure 7.2
Figure 5
Figure 7.1
Figure 6
13 cm
5”
Figure 4
Figure 5
Figure 6
Figure 7


