Crimp Verification
Section 3
TAC
·
7X
MANUAL
1. Introduction
2. Initial Crimp
Verification
Initial and periodic crimp verifications must be made in order to be certain
a given TAC is crimping properly. Once a TAC is set-up and crimp
verification accomplished, the device will normally complete hundreds of
thousands of acceptable crimps before indenter adjustment or
replacement is necessary.
However, as in all precision equipment, something can malfunction, or the
indenters may inadvertently be subjected to a hard substance and the
resulting crimp not meet acceptable parameters. Therefore, it is
recommended that the Crimp Verification procedure be performed at least
monthly. A system of "spot checks" can also be established to verify
acceptable crimps.
The Initial Crimp Verification should be performed immediately after the
TAC has been set-up (Section 2). Although the procedure is the same as
all other verification tests, it affords the user an opportunity to record data
before the machine has been used extensively. Read and understand
Section 4, Operating Procedures, before performing the verification. This
paragraph details the procedure to verify TAC's with a fixed "G" dimension
and with an operator-selectable "G" dimension.
Perform the following steps to verify acceptable crimps:
WARNING
Before the funnel cover plate or the cylinder arbor cover plate
is removed, DISCONNECT the air supply
from the sleeve valve. INJURY COULD RESULT ! !
Step 1.
Open the sleeve valve.
Step 2.
Disconnect the air supply from the sleeve valve.
Step 3.
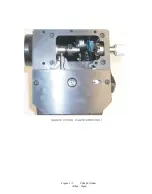
Refer to Figure 3-1.
Step 4.
Remove the four button head socket cap screws securing the
crimp cylinder arbor cover plate.
Summary of Contents for TAC-7AE
Page 6: ...Figure 1 1 TAC 7X Front View ...
Page 8: ... Figure 1 2 Wire Insertion Through Funnel ...
Page 12: ...Figure2 1 Pneumatic Hook Up ...
Page 14: ... Fiqure 2 4 Track Drop Tube Escapement ESCAPEMENT SYSTEM _ _ _ BR ASSEMBL I TRA ...
Page 18: ... ARBOR COVER PLA TE REMOVED Figure 3 1 Crimp Cylinder Arbor Open ...
Page 20: ... ARBOR COVER PLAT E REMOVED Figure 3 2 Crimp Cylinder Arbor Closed ...
Page 23: ... Crimp Inspection Points Improper Crimps ...
Page 33: ...Figure 6 1 TAC 7X Components ...
Page 34: ...Figure 6 2 Control Box Components Figure 6 2 TAC 7X Components Right View ...
Page 37: ...Figure 6 3 Contact Track Feed Air Adjustments ...
Page 42: ... Figure 6 4 Indenter Plate Removal ...
Page 43: ...HOSE CLAMP CAREFULL Y REMOVE Figure 6 5 Indenter Replacement ...
Page 47: ...Figure 6 6 Indenter Adjustment ...
Page 52: ...TAC 7X Pneumatic Diagram ...


