background image

TRI TOOL INC.

92-0092 Rev. 210701

38

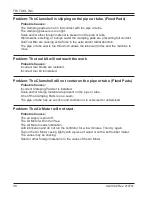
Problem: The Clamshell is slipping on the pipe or tube. (Fixed Pads) 

Probable Causes:

The clamping pads are not in full contact with the pipe or tube.

The clamping pressure is too light.

Scale and/or other foreign material is present on the pipe or tube.

Weld seams, swelling, or bumps under the clamping pads are preventing full contact.

Dull Tool Bits are causing extra force in the axial and/or radial direction.

The pipe or tube wall is too thin which allows the tube wall to flex and the machine to 

move. 

Problem: The tool bit will not reach the work

Probable Causes:

Incorrect tool blocks are installed.

Incorrect tool bit is installed.

Problem: The Clamshell will not center on the pipe or tube. (Fixed Pads)

Probable Causes:

Incorrect Clamping Pad Set is installed.

Scale and/or foreign material are present on the pipe or tube.

One of the Clamping Pads is on a seam.

The pipe or tube has an out-of-round condition or is oversized or undersized.

Problem: The Air Motor will not start.

Probable Causes:

The air supply is shut off.

The Air Motor will not run free.

The Air Motor needs lubrication.

Add lubrication and do not run the Air Motor for a few minutes. Then try again.

Tap on the Air Motor casing lightly with a piece of wood or with a soft rubber mallet.

The vanes may be sticking.

Sand or other foreign material is in the vanes of the Air Motor.

Summary of Contents for 601SBM

Page 1: ...Operation Manual 92 0092 Rev 210701 Model 601SBM Low Profile Clamshell ...

Page 2: ... insist on developing tools and equipment that exceed your expectations of performance precision safety and durability As a full service engineering firm we are here to support you every step of the way For more information on engineered solutions products and trainings visit tritool com or contact our engineers at 1 916 288 6100 ...

Page 3: ... Manual 4 Safety Precautions 6 General Description 8 Specifications 9 Maintenance 11 Operation 19 Cutting Speeds 27 Clamping Pad Sets 28 Tool Bits 29 Tool Blocks 35 Troubleshooting 36 Accessories 39 Illustrated Parts Breakdown 40 92 0092 Rev 210701 Model 601SBM Low Profile Clamshell ...

Page 4: ...a third party are subject strictly to the third party s warranty for those goods Seller makes no warranty and disclaims all statutory or implied warranties for these goods including the implied warranties of merchantability freedom from patent infringement and fitness for a particular purpose Neither this warranty nor any other warranty expressed or implied including implied warranties of mechanic...

Page 5: ... when returning the defective Goods that it is suitably packed fully insured and transportation and insurance prepaid in accordance with instructions issued by Seller Seller at its sole option will either repair or replace any Goods authorized for return to Seller Such repair replacement or credit shall be Buyer s sole remedy for defective Goods Buyer must promptly provide Seller with all informat...

Page 6: ...s in this Manual Failure to follow the instructions or follow the safety instructions could result in serious injury or death This manual describes conditions and hazards that are common and anticipated during equipment operation No manual can address all conditions which may occur Safety Symbols The manual may contain one or more safety symbols These symbols and the associated text warn you of po...

Page 7: ... use of safety glasses HOT SURFACE HOT SURFACE Indicates a hazardous situation that hot surfaces may be present SHOCK HAZARD ARC FLASH SHOCK HAZARD High voltage Entry by authorized personnel only Appropriate PPE and tools required when working on this equipment GLOVES GLOVES Indicates a hazardous situation that requires glasses ...

Page 8: ...e Wear safety glasses Do not wear loose clothing or jewelry Wear nonskid footwear Put long hair in a cap or a net to make sure hair does not get tangled in equipment Personnel Only personnel who are trained or are being trained may operate the equipment Keep the operation manual available where the equipment is used The operator must read the operation manual before using the equipment The equipme...

Page 9: ...erating the equipment do no load tests and feed function checks Tool Use Use the right tool and tool bit for the job Contact Tri Tool to help with your application Keep the tool bits fully engaged in the tool bit holders Loose bits are sharp and can cause cuts or punctures Disconnect power supply during setup and maintenance Use all Stop or Shut off features available when changing or adjusting to...

Page 10: ...ecured to the two halves thus avoiding the loss of parts and at the same time providing maximum ease of handling The Clamshell is equipped with Adjustable Clamping Pads and Jackscrews for out of round pipe conditions Dual Tool Blocks with Auto feed Sprockets and Adjustable Slides provide maximum maintainability life and operator safety with a minimum of operator training The Auto feed Sprockets pr...

Page 11: ...ndard Air Motor Weight 24 lbs 11 kg Power Requirements 55 cfm at 90 psi 26 L s at 621 kPa with the standard Air Motor Figure 1 Envelope Model 601SBM Clamshell Air Motor 548 3 21 59 234 3 9 22 MAX HEIGHT 135 5 32 36 8 1 45 ROTATION 50 8 2 00 BASIC MACHINE 77 3 03 106 4 17 88 9 3 50 NOMINAL SEVER LINE ...

Page 12: ... mm Clearances Rotating parts diameter 5 50 139 7 mm 5 31 134 9 mm Main Frame diameter 5 31 134 9 mm 5 31 134 9 mm Axial clearance required relative to Center line of the cut mounting side 2 51 63 8 mm 3 50 88 9 mm Side opposite of the frame 63 16 0 mm 63 16 0 mm Radial Clearance Over The Pipe Pipe Size True Diameter Clearance Low Profile Tool Blocks Clearance Extended Tool Blocks 1 00 1 315 33 4 ...

Page 13: ... Blocks and the Feed Screws should be cleaned after each cutting operation Recommended Maintenance Schedule Daily maintenance when the unit is in operation Wipe the unit down and spray with rust preventative under severe humidity conditions Visually inspect for loose screws missing screws damage etc After every 20 hours of actual operation Check adjustment of the Main Bearing pre load Drive torque...

Page 14: ...ent Lock Screws A through F Loosen all Bearing Adjustment Set Screws about turn 1 through 8 Turn in Bearing Adjustment Set Screws 1 3 5 and 7 so that they are snugged tightly This insures that the Bearing is fully pushed forward Refer to the Bearing Adjustment Screw locations Lightly turn in the remaining Bearing Adjustment Set Screws in the order shown until all touch the Bearing Relax Bearing Ad...

Page 15: ... torque is 8 to 10 ft lbs 11 to 14 N m WARNING Too much torque may crack the Bearing while too little torque may allow the Bearing pre load to relax Inspection of the Main Gear If the Headstock does not run smoothly even after adjustment inspect the Main Gear to ensure that no chips dirt or dust have damaged the gear Remove the front Thrust Plates by removing the 6 Hold Down Screws Lift the Headst...

Page 16: ...and clean the Housing cavity Regrease the Gear using a lubricant approved by TRI TOOL Inc Refer to Lubricant Recommendations located later in this section Place the Headstock carefully back into the Housing Bolt the Front Thrust Plates back into place If the bearing pre load was properly adjusted before disassembly then it will still be adjusted when reassembled HEADSTOCK THRUST PLATE HOLD DOWN SC...

Page 17: ...place as required Lubricate and reassemble the Tool Block Refer to the Tool Block Assembly NOTE Use lubricant on the Feed Screw sparingly or wipe to a film condition Excess lubricant will collect grit and or chips and tend to cause thread jamming and or damage Adjust the Adjustable Slide Rail to provide a firm but not excessive rotational pressure on the Sprocket The Slide Rails must be over tight...

Page 18: ...t Loosen the Hold down Screws on the Adjustable Slide Rail Run the Tool Holder to the most outward position Using the Adjustment Set Screws apply a light force to the side of the Adjustable Slide Rail so that it is in positive contact with the Tool Holder Figure 6 Tool Holder Adjustment ...

Page 19: ...r Wrench should be about 2 to 5 ft lbs 3 to 7 N m Air Motor Lubrication No direct maintenance is normally required on the Air Motor However the air supply must flow through a filter regulator lubricator FRL unit or separate units before arriving at the motor The FRL unit must be maintained as required frequency dependent on the basic air supply to keep the water trap drained filter cleaned and the...

Page 20: ... Assy require a SAE 10 light machine oil for normal conditions and under dusty conditions a silicone graphite or molybdenum disulfide dry lubricant WARNING WARNING A light film of all purpose grease may be used but it must be checked for grit contamination frequently The Air Motor requires a Class 2 lubricant viscosity of 100 to 200 SSU at 100OF 38OC minimum aniline point of 200OF 93OC Tri Tool In...

Page 21: ... the pipe Installation of the Clamshell on an In Line Pipe Separate the two halves of the Clamshell Figure 8 Locking Screw Locations Disengage the Air Motor by removing the Motor Hold down Bolt and removing the Air Motor from the drive socket Rotate the Headstock until the split lines of the Headstock match the split lines of the Housing Unbolt the two halves of the Clamshell Two Locking Screws ar...

Page 22: ... Screws in the Housing and in the Headstock Tightening torque should be 35 to 40 ft lbs 47 to 54 N m If using Fixed Clamping Pads clamp the Clamshell to the pipe as follows if not go to If using fixed Clamping Pads P N See the following Tighten the Adjustable Pads lightly so that all four of the Clamping Pads contact the pipe Gently rock the Clamshell as you tighten the Adjustable Clamping Pads to...

Page 23: ... The Adjustable Pads tend to square the Clamshell to the pipe If additional precision in squaring is required consult Tri Tool about alternate methods of squaring Fine center the Clamshell as you would a 4 jaw check Take measurements from the pipe OD to the Housing ID or use a dial indicator to sweep around the pipes outside diameter Adjust the four Clamping Pads so that the measurements at opposi...

Page 24: ...ositions 2 3 4 5 6 Figure 11 Approach of the Feed Pin to the Feed Sprocket Figure 12 Dead Man Switch Warning WARNING WARNING DO NOT OVERIDE THE DEADMAN SWITCH Locking down obstructing or in any way defeating the deadman switch on this unit may result in serious injury ...

Page 25: ...Clamshell disengage the feed for 2 3 revolutions to clear the chip Then stop the Clamshell and remove the chips When the machine operation is finished turn off the Air Motor by closing the Throttle Control Valve CAUTION CAUTION In Line pipe stores energy When the pipe is severed the pipe may move To prevent accidents due to the spring in the pipe system be sure to secure the pipe on both sides of ...

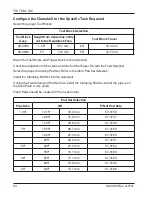
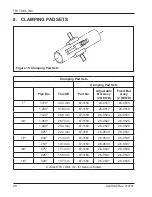
Page 26: ...Pin with the Feed Sprocket Select the proper Clamping Pad Set Refer to the table Pad Set Selection Install the Clamping Pad Set into the clamshell If using the Fixed Clamping Pad Set then install the Clamping Pad Set so that the pipe is on the fixed Pads or vice versa Fixed Pads should be located 90o from each other Pad Set Selection Pipe Size OD P N of Pad Sets 1 00 1 315 33 4 mm 67 3156 1 250 31...

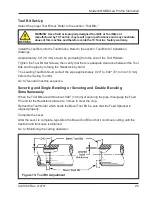
Page 27: ...there is adequate clearance between the Tool Bits and the pipe by rotating the Headstock by hand The Leading Tool Bit should contact the pipe approximately 020 to 040 51 mm to 1 0 mm before the Trailing Tool Bit Go to General machine sequence Severing and Single Beveling or Severing and Double Beveling Simultaneously When the Tool Bits are within about 040 1 0 mm of severing the pipe disengage the...

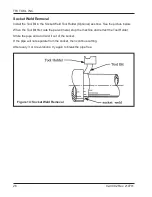
Page 28: ...See the picture below When the Tool Bit first cuts the parent metal stop the machine and retract the Tool Holder Strike the pipe end and twist it out of the socket If the pipe will not separate from the socket then continue cutting After every 3 or 4 revolutions try again to break the pipe free Figure 14 Socket Weld Removal ...

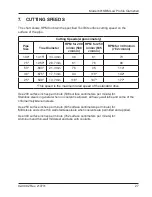
Page 29: ...114 38 675 17 1 mm 94 118 142 25 540 13 7 mm 118 147 177 This speed is the maximum rated speed of the standard drive Use 200 surface inches per minute 508 surface centimeters per minute for Stainless steels in general when no coolant is allowed all heavy wall tube and some of the chrome molybdenum steels Use 250 surface inches per minute 635 surface centimeters per minute for Mild steels and some ...

Page 30: ... 0515 1 250 31 8 mm 67 3157 26 0517 26 0519 1 125 28 6 mm 67 3158 26 0523 26 0521 3 4 1 050 26 7 mm 67 3159 26 0527 26 0525 1 000 25 4 mm 67 3160 26 0527 26 0529 875 22 2 mm 67 3161 26 0533 26 0531 1 2 840 21 3 mm 67 3162 26 0533 26 0535 750 19 1 mm 67 3163 26 0533 26 0537 3 8 675 17 1 mm 67 3164 26 0541 26 0539 625 15 9 mm 67 3165 26 0541 26 0543 1 4 540 13 7 mm 67 3166 26 0541 26 0545 Contact TR...

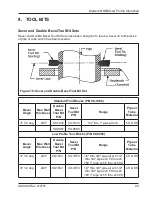
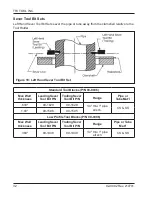
Page 31: ...ss Double Bevel Tool Bit P N Sever Tool Bit P N Range Pipe or Tube Material 37 1 2 deg 400 99 1632 99 1633 1 4 thru 1 pipe all sch CS SS 99 0987 99 0986 Low Profile Tool Blocks P N 08 0096 Bevel Angle Max Wall thickness Double Bevel Tool Bit P N Sever Tool Bit P N Range Pipe or Tube Material 37 1 2 deg 240 99 1952 99 1953 1 4 thru 3 8 pipe all sch 1 2 thru 3 4 pipe sch 5 thru sch 160 1 pipe sch 5 ...

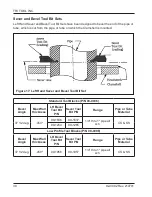
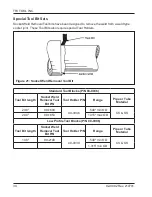
Page 32: ...ft Hand Sever and Bevel Tool Bit Set Standard Tool Blocks P N 08 0036 Bevel Angle Max Wall thickness LH Bevel Tool Bit P N Sever Tool Bit P N Range Pipe or Tube Material 37 1 2 deg 450 99 1636 99 1637 1 4 thru 1 pipe all sch CS SS 99 1264 99 1265 Low Profile Tool Blocks P N 08 0096 Bevel Angle Max Wall thickness LH Bevel Tool Bit P N Sever Tool Bit P N Range Pipe or Tube Material 37 1 2 deg 450 99...

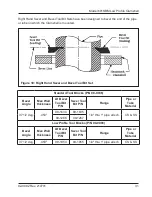
Page 33: ...vel Tool Bit Set Standard Tool Blocks P N 08 0036 Bevel Angle Max Wall thickness LH Bevel Tool Bit P N Sever Tool Bit P N Range Pipe or Tube Material 37 1 2 deg 450 99 1634 99 1635 1 4 thru 1 pipe all sch CS SS 99 1266 99 1267 Low Profile Tool Blocks P N 08 0096 Bevel Angle Max Wall thickness LH Bevel Tool Bit P N Sever Tool Bit P N Range Pipe or Tube Material 37 1 2 deg 450 99 1954 99 1955 1 4 th...

Page 34: ...it Set Standard Tool Blocks P N 08 0036 Max Wall thickness Leading Sever Tool Bit P N Trailing Sever Tool Bit P N Range Pipe or TubeMat l 630 99 1628 99 1629 1 4 thru 1 pipe all sch CS SS 1 00 99 1596 99 1595 Low Profile Tool Blocks P N 08 0096 Max Wall thickness Leading Sever Tool Bit P N Trailing Sever Tool Bit P N Range Pipe or Tube Mat l 380 99 1948 99 1949 1 4 thru 1 pipe all sch CS SS ...

Page 35: ... Bit Set Standard Tool Blocks P N 08 0036 Max Wall thickness Leading Sever Tool Bit P N Trailing Sever Tool Bit P N Range Pipe or TubeMat l 630 99 1630 99 1631 1 4 thru 1 pipe all sch CS SS 1 00 99 1597 99 1598 Low Profile Tool Blocks P N 08 0096 Max Wall thickness Leading Sever Tool Bit P N Trailing Sever Tool Bit P N Range Pipe or Tube Mat l 380 99 1950 99 1951 1 4 thru 1 pipe all sch CS SS ...

Page 36: ...igure 21 Socket Weld Removal Tool Bit Standard Tool Blocks P N 08 0036 Tool Bit length Socket Weld Removal Tool Bit P N Tool Holder P N Range Pipe or Tube Material 2 38 99 1600 49 0046 540 min OD CS SS 2 00 99 1853 1 315 max OD Low Profile Tool Blocks P N 08 0096 Tool Bit length Socket Weld Removal Tool Bit P N Tool Holder P N Range Pipe or Tube Material 1 38 99 2148 49 0039 540 min OD CS SS 1 315...

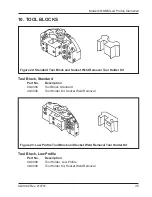
Page 37: ...val Tool Holder Kit Tool Block Standard Part No Description 08 0036 Tool Block Standard 49 0046 Tool Holder Kit Socket Weld Removal Figure 23 Low Profile Tool Block and Socket Weld Removal Tool Holder Kit Tool Block Low Profile Part No Description 08 0096 Tool Holder Low Profile 49 0039 Tool Holder Kit Socket Weld Removal ...

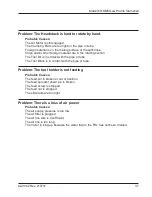
Page 38: ... There is scale or other foreign matter on the pipe or tube which is dulling the tool bit at the start of the cut The tool bit is incorrect for the material being cut Problem The surface finish is rough Probable Causes The tool bit is dull chipped etc Metal build up on the cutting edge of the tool bit is creating a false cutting edge Cutting fluid is required The cutting speed is incorrect Problem...

Page 39: ... contact with the pipe or tube The Tool Block is in contact with the pipe or tube Problem The tool holder is not feeding Probable Causes The feed pin is broken or out of position The feed sprocket shear pin is broken The feed screw is stripped The feed nut is stripped The slide rails are too tight Problem There is a loss of air power Probable Causes The air supply pressure is too low The air filte...

Page 40: ...obable Causes Incorrect tool blocks are installed Incorrect tool bit is installed Problem The Clamshell will not center on the pipe or tube Fixed Pads Probable Causes Incorrect Clamping Pad Set is installed Scale and or foreign material are present on the pipe or tube One of the Clamping Pads is on a seam The pipe or tube has an out of round condition or is oversized or undersized Problem The Air ...

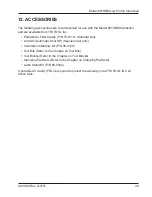
Page 41: ...Air Filter Caddy P N 75 0115 Standard Duty An ASO Automatic Shut Off Special order only Counterbore Module Kit P N 05 0128 Tool Bits Refer to the Chapter on Tool Bits Tool Blocks Refer to the Chapter on Tool Blocks Clamping Pad Sets Refer to the Chapter on Clamping Pad Sets Lathe Stand Kit P N 60 0042 A portable Air Caddy FRL is required to protect the warranty on all TRI TOOL INC air driven tools...

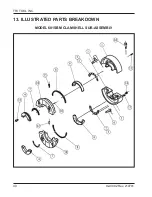
Page 42: ...TRI TOOL INC 92 0092 Rev 210701 40 13 ILLUSTRATED PARTS BREAKDOWN MODEL 601SBM CLAMSHELL SUB ASSEMBLY ...

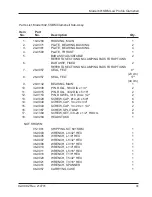
Page 43: ...G MAIN 1 10 32 0008 PIN ROLL 5 64 DIA x 1 4 2 11 32 0015 PIN ROLL 3 32 DIA x 5 16 2 12 32 0153 PIN DOWEL 3 16 DIA x 1 2 2 13 33 0029 SCREW CAP 10 24 x 5 8 6 14 33 0040 SCREW CAP 1 4 20 x 3 4 6 15 33 0043 SCREW CAP 1 4 20 x 1 1 4 2 16 33 1367 SCREW SPLITLINE 2 17 33 1369 SCREW SET 3 8 24 x 1 2 HDOG 8 18 39 0269 HEADSTOCK 1 NOT SHOWN 05 1081 SHIPPING KIT 601SBM 1 36 0003 WRENCH L 3 32 HEX 1 36 0005 ...

Page 44: ...TRI TOOL INC 92 0092 Rev 210701 42 HOUSING ASSY DRIVE P N 19 0285 5 1 2 4 7 9 8 6 3 ...

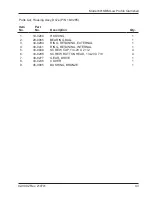
Page 45: ...5 Item No Part No Description Qty 1 19 0284 HOUSING 1 2 29 0065 BEARING BALL 1 3 30 0294 RING RETAINING EXTERNAL 1 4 30 0411 RING RETAINING INTERNAL 1 5 33 0048 SCREW CAP 1 4 20 X 2 1 2 4 6 33 0288 SCREW BUTTON HEAD 1 4 20 X 7 8 4 7 39 0277 GEAR DRIVE 1 8 43 0236 COVER 1 9 45 0095 BUSHING BRONZE 1 ...

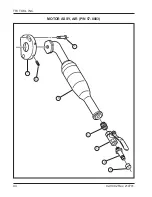
Page 46: ...TRI TOOL INC 92 0092 Rev 210701 44 MOTOR ASSY AIR P N 57 0083 5 4 2 3 8 1 6 7 ...

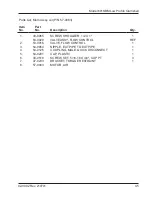
Page 47: ...ption Qty 1 33 0965 SCREW SHOULDER 1 2 X 1 1 53 0029 VALVE ASSY FLOW CONTROL REF 2 53 0016 VALVE FLOW CONTROL 1 3 54 0050 NIPPLE EXT PIPE TO EXT PIPE 1 4 54 0126 COUPLING MALE QUICK DISCONNECT 1 5 54 0201 CAP PLASTIC 1 6 33 0518 SCREW SET 5 16 18 X 3 4 CUP PT 3 7 47 0243 BRACKET TORQUE RESTRAINT 1 8 57 0043 MOTOR AIR ...

Page 48: ...TRI TOOL INC 92 0092 Rev 210701 46 TOOL BLOCK STANDARD P N 08 0036 2 7 6 10 11 12 13 8 3 4 5 9 9 1 ...

Page 49: ...1 4 20 X 1 1 4 4 3 33 0279 SCREW BUTTON HEAD 10 24 X 1 2 2 4 33 0639 SCREW SET 5 16 24 X 5 16 CUP PT 1 5 33 0642 SCREW SET 5 16 24 X 1 2 CUP PT 1 6 35 0176 NUT FEED 1 7 38 0052 SPROCKET ASSY 1 8 47 0235 BRACKET 1 9 48 0225 RAIL SLIDE 2 10 49 0020 HOLDER ASSY TOOL 1 11 33 0204 SCREW CAP 10 32 X 1 3 12 33 0500 SCREW SET 1 4 20 X 5 16 CUP PT 3 13 33 0505 SCREW SET 1 4 20 X 3 4 CUP PT 2 ...

Page 50: ...TRI TOOL INC 92 0092 Rev 210701 48 TOOL BLOCK LOW PROFILE P N 08 0096 1 7 9 8 5 3 2 11 6 4 3 10 ...

Page 51: ...SCREW CAP 10 24 X 3 8 2 2 33 0031 SCREW CAP 10 24 X 7 8 2 3 33 0040 SCREW CAP 1 4 20 X 3 4 4 4 33 0501 SCREW SET 1 4 20 X 3 8 CUP PT 2 5 33 1377 SCREW SET 1 4 28 X 3 8 HDOG 2 6 35 0149 NUT FEED 1 7 38 0058 SPROCKET ASSY 1 8 48 0237 BLOCK ADJUSTMENT 1 9 48 0238 BLOCK ADJUSTMENT SLIDE 1 10 48 0239 BLOCK FIXED SLIDE 1 11 48 0240 BLOCK TOOL MODULE 1 ...

Page 52: ... Item No Part No Description Qty 1 14 0138 SHAFT ASSY TRIPPER SB 1 2 24 3901 GUARD TRIPPER SB 1 3 30 0125 PLUNGER BALL 1 4 20 X 17 32 1 4 30 5686 LABEL HAND CRUSH TRIANGLE 1 5 33 0042 SCREW CAP 1 4 20 X 1 2 6 33 0278 SCREW BUTTON 10 24 X 3 8 4 7 33 1303 SCREW SHLDR 1 4 X 1 1 8 41 0246 LEVER HANDLE TRIPPER SB 1 9 47 2387 BLOCK TRIPPER 1 ...

Page 53: ...DED SPARES Recommended Spares for the Low Profile Clamshell Item No Part No Description Qty 1 14 0138 SHAFT ASSY 2 2 32 0126 PIN FEED SPROCKET 2 3 33 0040 SCREW CAP 1 4 20 X 3 4 8 4 33 0043 SCREW CAP 1 4 20 X 1 1 4 4 5 33 0965 SCREW SHOULDER 1 6 38 0023 SPROCKET FEED 2 ...

Page 54: ...THIS PAGE INTENTIONALLY LEFT BLANK ...

Page 55: ......

Page 56: ...ous injury Never lock or tie down any safety triggers SHOCK HAZARD Ensure that the equipment is properly installed and grounded Ensure that the equipment is not damaged and that the power cord is intact Tool bits are sharp and can cause serious injury Do not defeat or modify safety features Disconnect power sources before servicing or moving the equipment Remove all loose articles of clothing and ...

Reviews: