background image

4

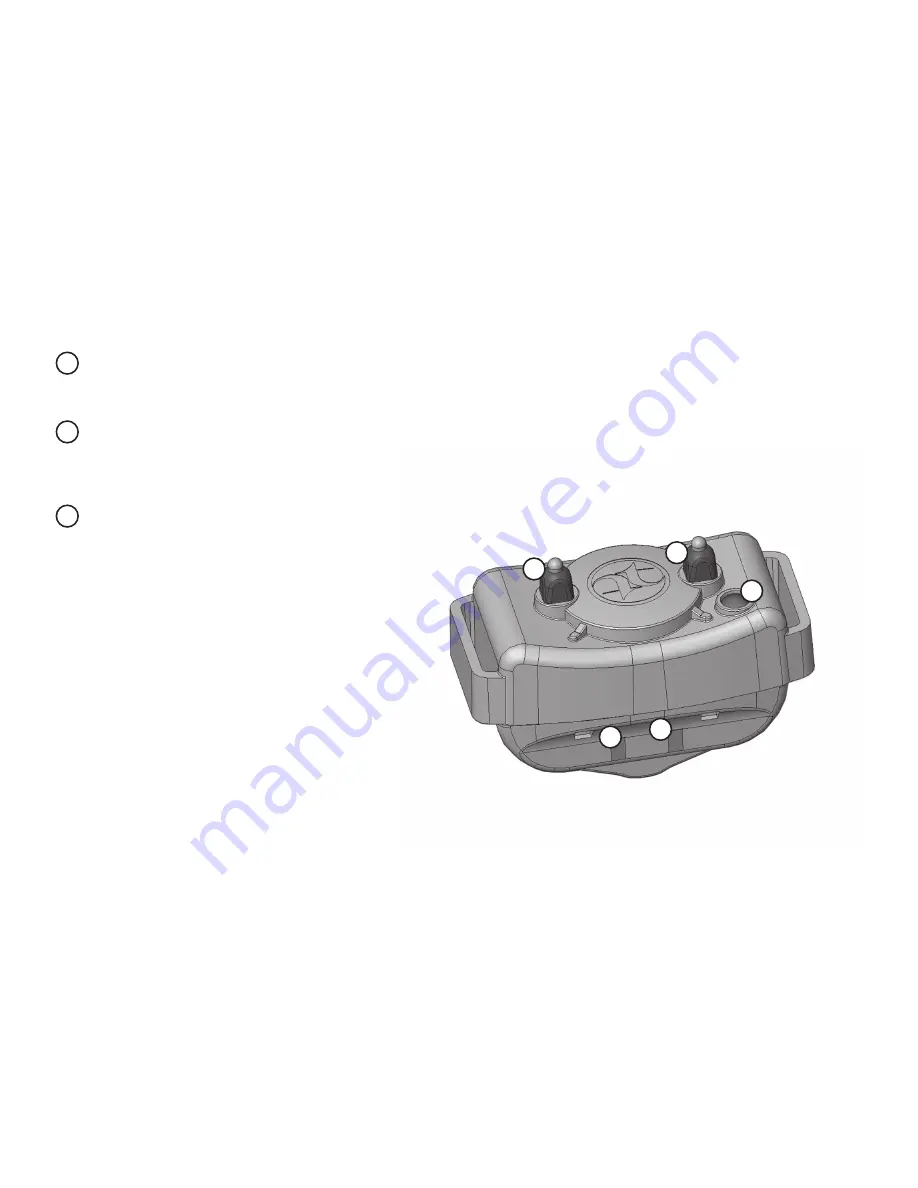
Contact Points

The Tri-Tronics patented insulated contact points ensure consistent stimulation under all conditions.

Choose short or long points to match the dog’s coat type.  (See the section “Fitting the Collar on the Dog” on page 29.)

Collar On/Off Button

Press to switch the collar on. Two confirming tones will sound and the collar light will flash periodically while the collar is on.  

Press to switch the collar off. One long tone will sound and the light will stop flashing.  Switch the collar off when not in use 

to conserve batteries.

Charging Contacts

Place the receiver in the supplied cradle to charge. 

Discharged batteries will take only two hours to fully 

recharge with the exclusive Tri-Tronics charging system.

NOTE:  CHARGE RECEIvER BEFORE FIRST USE.

D

E

F

F

F

E

D

D

Summary of Contents for Classic 70 G3 EXP

Page 1: ......

Page 2: ...ers for your Tri Tronics Remote Trainer We can be reached via email at support tritronics com or by calling toll free 1 800 456 4343 or visit our website at www tritronics com Thank you for choosing Tri Tronics Models Covered Classic 70 G3 Classic 70 G3 EXP Field 90 G3 EXP Flyway G3 EXP Upland Special G3 EXP Trashbreaker G3 EXP Pro 100 G3 EXP Pro 200 G3 EXP Pro 500 G3 EXP Sport Basic G3 Sport Comb...

Page 3: ...7844 7000570 6928958 7187291 7198009 7252051 D520894 D531584 D553037 and patents pending Canada patent numbers D 105795 2456603 2456431 2456876 2456852 2456425 2456433 2456879 Owner s Registration Reply Card Please take a moment to complete and return the Owner s Registration Reply Card When you do you ll be on file at Tri Tron ics This will help ensure timely warranty work should you need it You ...

Page 4: ...NG THE BATTERIES 26 28 FITTING THE COLLAR ON THE DOG 29 STIMULATION OVERVIEW 30 STIMULATION CONTINUOUS MOMENTARY 31 RANGE 31 TRI TRONICS BEEPER 32 36 REPLACING BATTERIES 37 CARE AND CLEANING 38 RADIO SIGNAL ISSUES 38 FCC COMPLIANCE 38 TROUBLESHOOTING GUIDE 39 43 BASIC TRAINING INTRODUCTION 44 E COLLAR BASICS 44 BASIC TRAINING 45 48 ...

Page 5: ...our fingers off the antenna Tone or Beeper Control Button Activates the no stimulation signal tone of the following models Field 90 G3 EXP Flyway G3 EXP Pro 100 G3 EXP Pro 200 G3 EXP and Pro 500 G3 EXP Switches Beeper on and off on the Upland Special and controls the TracerTM light settings Note Tone on the Classic 70 Trashbreaker and Upland Special is activated by pressing any stimulation button ...

Page 6: ...reen when the batteries are fully charged Steady amber when the batteries are partly discharged Steady red when the batteries need charging very soon Rapid red flashing means the batteries are completely dead and the transmitter will not operate the collar Intensity and Stimulation Indicator This light is the position indicator for the selected operational setting or intensity level It flashes as ...

Page 7: ...the light to register the battery charge level Collar Strap Retaining Loops Belt Loops The receiver has three belt loops for secure collar strap attachment and retention with no gap Do not use the collar strap belt loops for attaching a leash They are not designed for this use Battery Pack Access Screws Remove these two screws to remove the battery pack for replacement Position the new pack in pla...

Page 8: ... Two confirming tones will sound and the collar light will flash periodically while the collar is on Press to switch the collar off One long tone will sound and the light will stop flashing Switch the collar off when not in use to conserve batteries Charging Contacts Place the receiver in the supplied cradle to charge Discharged batteries will take only two hours to fully recharge with the exclusi...

Page 9: ... setting on intensity dial for tone Set the dial to T and press any stimulation button to produce the tone signal instead of stimulation A setting on intensity dial for Beeper or Tracer accessory Set the dial to A and press any stimulation button to activate a Tri Tronics Beeper or TracerTM accessory if installed 1 mile range on Classic 70 2 mile range on Trashbreaker ...

Page 10: ...6 ...

Page 11: ... strap included with system Receiver matched at factory to black position on dog selection switch A setting on intensity dial for Beeper or Tracer Set the dial to A and press any stimulation button to activate a Tri Tronics Beeper or TracerTM accessory if installed N neutral setting on intensity dial transmitter buttons will not function ...

Page 12: ...8 ...

Page 13: ...s 1 black collar strap included with system Receiver matched at factory to black position on dog selection switch A setting on intensity dial for Beeper and TracerTM Set the dial to A and press any stimulation button to activate a Tri Tronics Beeper or TracerTM if installed N neutral setting on intensity dial transmitter buttons will not function ...

Page 14: ...10 ...

Page 15: ...gs 1 black collar strap included with system Receiver matched at factory to black position on dog selection switch A setting on intensity dial for Beeper and TracerTM Set the dial to A and press any stimulation button to activate a Tri Tronics Beeper or TracerTM if installed N neutral setting on intensity dial transmitter buttons will not function ...

Page 16: ...12 ...

Page 17: ...s 1 black collar strap included with system Receiver matched at factory to black position on dog selection switch A setting on intensity dial for Beeper and TracerTM Set the dial to A and press any stimulation button to activate a Tri Tronics Beeper or TracerTM if installed N neutral setting on intensity dial transmitter buttons will not function ...

Page 18: ...14 ...

Page 19: ...rain up to 3 dogs 1 black collar strap included with system Receiver matched at factory to black position on dog selection switch A setting on intensity dial for Beeper and TracerTM Set the dial to A and press any stimulation button to activate a Tri Tronics Beeper or TracerTM if installed N neutral setting on intensity dial transmitter buttons will not function ...

Page 20: ...16 ...

Page 21: ...ation Train up to 3 dogs 1 orange collar strap included with system Receiver matched at factory to orange position on dog selection switch T setting on intensity dial for Tone Set the dial to T and press any stimulation button to activate a tone signal N neutral setting on intensity dial transmitter buttons will not function ...

Page 22: ...18 ...

Page 23: ...hree way dog selection switch Black red and blue positions Your transmitter is capable of training up to three dogs with the addition of accessory EXP receivers available at www tritronics com or 1 800 456 4343 The black collar strap is included with your original purchase Your system will come with the receiver matched to the black position of the dog selection switch 10 levels of continuous stim...

Page 24: ...with the receiver matched to the black position of the dog selection switch Three way mode selection switch Up to 20 levels of continuous stimulation up to 20 levels of momentary stimulation N neutral setting When the intensity dial is set on N transmitter buttons do not function Sport Combo G3 Mode Chart Mode switch in DOWN position Upper button No stimulation tone Middle button Continuous Lower ...

Page 25: ...ing up to three dogs with the addition of accessory EXP receivers available at www tritronics com or 1 800 456 4343 The orange collar strap is included with your original purchase Your system will come with the receiver matched to the orange position of the dog selection switch 10 levels of continuous stimulation 10 levels of momentary stimulation N neutral setting When the intensity dial is set o...

Page 26: ...ty dial 10 levels dots between levels indicate half steps Top button Dog selection dial Dog 1 2 or 3 Middle button Bottom button Lanyard attachment point Multi function selection switch See Model Guide for button function on your model B C A D E F G H B C A D E H I I F G ...

Page 27: ...kes it easy for you to replace a lost collar if necessary Simply purchase additional EXP receivers with collar straps and add them to your system You can have a multi dog Remote Trainer when you need one with the simple addition of another receiver at any time In addition the Beeper and Tracer light accessories can be added at any time Additional collar straps in various colors receivers and acces...

Page 28: ...ton then press and hold a continuous transmitter button both buttons down for about 5 seconds until you hear two quick beeps ignore the long beep that sounds right away Release both buttons Receiver will now be set to match your transmitter and will be switched off Check for a successful match by switching receiver back on and pressing a continuous transmitter button The receiver light will switch...

Page 29: ...n matched to its transmitter until matched to a different compatible transmitter by following the Adding a Receiver steps Backwards Compatibility All G3 transmitter models are backward compatible with all Tri Tronics receivers that have three belt loops and display the EXP symbol on the LED side of the receiver If you have questions please call our Customer Service Department for advice at 1 800 4...

Page 30: ...cord into the charging cradle Insert the receiver into the cradle so that the receiver charging contacts line up with the cradle charging contacts There will be a positive snap feel when the receiver locks into the cradle correctly Do not charge batteries in especially hot areas such as inside a vehicle Keep the vents on both sides of the charging cradle free of dirt and debris Do not block the ve...

Page 31: ... temperature Allow cold batteries to reach room temperature before charging If the receiver charging contacts are very dirty wash the receiver with clean water and dry thoroughly before charging so that good contact with the charger can be made If the unit is in storage recharge every four months and recharge prior to use Important If the charging cradle light blinks red slowly when the receiver i...

Page 32: ...left on charge If the transmitter light is off power has been interrupted the transmitter is not properly seated in the adaptor or there is no Transmitter on the adaptor When the Field and Pro series charging adaptor is attached to the transmitter body there will be a positive snap feel when the Transmitter locks into the adapter correctly Note that the Sport G3 model transmitters are not recharge...

Page 33: ... the strap as you tighten it Slip the free end of the strap through any D ring or keeper that is present and through both sides of a double sided buckle You can easily adjust the strap for different sized necks by moving the receiver to a new position on the strap If the strap is too long for your dog cut off the excess length Leave enough length to go through the D ring or keeper with at least 3 ...

Page 34: ...l level on the Sport Combo G3 depending upon mode selected and on all Field Pro G3 Series models other than the Classic 70 Trashbreaker and Field 90 Some models allow multi button control only for continuous stimulation some allow it only for momentary stimulation and some allow it for both types of stimulation Note See the Model Guide Section beginning on page 5 for the exact button functions of ...

Page 35: ...ons Momentary Stimulation The duration of momentary stimulation is pre set Momentary stays on only briefly no matter how long the transmitter button is pressed To produce a series of momentary corrections press the momentary button repeatedly RANGE The Trashbreaker G3 has a range of up to two miles All other Field Pro G3 Series models have a range of up to one mile All Sport G3 models have a range...

Page 36: ...n ditions If you purchased a Sport Upland G3 or Upland Special G3 your transmitter has one button specifically for switching the Beeper on and off If you purchased any other Field or Pro G3 series model you can use any transmitter button to switch the Beeper on or when your transmitter dial is set on A If you purchased a Sport Basic G3 or Sport Combo G3 you cannot switch your Beeper on or off from...

Page 37: ...er for the Beeper to operate Press the round power switch located on the rear surface of the Beeper You will hear two tones and the Beeper light will begin flashing The Beeper will begin beeping as soon as its power is switched on If you want to silence it until you begin hunting use the remote switch on off feature see next section To save Beeper battery life switch the Beeper power switch off af...

Page 38: ...Tone You may select one of four tones as your run tone When the Beeper is set on range point mode you will hear the run tone every 5 seconds while the dog is hunting Your hearing and your personal preference will determine which run tone you prefer You can distinguish among several dogs hunting at the same time by setting each dog s Beeper on a different run tone The tracking tone reflects some of...

Page 39: ...n their positions are changed Replace the battery compartment cover when done Low High Range Point Point Only Single Beep Double Beep Triple Beep Tracking Tone Single Tone Hawk Scream Modes Run Tones Point Tones Volume Switch Changing Beeper Settings Remove Battery Compartment Cover Hold the Beeper upside down and unscrew the four Phillips head screws on the bottom of the Beeper Slide the battery ...

Page 40: ...a beeper at least 20 yards away from the dog s kennel and let the dog listen to it beeping for several hours before you put it on to hunt Beeper Care and Maintenance Remove the Beeper from the collar strap for thorough cleaning You can wipe the Beeper with a damp cloth and mild detergent if desired Do not use any solvents as they can cause damage Do not submerge the Beeper when cleaning it Dirt an...

Page 41: ...y Never force a battery into this compartment Replace the battery cover and tighten the screws do not over tighten Check for function by switching the Beeper on or by pressing a button on the transmitter while you watch the transmitter indicator light If there is no function you may have installed the battery backwards If so take it out and switch it around Field and Pro Series G3 Transmitter Your...

Page 42: ...ould be unintentionally set off by someone else with a Tri Tronics product Please contact our Customer Service Department at support tritronics com or 1 800 456 4343 with any questions FCC COMPLIANCE The manufacturing of Tri Tronics remote trainers involves exacting production methods precise tuning and stringent quality control tests In addition these products are manufactured to operate within F...

Page 43: ...ff while training evidence of low batteries For best performance during winter months follow these guidelines 1 Keep the unit at room temperature when it is not being used Do not store overnight in unheated areas such as vehicles sheds or garages When traveling transport your Remote Trainer in the passenger cab not in the back of the truck 2 Charge the unit at room temperature If the unit is cold ...

Page 44: ...ched transmitters Problem 2 The Remote Trainer doesn t have range or the range has been significantly reduced Either you or the dog is shielded by a metal structure Metal fences chain link dog enclosures screen doors buildings and other metal structures can affect the radio signal Operate the Remote Trainer away from these structures The receiver is on backwards For best range position the receive...

Page 45: ...eceiver again even if the light is green Problem 5 The receiver deactivates itself while training The batteries have run down The receiver light may require up to 20 seconds to register low batteries after you switch the unit on Check the receiver after 20 seconds to see if the low battery indicator is on You normally can complete a training session after the low battery indicator flashes but not ...

Page 46: ...ry life Use only Duracell or Eveready 9 volt batteries Other brands may not fit correctly Loose battery connection Gently pull the metal tabs in the Beeper battery compartment to hold the 9 volt battery more firmly Beeper Problem 2 Pressing the Beeper control button on the transmitter does not switch the Beeper on or off The Beeper power switch is off Switch the Beeper power switch on The receiver...

Page 47: ... determine if it can operate a Tri Tronics Beeper remotely or call our Customer Service Department at 1 800 456 4343 Beeper Problem 3 The Beeper sound quality has become muffled or distorted Dirt or debris has become trapped in the horn Remove trapped debris as described in the Care and Maintenance section Beeper Problem 4 The Beeper light is on but the Beeper isn t working The Beeper battery is g...

Page 48: ...d then be pulled snug so the contact points of the receiver make good contact with the dog s skin The collar should ride snugly in place high on the dog s neck Check contact points regularly for tightness Use only the Tri Tronics plastic wrench to remove or tighten the contact points and do not over tighten Choosing the Correct Intensity Level Selecting the intensity suitable for training your dog...

Page 49: ...it Stay After the dog has begun to grasp the concept of walking at heel on lead it is time to introduce the Sit Stay command The actual command is Sit and the Stay is implied In other words when you tell the dog to sit he should stay until you indicate other wise You should begin training this command with the dog walking on lead in the heel position Then simply stop pull up on the leash and tell ...

Page 50: ...ore quickly As the dog becomes more responsive you should begin to stimulate intermittently at times giving the dog a freebie This will help keep the dog s attitude upbeat and let you know that the dog is responding to the command rather than just the collar Remember that if the dog doesn t respond to the stimulation level you have selected switch it up one level at a time until you achieve the ap...

Page 51: ... time tug on the line and press a stimulation button briefly to help the dog move toward you Be sure to reward the dog with lots of praise whenever he comes after being called As with the other commands you can start to introduce distractions as the dog s proficiency increases Cautionary note Teaching this command may be a little confusing to the dog at first After all in earlier training he got c...

Page 52: ...r the collar until you feel certain that it is no longer needed to reinforce known commands Abandoning the collar too early can lead to problems in the future Remembering to be fair and consistent in using the collar as a training tool will help you avoid most problems and it will allow you to help your dog reach his full potential ...

Page 53: ...49 ...

Reviews: