background image

Prestige SOLO 399

Burner Mounting Plate Kit

7

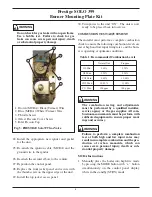
The  combustion  chamber  insulation  con-

tains ceramic fibers, which are classified as

a possible human carcinogen. When

exposed to extremely high temperatures,

the ceramic fibers, which contain crys-

talline silica, can be converted into cristo-

balite.

Avoid  Breathing  and  Contact  with  Skin  and

Eyes

When  removing  or  repairing  the  combustion

chamber insulation follow these precaution mea-

sures:
1. Use  a  NIOSH  approved  respirator  which

meets  OSHA  requirements  for  cristobalite

dust, similar to N95. Contact NIOSH at:

1-800-356-4676  or  on  the  web  at

www.cdc.gov/niosh for latest recommendations.

2. Wear  long  sleeved,  loose  fitting  clothing,

gloves and eyes protection.

3. Assure adequate ventilation.
4. Wash with soap and water after contact.
5. Wash  potentially  contaminated  clothes  sepa-

rately  from  other  laundry  and  rinse  washing

machine thoroughly.

6. Discard used insulation in an air tight plastic

bag.

Niosh Stated First Aid:

Eye/Skin: Immediately irrigate

Breathing: Clean fresh air

WARNING

Handling of Previously Fired Combustion Chamber Insulation

Revised 3/4/15

2015-02 Solo 399 Burner Mounting Plate Kit

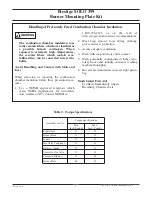
Table 2:  Torque Specifications

Assembly Screws

Torque Specifications

Min. 

Inch- Pounds

Max. 

Inch- Pounds

Sight Glass

11

13

Burner Head

27

31

Igniter

27

31

Gas Valve Couplings

27

31

Blower - Outlet

27

31

Venturi to Gas Valve

31

35

Venturi to Blower

31

35

Burner Plate

44

59

Summary of Contents for PSRKIT39

Page 1: ...rdous situation which if ignored can result in serious injury or substantial property damage For your safety turn off electrical power supply at service panel and allow unit to cool before proceeding...

Page 2: ...ors from the blower and remove the blower retaining nuts Remove the blower with venturi and gas valve from the unit 11 Remove the 10 mm nuts and remove the burn er mounting plate assembly from the hea...

Page 3: ...g nuts are in place use a wrench to tighten using an alternating pattern until the gasket is slightly compressed See Table 2 page 7 for torque specifications 21 Re assemble the blower onto the burner...

Page 4: ...is operating at optimum conditions The combustion testing and adjustments must be performed by a qualified installer service agency or the gas supplier All com bustion measurements must be perform wit...

Page 5: ...wrench see Fig 5 as follows Counter clockwise adjustment of OFFSET SCREW at Low Fire O2 increases and CO2 decreases Clockwise adjustment of OFFSET SCREW at Low Fire O2 decreases and CO2 increases 5 P...

Page 6: ...mbustion level is set at high fire manually place the boiler into low fire mode by pressing the LEFT button to adjust firing rate down to 1 low fire 8 If the CO2 combustion level at low fire is not wi...

Page 7: ...for latest recommendations 2 Wear long sleeved loose fitting clothing gloves and eyes protection 3 Assure adequate ventilation 4 Wash with soap and water after contact 5 Wash potentially contaminated...

Reviews: