background image

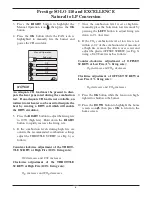
Prestige SOLO 110 and EXCELLENCE

Natural to LP Conversion

1

Kit Part Numbers: PSRKIT65
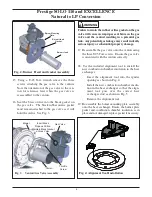
Parts List 

1. Burner Head - KNIT Style

2. Burner Head Gasket

3. Stainless Steel Phillips Screws.  (For attaching the

new burner head to the burner mounting plate.)

4. PS 110 LP Orifice 0.203

5. T-25 Torx Wrench

6. Conversion Label

7. Rating Label

8. Combustion Chamber Insulation

9. Insulation Alignment Tool

Recommended tools:

A. Pipe Wrench.

B. Phillips Screw Driver.

C. 10 mm Socket and/or 10 mm Open Ended

Wrench and/or Adjustable Wrench.

D. Flat Blade Putty Knife.

Indicates  a  potentially  hazardous  situation

which,  if  ignored,  can  result  in  serious

injury or substantial property damage.

For  your  safety,  turn  off  electrical  power

supply at service panel  and allow unit to cool

before proceeding.  Failure to do so can cause

severe personal injury or death.  

Indicates  special  instructions  on  installa-

tion,  operation  or  maintenance,  which  are

important  to  equipment  but  not  related  to

personal injury hazards.

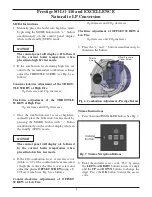
Failure  to  follow  instructions  below  can

result in severe personal injury or damage if

ignored.
• Instructions are for a qualified installer/

service technician.

• Read all instructions before proceeding.

• Follow instructions in proper order.

WARNING

WARNING

NOTICE

WARNING

Summary of Contents for PSRKIT65

Page 1: ...lade Putty Knife Indicates a potentially hazardous situation which if ignored can result in serious injury or substantial property damage For your safety turn off electrical power supply at service panel and allow unit to cool before proceeding Failure to do so can cause severe personal injury or death Indicates special instructions on installa tion operation or maintenance which are important to ...

Page 2: ...tion cable from the igniter MCBA and remove the ground wire at the igniter To ease the removal of the burner assembly remove the top jacket access panel 10 Disconnect the wiring harness connectors from the blower and remove the blower retaining screws Remove the blower with venturi and gas valve from the unit 11 Remove the 10 mm nuts and remove the burn er mounting plate assembly from the heat exc...

Page 3: ...o the venturi using the three T 25 Torx screws Ensure the gas valve is orientated with the venturi correctly 18 Use the included alignment tool to install the new combustion chamber insulation in the heat exchanger Insert the alignment tool into the igniter opening as shown in Fig 4 Install the new combustion chamber insula tion in the heat exchanger so that the align ment tool goes over the corre...

Page 4: ...lure to check for gas leaks can cause severe personal injury death or substantial property damage 24 Re attach the ignition cable MCBA and the ground wire to the ignitor 25 Reattach the air inlet elbow to the venturi 26 Reposition the control panel 27 Replace the front jacket panel and secure with the thumb screw on the upper edge of the unit 28 Install the top jacket access panel 29 Turn power to...

Page 5: ... The control panel will display a L followed by the current boiler temperature when placed into low fire test mode 4 If the CO2 combustion level at low fire is not within 0 2 of the combustion level measured at high fire remove the offset cover screw and adjust the plastic OFFSET SCREW using a T 40 Torx wrench see Fig 6 as follows Counter clockwise adjustment of OFFSET SCREW at Low Fire O2 increas...

Page 6: ...nt of the THROT TLE SCREW at High Fire 100 firing rate O2 decreases and C02 increases Clockwise adjustment of the THROTTLE SCREW at High Fire 100 firing rate O2 increases and CO2 decreases 7 Once the combustion level is set at high fire manually place the boiler into low fire mode by pressing the LEFT button to adjust firing rate down to 1 low fire 8 If the CO2 combustion level at low fire is not ...

Page 7: ...h for latest recommendations 2 Wear long sleeved loose fitting clothing gloves and eyes protection 3 Assure adequate ventilation 4 Wash with soap and water after contact 5 Wash potentially contaminated clothes sepa rately from other laundry and rinse washing machine thoroughly 6 Discard used insulation in an air tight plastic bag Niosh Stated First Aid Eye Skin Immediately irrigate Breathing Clean...

Reviews: