EN
3
Installation:
First rule in any Multiswitch installation are: NEVER use a too small size satellite Dish, and
NEVER use the compromise of a dual mount LNB for a multi satellite position reception on one Dish.
Correct Dish size for each position ensures sufficient reserves in bad weather conditions and the best
possible C/N for the rest of the installation. Making compromises here CANNOT be fixed later in the
network by adding Amplifiers!
A High Gain LNB only gives more Signal Level, but not Signal Quality. That only comes from Dish Size!
Mount the multi switch only indoor on a vertical dry surface using the available screw holes and ‘feets’.
Make sure that no supply voltage is available on the connection cables during installation. (Temporarily
turn off satellite receivers and/or their LNB supply).
Mount suitable F-connectors on the coax cable going to the satellite receivers and connect them
individually to a multi switch subscriber output (6, 8 to 32 outputs dependent on type). Recommended
maximum cable length from switch to receiver is typically 25-35 meters (6-7mm Ø) depending upon
cable type and quality and satellite receiver.
Mount suitable F-connectors on the coax cable coming from the LNB units (or another cascaded
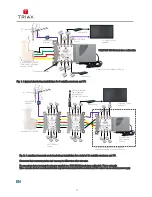
Multiswitch unit). Connect them to the correct inputs of the multi switch. Observe correct colour coding.
Double-check that correct SAT polarities are connected to correct multiswitch inputs.
Preferably use a suitable outlet socket in the apartment at the satellite receiver to separate the terrestrial
RF and satellite SAT-IF signals (e.g.: TOU 01S, EDA 302 F). NOTE: The SAT outlet must have DC a pass.
Outputs not in use on the multiswitch should be terminated with DC-blocked 75 ohm terminators.
DC supply for LNBs and/or Line Amplifier(s) can be done via the built-in PSU (P-EU and A-EU versions)
and can be done by attaching an external power supply to any of the TMS 5XX CE cascade units.
Cascade switches can also take DC Supply from the trunk lines if a PSU is connected elsewhere in the
trunk. DC is only needed for an active TER path, the SAT path is always DC sourced by the STB.
Please consider and calculate total system power consumption requirements and add Power supplies
as needed. DC-blockers may need to be inserted to avoid power supply conflicts.
REMEMBER: if you mount two or more power supplies in parallel to the same lines, in different positions
throughout the building, the one that delivers just 0,1VDC more than the other, WILL SUPPLY ALL
current, the other nothing! Therefor mounting DC blockers between them is necessary and critical.
ONLY apply mains power to the installation power supply(es) when all connections are done and you are
sure there are no short circuits present on the coax cables (use a multi-meter to check and verify that).
Satellite receivers can now be connected, turned on and set up. System is ready for use.
BEWARE: A high Signal Level does not guarantee the digital quality of your signal! Make sure to use a
suitable quality Field Strength Measurement Instrument that lets you keep track of, and ensure suitable
Signal Level, C/N, BER and MER Levels throughout the network.
If additional signals are required in the distribution network, you need to make sure that no signals (such
as MoCA or DOCSIS) are using the 950-2150Mhz SAT-IF range, which must be kept free for satellite.
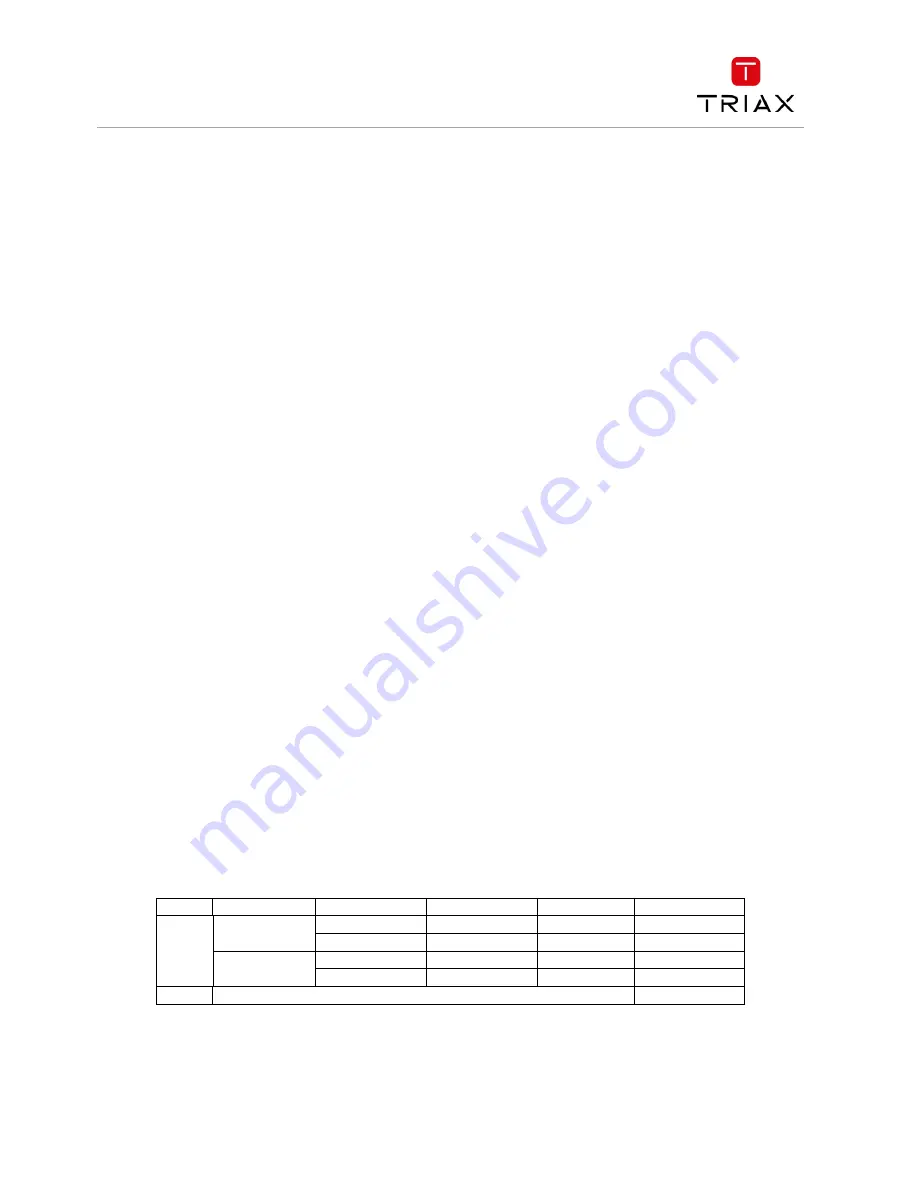
Multiswitch colour coding layout for LNB inputs and outputs:
Type
BAND
Polarity
Switch voltage
Switch freq.
Colour coding
SAT
High Band
Horisontal
18 V DC
22 kHz
Yellow
Vertical
13 V DC
22 kHz
Red
Low Band
Horisontal
18 V DC
0 kHz
Green
Vertical
13 V DC
0 kHz
Black
TER
NA
White


