background image

9

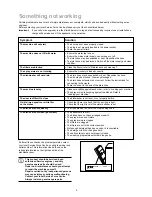
Something not working

Certain problems are due to lack of simple maintenance or oversights, which can be solved easily without calling out an
engineer. 
Before contacting your local Service Force Centre, please carry out the checks listed below.

Important:

If you call out an engineer to a fault listed below or to repair a fault caused by incorrect use or installation a 
charge will be made even if the appliance is in guarantee.

Symptom

Solution

The machine will not start 

The door has not been properly closed.

The plug is not properly inserted in the power socket.

There is a power failure.

The machine does not fill with water

Ensure the water tap is open.

Ensure the mains water supply has not been cut off.

The inlet hose may be squashed or bent. Reposition the hose.

The inlet hose may be blocked. Switch off the water supply and clean 
the filter.

The filters are blocked

Clean the filters (refer to "Maintenance and cleaning").

The spray arms are not rotating

Ensure the crockery is loaded correctly.

The dishwasher will not drain

The drain hose may be squashed or bent. Reposition the hose.

The sink may be blocked. Clear any blockages.

The drain hose extension is not correct. Follow the instructions for 
connecting to the waste.

There is no vent in the end of the drain hose.

The machine is noisy

Dishes are rattling against each other, refer to “Loading your machine”.

The spray arms are knocking against the dishes. Refer to 
"Loading your machine".

The door is difficult to close 

The dishwasher is not level, or not properly built-in.

Visible lime deposits or white film

Check that there is salt and that the salt cap is tight.

on the dishes

Check that the right level of the water softener is set.

The dishes are not quite dry

The rinse aid has run out or too little is being used.

The dishes are not clean (poor wash)

The baskets are too full.

The dishes have not been arranged properly.

The spray arms do not rotate

The spray arms are clogged.

The filters are clogged.

The filters are not in the correct position.

Not enough detergent has been used or it is unsuitable.

The detergent is old or has gone hard.

The salt container cap is not properly closed.

The washing programme selected is too gentle.

If after all these checks, the problem persists, contact
your local Service Force Centre, quoting the model and
serial number. This information can be found on the
rating plate located on the right hand side of the
dishwasher door.

This product should be serviced by an 
authorised Service engineer, and only 
genuine spare parts should be used. 
Under no circumstances should you attempt 
to repair the machine yourself. 
Repairs carried out by inexperienced persons 
may cause injury or serious malfunctioning. 
Contact your local Service Force Centre. 
Always insist on genuine spare parts.

Prod.No. ........ Ser. No. .........

Mod. ........

RA01

Summary of Contents for DH 102 D

Page 1: ...Dishwasher DH 102 INSTRUCTION BOOK ...

Page 2: ...evelling spacers 3 Upper basket stop 4 Salt container 5 Large filter 6 Detergent dispenser 7 Control panel 8 Rating plate 9 Rinse aid dispenser 10 Central filter 11 Lower spray arm 12 Upper spray arm 13 Upper basket 14 Worktop 1 2 3 4 5 6 7 8 9 10 11 12 13 14 IN68 ...

Page 3: ... guide 4 Door handle 5 Programme marker 6 Programme selector dial 7 Programme sequence indicator As the programme progresses the programme selector dial turns to show the phase in the wash programme the appliance has reached Prewash Rinse and Hold Wash Cold rinse Hot rinse Drying ...

Page 4: ... description POWER WASH NORMAL WASH ECO WASH RINSE HOLD Cold prewash Main wash up to 65 C 1 cold rinse 1 hot rinse Drying Main wash up to 65 C 1 cold rinse 1 hot rinse Drying Main wash up to 65 C 1 cold rinse 1 hot rinse 1 cold rinse to avoid food scraps from sticking together Testing programme for EN 50242 see Hints for Test Centres This is a special programme for quick washing a full load of lig...

Page 5: ...l come on and the machine will start If you wish to interrupt the washing programme at any time open the door and press this button again 9 At the end of the washing programme At the end of the programme the dishwasher will automatically stop 10 Switch off the dishwasher Switch off the dishwasher by pressing the On Off push button Wait 15 20 minutes before opening the dishwasher s door in this way...

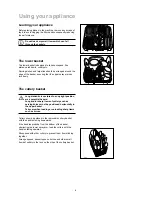
Page 6: ...ed knives stored in an upright position are a potential hazard Long and or sharp items of cutlery such as carving knives must be positioned horizontally in the upper basket Take care when loading or unloading sharp items such as knives Cutlery should be placed in the removable cutlery basket with the handles facing downwards If the handles protrude from the bottom of the basket obstructing the low...

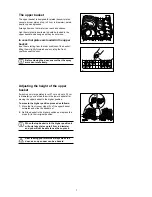
Page 7: ...r ensure that the spray arms can rotate freely Adjusting the height of the upper basket If washing very large plates over 27 cm and up to 32 cm in diameter you can load them in the lower basket after moving the upper basket to the higher position To move to the higher position proceed as follows 1 Move the front runner stops A of the upper basket outwards and slide the basket out 2 Refit the baske...

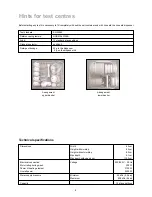
Page 8: ...inimum 50 kPa 0 5 bar Maximum 800 kPa 8 bar Capacity 12 place settings Technical specifications 8 Hints for test centres Before starting any test it is necessary to fill completely with salt the salt container and with rinse aid the rinse aid dispenser Test standard EN 50242 Reference programme NORMAL WASH Load 12 standard place settings Rinse aid selector position 5 Detergent dosage 25 g in the d...

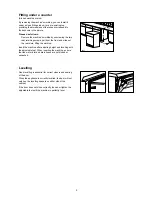
Page 9: ...ut the rear slots lifting the worktop Insert the machine after adjusting height and levelling with the adjustable feet When inserting the machine ensure that the water inlet and drain hoses are not kinked or squashed Levelling Good levelling is essential for correct closure and sealing of the door When the appliance is correctly levelled the door will not catch on the levelling spacers on either s...

Page 10: ...olux Group The world s No 1 choice The Electrolux Group is the world s largest producer of powered appliances for kitchen cleaning and outdoor use More than 55 million Electrolux Group products such as refrigerators cookers vacuum cleaners chain saws and lawn mowers are sold each year to a value of approx 14 billion USD in more than 150 countries around the world UK 0 07 01 ...

Page 11: ...d tips 7 Maintenance and cleaning 8 Internal cleaning 8 Cleaning the filters 8 External cleaning 8 Prolonged periods of non operation 8 Frost precautions 8 Moving the machine 8 Something not working 9 Installation 10 Water supply connections 10 Water outlet connection 10 Electrical connection 11 Guide to use the instruction book Safety instructions 1 2 3 Step by step Hints and tips Environmental i...

Page 12: ...e open door Isolate the appliance from the power supply and turn off the water supply after use Care should be taken when cleaning the bottom door seal and hinge area as any exposed metal edges may cut if care is not taken This product should be serviced by an authorised Service engineer and only genuine spare parts should be used Under no circumstances should you attempt to repair the machine you...

Page 13: ...Clarke French degrees and PPM parts per Million The softener should be adjusted according to the hardness of the water in your area Your local Water Authority can advise you on the hardness of the water in your area The dishwasher is factory set at level 2 If this level is not suitable for your area the softener should be adjusted To adjust the water softener With a screwdriver turn the selector o...

Page 14: ...nd almost disappears when the salt has finished reminding you to add salt B A salt indicator light on the control panel will come on when the salt has finished The salt indicator light on the control panel can remain illuminated for 2 6 hours after the salt has been replenished assuming the dishwasher remains switched on If you are using salts that take longer to dissolve then this can take longer...

Page 15: ...models with rinse aid indicator light Top up with rinse aid when the rinse aid indicator light on the control panel illuminates Ensure that the lid is closed after every refill Do not put liquid detergent in the rinse aid compartment Clean up any rinse aid spilt during filling with an absorbent cloth to avoid excess foaming during the next wash Adjusting the dose According to the finish and drying...

Page 16: ...ollows 1 For all programmes place 1 tablet inside the detergent dispenser 2 Always close the lid 3 For all programmes with prewash place a portion of a further tablet on the lid of the detergent dispenser If your dishwasher has a SID dispenser and you require a prewash put the extra detergent into the SID dispenser and not on the lid of the detergent dispenser Insufficient quantities of detergent ...

Page 17: ...oden or horn handles or glued parts bronze cutlery saucepans with wooden handles aluminium ware crystal ware leaded glass plastic items antique or fine decorated china Certain types of decoration can discolour when washed in a dishwasher Crystal ware and plastic objects if not guaranteed dishwasher proof should be washed by hand Certain types of glass can also become opaque after being washed seve...

Page 18: ...he drain filter should be pointing towards the front of the appliance The dishwasher must not be used without filters Incorrect repositioning and fitting of the filters will produce poor washing results Cleaning the filters is vital to ensure correct operation of the machine External cleaning Clean the external surfaces of the machine and control panel with a damp soft cloth If necessary use only ...

Page 19: ...Dishes are rattling against each other refer to Loading your machine The spray arms are knocking against the dishes Refer to Loading your machine The door is difficult to close The dishwasher is not level or not properly built in Visible lime deposits or white film Check that there is salt and that the salt cap is tight on the dishes Check that the right level of the water softener is set The dish...

Page 20: ... dishwasher features fill and drain hoses which can be turned either to the left or the right to suit the installation Do not use for connection old hoses which have been used in another appliance The locknut must be correctly fitted to avoid water leaks Avoid bends or kinks in the hose which could prevent or slow down the water supply If the machine is connected to new pipes or pipes which have n...

Page 21: ...in accordance with the following code Green and Yellow Earth Blue Neutral Brown Live If you fit your own plug the colours of the wires in the mains lead of your appliance may not correspond with the markings identifying the terminals in your plug Proceed as follows 1 Connect the Green and Yellow earth wire to the terminal in the plug which is marked with the letter E or the earth symbol or coloure...

Page 22: ...orking When you contact the Service Force Centre you will need to give the following details 1 Your name address and post code 2 Your telephone number 3 Clear and concise details of the fault 4 The model and serial number found on the rating plate 5 The purchase date Customer Care Department For general enquiries concerning your Tricity Bendix appliance or for further information on Tricity Bendix...

Page 23: ...nveralmond OWN SALES Perth PH1 3AF SHETLAND 3 4 Carlton Place Lerwick Shetland OWN SALES ZE1 0PW SHETLAND Bolts Shetland 26 North Road Lerwick OWN SALES Shetland ZE1 0PE WHALSAY Leask Electrical Harisdale Symbister Whalsay OWN SALES Shetland ZE2 9AA NORTHERN IRELAND BELFAST Owenmore House Kilwee Business Park Dunmurry Belfast BT17 0HD WALES CARDIFF Unit 4 Guardian Industrial Estate Clydesmuir Road...

Page 24: ...ield London EN3 7BB GRAVESEND Unit B4 Imperial Business Estate West Mill Gravesend Kent DA11 0DL IPSWICH Unit 6C Elton Park Business Centre Hadleigh Road Ipswich IP2 0DD LETCHWORTH 16 17 Woodside Ind Park Works Road Letchworth Herts SG6 1LA LONDON 2 4 Royal Lane Yiewsley West Drayton Middlesex UB7 8DL MAIDENHEAD Reform Road Maidenhead Berkshire SL6 8BY MOLESEY 10 Island Farm Avenue West Molesey Su...

Page 25: ......

Page 26: ......

Page 27: ......

Page 28: ...2 07 01 ...

Reviews: