background image

7

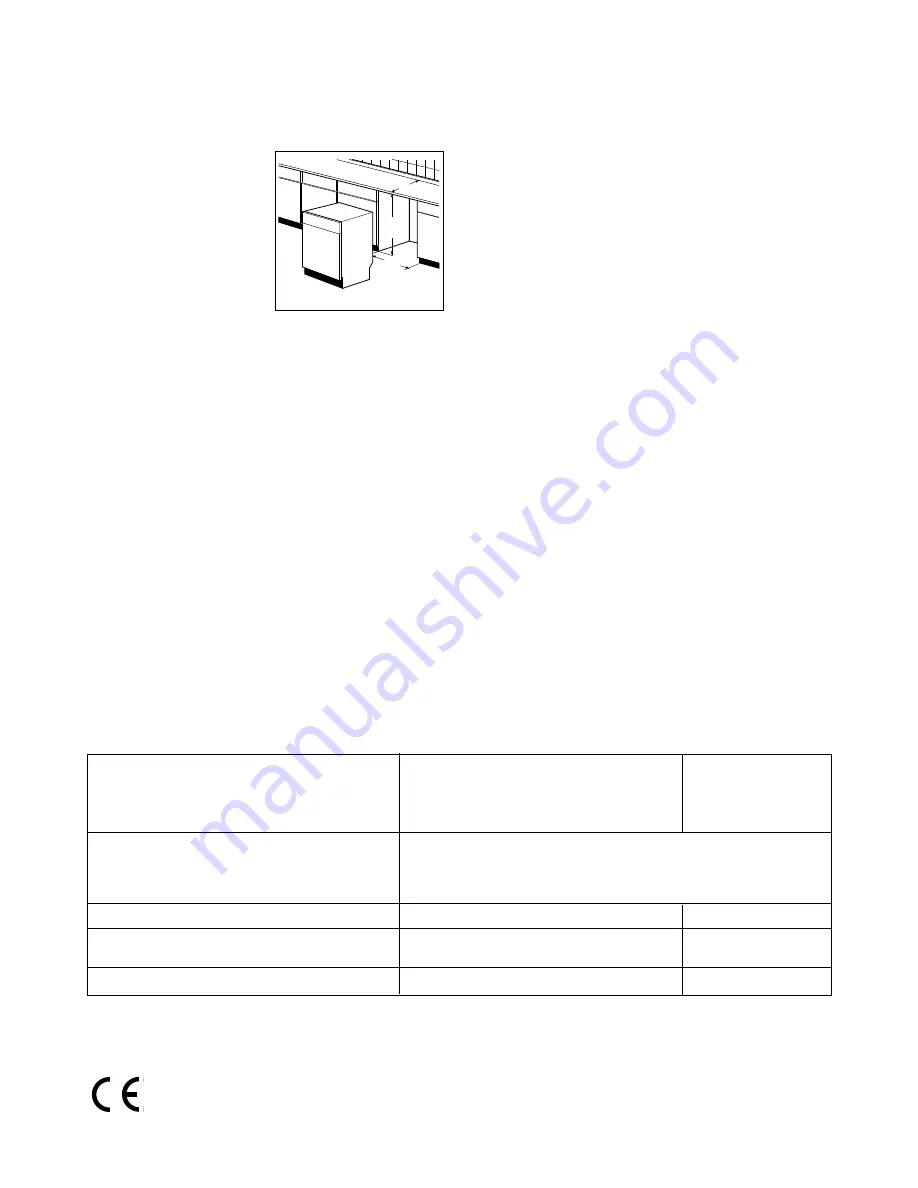
Fitting under a counter 

(kitchen worktop or sink)

By removing the machine’s worktop, you can install it under a
close fitting sink unit or a pre-existing top, providing the
dimensions of the recess correspond to those shown in the
picture.

Proceed as follows:

Remove the machine’s worktop by unscrewing the two rear
retaining screws, pull from the front and slide out the rear
slots, lifting the worktop.

Insert the machine after adjusting height and levelling with the
adjustable feet. When inserting the machine, ensure that the
water inlet and drain hoses are not kinked or squashed.

If the dishwasher is later used as a free-standing appliance,
the original worktop must be re-mounted.

The plinth on free-standing appliances is not adjustable.

Levelling

Good levelling is essential for correct closure and sealing of
the door.

When the appliance is correctly levelled, the door will not catch
on either side of the cabinet.

If the door does not close correctly, loosen or tighten the
adjustable feet until the machine is perfectly level.

820

570 - 600

600

IN05

Dimensions

Width

60 cm

Height with worktop

85 cm

Height without worktop

82 cm

Max depth

61 cm

Electrical connection:

Information on the electrical connection is given on the rating plate on the

Voltage

inner edge of the dishwasher’s door on the right.

Overall power
Fuse

Water supply connection:

cold water

Water supply pressure:

Maximum

50 kPa (0.5 bar)

Maximum

800 kPa (8 bar)

Capacity

12 place settings

Technical specifications

This appliance complies with the following E.E.C. Directives:
- 73/23 or 19.2.73 (Low Voltage Directive) and subsequent modifications;
- 89/336 or 3.5.89 (Electromagnetic Compatibility Directive) and subsequent modifications.

Summary of Contents for DH 103

Page 1: ...Dishwasher DH 103 INSTRUCTION BOOK 1 06 03 ...

Page 2: ...e aid dispenser type A type B 8 Filters 9 Lower spray arm 10 Upper spray arm 11 Upper basket 12 Worktop Description of the appliance IN148 Programme sequence indicator as the programme progresses the programme selector dial turns to show the phase in the wash programme the appliance has reached Prewash Rinse and Hold Main wash Cold rinse Hot rinse Drying ...

Page 3: ... are a potential hazard Long and or sharp items of cutlery such as carving knives must be positioned horizontally in the upper basket Take care when loading or unloading sharp items such as knives Cutlery should be placed in the removable cutlery basket with the handles facing downwards If the handles protrude from the bottom of the basket obstructing the lower spray arm load the cutlery with the ...

Page 4: ...s and avoiding the front positions near the door Before closing the door ensure that the spray arms can rotate freely Adjusting the height of the upper basket If washing very large plates you can load them in the lower basket after moving the upper basket to the higher position To move to the higher position proceed as follows 1 Move the front runner stops A of the upper basket outwards and slide ...

Page 5: ... Normal soil Crockery and cutlery Fresh soil Crockery and cutlery Any Partial load to be completed later in the day Programme 1 POWER WASH 65 NORMAL WASH 65 2 ECO WASH RINSE HOLD Cycle description 3 Consumption values Cold prewash Main wash up to 65 C 1 cold rinse 1 hot rinse Drying Main wash up to 65 C 1 cold rinse 1 hot rinse Drying Main wash up to 65 C 1 hot rinse 1 cold rinse to avoid food scr...

Page 6: ... On Off push button in this case the On Off indicator light turns off Press the On Off push button again the programme will start from the point in which it was interrupted 6 End of the washing programme The dishwasher will automatically stop Switch off the dishwasher by pressing the Mains on push button the Mains on indicator light turns off Open the door and wait a few minutes before removing th...

Page 7: ...ling Good levelling is essential for correct closure and sealing of the door When the appliance is correctly levelled the door will not catch on either side of the cabinet If the door does not close correctly loosen or tighten the adjustable feet until the machine is perfectly level 820 570 600 600 IN05 Dimensions Width 60 cm Height with worktop 85 cm Height without worktop 82 cm Max depth 61 cm E...

Page 8: ...post code 2 Your telephone number 3 Clear and concise details of the fault 4 The model and serial number found on the rating plate 5 The purchase date Please note that a valid purchase receipt or guarantee documentation is required for in guarantee service calls For Customer Service in Ireland please contact us at the address below Tricity Bendix Electrolux Group Irl Ltd Long Mile Road Dublin 12 R...

Page 9: ...r calls to put right an appliance which is improperly installed or calls to appliances outside the United Kingdom Appliances found to be in use within a commercial environment plus those which are subject to rental agreements Products of Tricity Bendix manufacture which are not marketed by Tricity Bendix European Guarantee If you should move to another country within Europe then your guarantee mov...

Page 10: ...enser and rinse aid container have been filled with salt and rinse aid respectively and using the test programme see Washing programmes chart Hints for test centres Load 12 standard place settings Rinse aid setting Rinse aid dispenser type A position 4 type III Rinse aid dispenser type B position 5 type III Detergent dosage 5 g 25 g type B Arrangement upper basket Arrangement lower basket Arrangem...

Page 11: ......

Page 12: ...s the world s largest producer of powered appliances for kitchen cleaning and outdoor use More than 55 million Electrolux Group products such as refrigerators cookers vacuum cleaners chain saws and lawn mowers are sold each year to a value of approx 14 billion USD in more than 150 countries around the world Electrolux plc 2003 152968 08 1 UK Subject to change without notice ...

Page 13: ...Instruction book Dishwasher Before use Maintenance Installation ...

Page 14: ...signed for use in dishwashers Long bladed knives stored in an upright position are a potential hazard Long and or sharp items of cutlery such as carving knives must be positioned horizontally in the upper basket When finishing loading or unloading close the door as an open door can be a hazard Do not sit or stand on the open door Isolate the appliance from the power supply and turn off the water s...

Page 15: ...allation instructions 2 Remove all packaging from inside the appliance 3 Set the water softener 4 Pour 1 litre of water inside the salt container and then fill with salt 5 Fill the rinse aid dispenser The water softener The dishwasher is equipped with a water softener designed to remove minerals and salts from the water supply which would have a detrimental or adverse effect on the operation of th...

Page 16: ...ed The salt indicator light on the control panel can remain illuminated for 2 6 hours after the salt has been replenished assuming the dishwasher remains switched on If you are using salts that take longer to dissolve then this can take longer The function of the machine is not affected Do not worry if water over flows from the unit when filling with salt this is quite normal Rinse aid Rinse aid i...

Page 17: ...ducing pollution Prior to the start of a wash programme not for the Rinse and Hold programme The detergent is released during the washing phase Please observe the manufacturer s dosing and storage recommendations as stated on the detergent packaging Fill with detergent Detergent dispenser type A 1 If the lid is closed press release button 1 The lid springs open 2 Fill the detergent dispenser 2 wit...

Page 18: ... rinse aid function this must be placed in the detergent compartment In this case the rinse aid compartment must be empty in order to avoid a double dosage If in the rinse aid compartment there is still rinse aid you must wait until it has finished before using these kind of detergents Use of 3 in 1 combi detergents General advice These products are detergents with integrated and combined detergen...

Page 19: ...ng water 6 Remove the flat filter D from the base of the washing compartment and clean both faces thoroughly 7 Put the flat filter D back in the base of the washing compartment 8 Place the coarse fine filter A B in the microfilter and press together 9 Put the filter combination in place and lock by turning the handle clockwise to the stop During this process ensure that the flat filter does not pr...

Page 20: ...he water tap is blocked or furred with limescale The water tap is turned off The filter where present in the threaded hose fitting at the water inlet valve is blocked The water inlet hose has not been correctly laid or it is bent or squashed Clean the water tap Turn the water tap on Clean the filter in the threaded hose fitting Check the water inlet hose connection The siphon is blocked Clean out ...

Page 21: ...e overloaded The spray arms do not rotate freely due to wrong arrangement of the load The filters in the base of the washing compartment are dirty or incorrectly positioned Too little or no detergent has been used Where there are limescales deposits on the dishes the salt container is empty or the wrong level of the water softener has been selected The drain hose connection is not correct The salt...

Page 22: ...onnected to new pipes or pipes which have not been used for a long time you should run the water for a few minutes before connecting the inlet hose Do not use for connection old hoses which have been used in another appliance The dishwasher is fitted with safety devices that prevent the wash water returning into the drinking water system and comply with the applicable plumbing regulations Water ou...

Page 23: ... and yellow 2 Connect the Blue neutral wire to the terminal in the plug which is marked with the letter N or coloured black 3 Connect the Brown live wire to the terminal in the plug which is marked with the letter L or coloured red The plug moulded onto the lead incorporates a 13amp BSI362 fuse Only ASTA or BSI fuses should be used The plug must not be used if the fuse cover carrier is lost The co...

Page 24: ...Subject to change without notice 152971 08 2 2 05 03 ...

Reviews: