background image

24

Unpacking

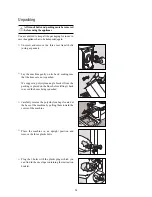
All transit bolts and packing must be removed
before using the appliance

You are advised to keep all the packaging for re-use in
case the appliance has to be transported again.

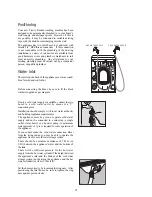
Unscrew and remove the three rear transit bolts
(using a spanner).

Lay the machine gently on its back, making sure
that the hoses are not squashed.

We suggest a polystyrene angle bracket from the
packing is placed on the floor before tilting it back
to avoid the hoses being squashed.

Carefully remove the polyethylene bags located at
the base of the machine by pulling them toward the
centre of the machine.

Place the machine in an upright position and
remove the three plastic bolts.

Plug the 3 holes with the plastic plugs which you
can find in the envelope containing the instruction
booklet.

AL009

2

1

P0287

P0018

P0002

P0001

Summary of Contents for TB1000 W

Page 1: ...WASHING MACHINE TB1000 W OPERATING INSTALLATION INSTRUCTIONS 35 292 493 0 ...

Page 2: ... ...

Page 3: ...se intheirclothing Only wash fabrics which are designed to be machine washed Ifindoubt consultthecarelabelontheclothes Before washing ensure that all pockets are empty and buttons and zips are fastened Avoid washing frayed or torn articles and treat stains such as paint ink rust and grass before washing Underwired bras must NOT be machine washed Any objects such as coins safety pins nails screws s...

Page 4: ... you follow these hints Adjust the quantity of detergent according to the hardness of your water supply the amount of laundry and the degree of soiling Select an ECO programme for normally soiled laundry A programme without prewash is sufficient for normally soiled laundry In the interest of the environment Materials marked with the symbol are recyclable Check with your local Council or Environmen...

Page 5: ...ic softener 14 Using a water softening agent 14 Wash Care Symbols 15 Washing Programmes 16 17 Maintenance and Cleaning 18 19 Descaling 18 After each wash 18 External cleaning 18 Cleaning the dispenser drawer 18 Cleaning the drawer recess 18 Cleaning the filter 19 The dangers of freezing 19 Something Not Working 20 21 Service Spare Parts 21 Customer Care 21 Peace of Mind for Twelve Months 22 For th...

Page 6: ...etergent dispenser drawer 2 Mains on light 3 Options buttons 4 Programme guide 5 Program selector dial ON OFF switch 6 Door opening handle 7 Filter 8 Adjustable feet Detergent dispenser drawer Prewash Main Wash Fabric softener 8 9 AL035 ...

Page 7: ...mp in the drum When it is convenient for you to empty the machine simply press this button again so that the machine can proceed to drain and short spin or turn the dial to the drain programme 14 If this button is not activated the washing programmes will end with a short spin Do not press this button for woollens wool items should be gently spun 5 Programme Guide 6 Programme Selector To select th...

Page 8: ... laundry in the drum one item at a time shaking out as much as possible Close the door 2 Measure out the detergent Pull out the dispenser drawer until it stops Measure out the amount of detergent recommended by the manufacturer in a graduated cup and pour it into the main wash compartment If you wish to carry out a prewash pour detergent into the compartment marked Prewash is available in programm...

Page 9: ...illuminate and the machine will start operating 7 At the end of the programme The machine stops automatically and the mains on light goes out The door is controlled by a safety device which releases 3 minutes after the end of the programme Before opening the door ensure there is no water in the drum Switch the machine off by pushing in the programme selector dial When the programme has finished yo...

Page 10: ...ose the door 2 Measure out the detergent Pull out the dispenser drawer until it stops Measure out the amount of detergent recommended by the manufacturer in a graduated cup and pour it into the main wash compartment 3 Add the fabric softener if required If required pour fabric softener into the compartment marked the amount used must not exceed the MAX mark in the drawer Close the drawer gently 4 ...

Page 11: ...mains on light goes out If you have depressed the RINSE HOLD button the machine will stop with the water left in the tub to prevent the fabric from creasing To drain the water release the same button the clothes will be gently spun or select programme 14 The door is controlled by a safety device which releases 3 minutes after the end of the programme Before opening the door ensure there is no wate...

Page 12: ...y detergent suitable for automatic washing machines Use the correct quantities of detergent For wool use gentle detergent only in small quantities Bleach is very corrosive it should be used with care and kept out of reach of children Some stains such as fruit wine grass rust etc are difficult to remove and should be treated before washing with specific products which can be found in most household...

Page 13: ... wash and only detergents recommended for use in automatic machines To maintain the appearance of your clothes and household textiles and to make them last longer you should use different types of detergent for different washes whether for whites colours or delicates Whites We recommend the Ariel product range which is biological and designed to provide excellent cleaning and stain removal even at...

Page 14: ...achine drum Traditional Liquids Liquid can be placed in the main wash compartment of the detergent drawer marked with the symbol start the machine immediately upon placing the detergent in the dispenser drawer Alternatively the detergent is measured into the specially designed dosing device which should be placed on top of the laundry and at the back of the machine drum Compact Powders and Liquids...

Page 15: ...ner entering the machine prematurely When using liquid detergent and a prewash programme place the detergent into the correct compartment in the dispenser drawer after the prewash has finished 95 60 50 40 40 40 P Chlorine bleach may be used May be tumble dried with high heat setting with low heat setting A cross through any symbol means DO NOT May be dry cleaned Other letters and or a bar beneath ...

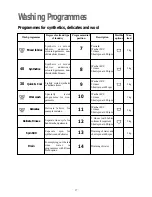
Page 16: ...oloured cotton or linen fabric shirts underwear towels 3 Wash at 60 C 4 rinses Long spin at 1000 rpm 4 5 kg Non Fast coloureds Non fast coloured cotton or linen fabric shirts blouses underwear 4 Wash at 40 C 4 rinses Long spin at 1000 rpm 4 5 kg Hand Rinses Separate rinse cycle for hand washed garments 5 4 rinses Long spin at 1000 rpm 4 5 kg Spin 1000 rpm Separate spin for cotton and linen items 6...

Page 17: ... for example curtains 11 Wash at 40 C 3 rinses Short spin at 600 rpm 2 kg Spin 600 Separate spin for synthetics and delicates 13 Draining of water and short spin at 600 rpm 2 kg Drain For emptying out the last rinse water in programmes with Rinse Hold option 14 Draining of water Synthetics 40 Synthetic or mixed fabrics underwear coloured garments non shrink shirts blouses 8 Wash at 40 C 3 rinses S...

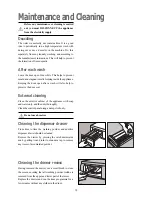
Page 18: ...pen after a wash will also help to preserve the door seal External cleaning Clean the exterior cabinet of the appliance with soap and water only and then dry thoroughly Clean the control panel using a damp cloth only Do not use abrasives Cleaning the dispenser drawer From time to time the washing powder and additive dispenser drawer should be cleaned Remove the drawer by pressing the catch downwar...

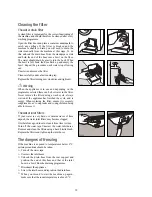
Page 19: ...filter Never remove the filter during a wash cycle always wait until the appliance has finished the cycle and is empty When replacing the filter ensure it is securely retightened so as to stop leaks and young children being able to remove it The water inlet filters If your water is very hard or contains traces of lime deposit the water inlet filters may become clogged It is therefore a good idea t...

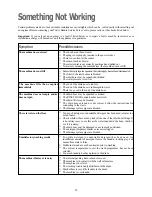
Page 20: ...machine does not empty and or does not spin The drain hose may be squashed or kinked The RINSE HOLD option has been selected The drain filter may be blocked The drain hose extension is not correct Follow the instructions for connecting to the waste The drainage system pipes are blocked There is water on the floor Too much detergent or unsuitable detergent has been used creates too much foam Check ...

Page 21: ...n The electronic unbalance detection device has cut in because the laundry is not evenly distributed in the drum The laundry is redistributed by reverse rotation of the drum This may happen several times before the load is evenly distributed and spinning can resume eventually at a lower speed if the wash load is still not sufficiently balanced distributed after 10 minutes the machine will not spin...

Page 22: ...neglect the replacement of any light bulbs or removable parts of glass or plastic Costs incurred for calls to put right an appliance which is improperly installed or calls to appliances outside the United Kingdom Appliances found to be in use within a commercial environment plus those which are subject to rental agreements Products of Tricity Bendix manufacture which are NOT marketed by Tricity Be...

Page 23: ...y a qualified plumber or competent person DIMENSIONS Height 85 cm 33 5 Width 60 cm 23 6 Depth 55 cm 22 7 POWER SUPPLY VOLTAGE 230 240 V 50 Hz MAX POWER ABSORBED 2600 W 13A WATER PRESSURE Minimum cold 5 N cm2 7 psi Minimum hot 3 N cm2 4 psi Maximum 80 N cm2 110 psi MAXIMUM RECOMMENDED LOAD Cotton linen 4 5 kg 10 lbs Synthetics 2 kg 4 5 lbs Delicate fabrics 2 kg 4 5 lbs Wool 1 kg 2 2 lbs SPIN SPEED ...

Page 24: ... the hoses are not squashed We suggest a polystyrene angle bracket from the packing is placed on the floor before tilting it back to avoid the hoses being squashed Carefully remove the polyethylene bags located at the base of the machine by pulling them toward the centre of the machine Place the machine in an upright position and remove the three plastic bolts Plug the 3 holes with the plastic plu...

Page 25: ...onnect the two hoses to a cold water outlet by means of a Y connection piece Installation should comply with local water authority and building regulation requirements The appliance must be given a separate cold water supply and not be connected to a mixer tap a single outlet water heater or a booster pump A minimum water pressure of 7psi is required for safe operation of the appliance If you cann...

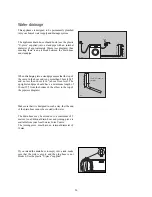
Page 26: ... level The upright standpipe should have a minimum length of 30cm 12 from the bottom of the elbow to the top of the pipe see diagram Make sure that it is designed in such a way that the end of the drain hose cannot be covered with water The drain hose may be extended to a maximum of 3 metres An additional drain hose and joining piece is available from your local Service Force Centre The joining pi...

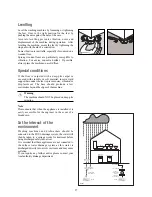
Page 27: ... The base should protrude a few centimetres beyond the edges of the machine Warning The machine should NOT be placed on deep pile carpeting Note Please ensure that when the appliance is installed it is easily accessible for the engineer in the event of a breakdown In the interest of the environment Washing machines and dishwashers should be connected to the FOUL drainage system the water will then...

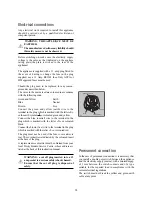
Page 28: ... the earth symbol or coloured green and yellow Connect the blue neutral wire to the terminal in the plug which is marked with the letter N or coloured black Connect the brown live wire to the terminal in the plug which is marked with the letter L or coloured red The plug must not be used if the fuse cover carrier is lost The cover carrier is indicated by the coloured insert at the base of the plug...

Page 29: ...Tricity Bendix 55 77High Street Slough Berkshire SL1 1DZ Consumer care telephone number 08705 950950 Electrolux Household Appliances Limited ...

Reviews: