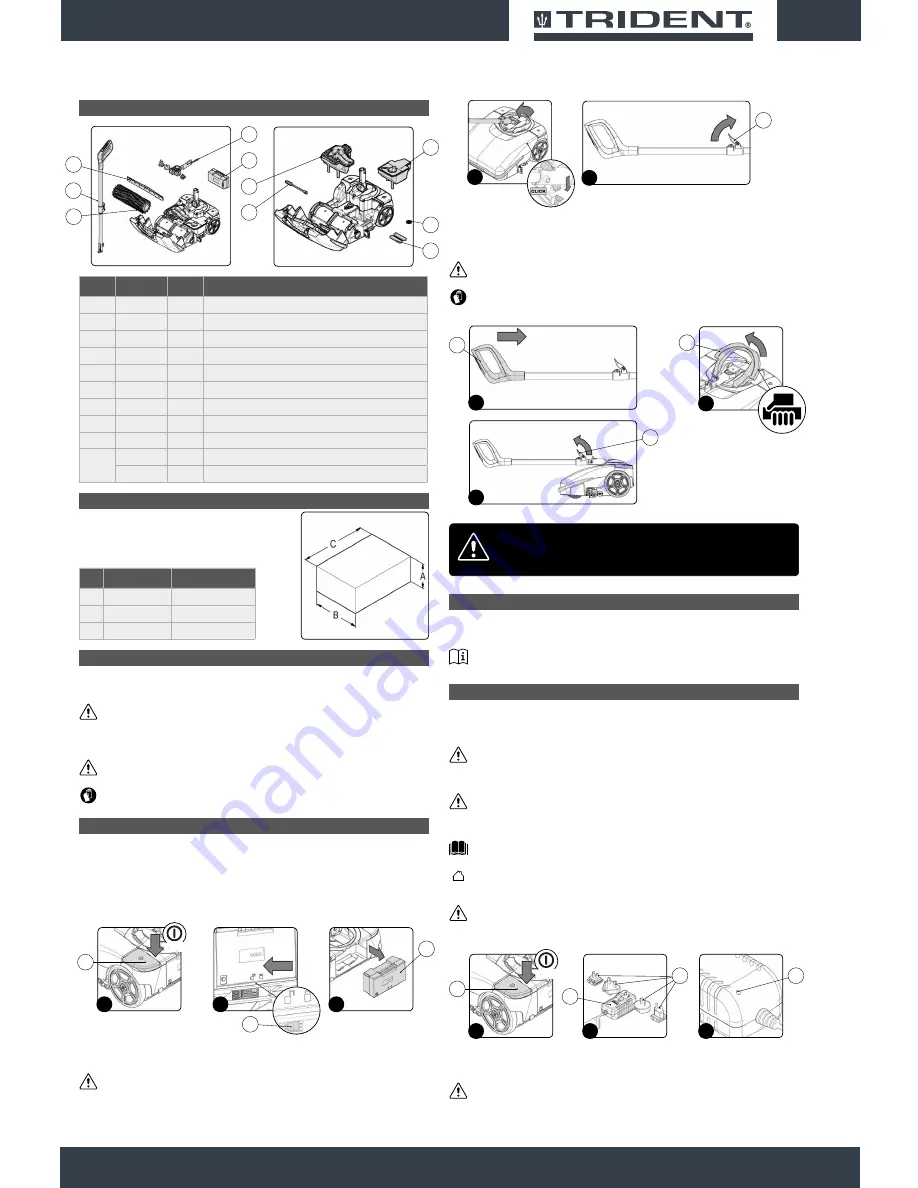
SPARE PARTS
HANDLING THE PACKAGED MACHINE
The machine is contained in specific packaging, and since
the packaging elements (plastic bags, staples, etc.) are
a potential source of danger, they should not be left within
the reach of children, disabled persons, etc. The machine's
overall weight including packaging is 18 Kg.
The packaging dimensions are as follows:
U/M
TRIDENT NM14
A
in
10,6
B
in
19,2
C
in
27,5
HOW TO UNPACK THE MACHINE
The procedure for unpacking the machine is as follows:
1.
Place the lower part of the outer packaging in contact with the floor.
CAUTION
: Use the pictograms printed on the box as reference.
2. Open the outer box.
3. Remove the accessories from the box and carefully lay them on the ground.
4. Take the machine out of the box.
ATTENTION:
it is recommended that all the packaging components be kept for any future
machine transportation.
CAUTION:
these operations must be carried out using protective gloves to avoid any possible
contact with the edges or tips of metal objects.
HOW TO MOVE THE MACHINE
The procedure for the safe transportation of the machine is the following:
1.
If the machine is running, switch it off by pressing the main switch (1) (
Fig.1
).
2. Make sure the recovery tank is empty. If it isn't, empty it completely.
3. Make sure the solution tank is empty, otherwise empty it completely.
4. Remove the battery (2) from the battery compartment; to free the battery, shift the stop lever (3) in
the direction of the arrow (
Fig.2
). Remove the battery from the machine using the handle moulded
on it (
Fig.3
).
The machine must not be transported or parked in its
rest position when the solution tank and recovery
tank are full.
5. Block the handlebar in the horizontal position. Rest your foot on the body of the machine to prevent
it from tilting, then push the handle away from you until it snaps into the horizontal position (
Fig.4
).
CAUTION
: do not rest your foot on the main switch.
6. Rotate the stop lever of the command handlebar (4) in the direction of the arrow (
Fig.5
).
7. Close the command handlebar, pushing the handle (5) towards the body of the machine (
Fig.6
).
8. Rotate the stop lever of the command handlebar (4) in the direction of the arrow (
Fig.7
).
9.
To lift the machine off the floor, use the handle (6) on its rear (
Fig.8
)
CAUTION:
When transporting on vehicles, secure it firmly in place in compliance with the
directives in force so that it cannot slide or tip over.
CAUTION:
these operations must be carried out using protective gloves to avoid any possible
contact with the edges or tips of metal objects.
BATTERY TYPE
To power the appliance, use only the battery supplied in the packaging or one supplied by a specialised
technician.
OTHER BATTERY TYPES CANNOT BE USED.
The machine is powered by a lithium-ion
battery. The battery compartment can accommodate a single battery slot at 25.55V.
WARNING:
for the maintenance and disposal of the battery, refer to the document supplied by
the battery manufacturer.
RECHARGING THE BATTERY
The battery must be charged prior to the first use, and when it doesn't provide enough power for tasks
that could formerly be performed without difficulty. To recharge the battery, proceed as follows:
1. Take the machine to the designated place for charging the battery.
WARNING:
the place for charging the battery should be suitably ventilated.
2.
If the machine is running, switch it off by pressing the main switch (1) (
Fig.1
).
3. Block the handlebar in the vertical position.
CAUTION:
during this operation, do not rest your foot on the machine.
4. Read the battery charger manual that comes with the machine for inserting the power plug (2) into
the power pack (3) (
Fig.2
).
CAUTION:
before connecting the battery charger to the socket, make sure the characteristics of
the mains supply correspond to those of the battery charger.
WARNING:
the battery charger must only be used in a covered place.
5. Connect the power plug (2) to the mains supply.
WARNING:
make sure the green LED (4) on the battery charger lights up when you enable the
battery charger base circuit (
Fig.3
). This LED indicates that the battery charger circuit is
correctly powered.
6. Remove the cap (5) covering the battery power socket (
Fig.4
).
7. Insert the battery charger power cable plug (6) in the socket (7) on the battery (
Fig.5
).
WARNING:
make sure the green LED (4) on the battery charger lights up when you enable the
charger
(
Fig.3
)
. This LED indicates that the battery charger circuit is correctly powered.
9
6
4
10
5
2
1
8
7
9
3
1
1
OFF
2
2
3
3
4
5
4
6
5
6
8
7
4
1
1
OFF
4
3
3
2
2
POS.
CODE
QTY DESCRIPTION
1
440974
1
BATTERY
2
441033
1
BATTERY CHARGER
3
439888
1
DETERGENT SOLUTION FILTER
4
441025
2
ANTI-DUST FILTER
5
224800
1
SQUEEGEE RUBBER KIT
6
224615
1
CONTROL HANDLEBAR
7
441023
1
TUBE-CLEANING BRUSH
8
227332
1
RECOVERY TANK
9
224619
1
SOLUTION TANK
10
440905
1
SOFT BRUSH
440904
1
HARD BRUSH


