background image

11

Version 3.0

x-touchBOX/PANEL

4  Basic settings

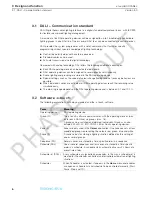
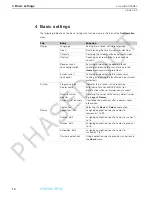
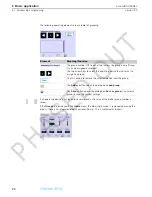
Layout

S1...S4, S5...S8, 
S9...S12, S13...S16

Selecting buttons for the 

Home

 menu (4 scenes 

on each page).

Dim

Activating the dimming function for buttons 
activated in the first column.

S1...S8, S9...S16
(Colour application : 
2 zones, 4 zones, 
colour scenes)

Selecting buttons for the 

Home

 menu (8 scenes 

on each page, in the Colour application 2 zones, 4 
zones or 8 colour scenes).

Scheduler

Activating the Scheduler.
Scheduler enables controlling the sequence, 
schedule list and schedule manually (Start, Pause, 
Stop and Off).

G1...G4, G5...G8, 
G9...G12, G13...G16
(Colour application : 
G1...G4)

Selecting buttons for the 

Home

 menu (4 groups 

on each page). 
Only the 4 groups White are possible in the 

Colour

 application.

Cleaning

Selecting buttons 

Clean

OFF

 and 

ON

 for the 

Home

 menu. 

Clean

 deactivates the touchscreen 

for 20 seconds during cleaning. The 

OFF

 and 

ON


buttons are used for switching configured lighting 
situations.

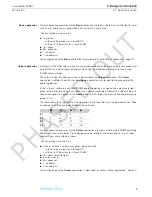
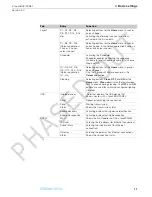
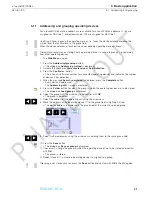
IrDA

Infrared devices

 Field that displays the IrDA device that 
communicates with x-touchBOX/PANEL.

Reset

Repeat establishing the connection.

Send

Starting transmission.

Status

Shows the transmission status.

Enable discovery

Activating or deactivating device identification.

Enable file reception

Activating or deactivating file reception.

TCP/IP

MAC

Shows the MAC address of the x-touchPANEL.

IP Picker

Entering the IP address (for Ethernet connection).

Subnet Mask

Entering the subnet mask (for Ethernet 
connection).

Gateway

Entering the gateway (for Ethernet connection).

Status

Shows the connection status.

Tab

Entry

Function

PHASED 

OUT

Summary of Contents for x-touchBOX

Page 1: ...OPERATION MANUAL x touchBOX x touchPANEL P H A S E D O U T ...

Page 2: ...P H A S E D O U T ...

Page 3: ...he exact starting and fade time of a scene 26 5 4 Schedule SDL 27 5 4 1 Configuring schedules 28 5 4 2 Loading or checking a schedule 28 5 5 Configuring a schedule list 29 6 Colour application 30 6 1 Changing the application 30 6 2 Addressing and zone assignment 30 6 2 1 Addressing RGBW operating devices and assigning them to zones 31 6 3 Configuring colour sequences 32 6 4 Configuring colour even...

Page 4: ... files 48 9 Help in the case of problems 49 9 1 Resetting to factory defaults 49 9 2 The touchscreen does not react properly 49 9 3 Scenes cannot be defined 49 9 4 Infrared connection does not work 50 9 5 Ethernet connection cannot be established 50 10 Technical data 51 10 1 Circuit diagram x touchBOX 52 10 2 Circuit diagram x touchPANEL 52 11 Disposal 52 P H A S E D O U T ...

Page 5: ...ting instructions for x touchBOX and x touchPANEL supplement the user manual The following symbols are used in this user manual Symbol Meaning Notes contain important information for operating the units Prerequisites that must be checked prior to a certain action are marked with a hyphen This symbol is used for instructions that consist of a single action 1 In the case of instructions consisting o...

Page 6: ...fety instructions The following safety instructions must be observed when operating the x touchBOX PANEL Every operator must read this user manual carefully and comply with the instructions contained therein The owner must ensure that the wiring instructions and specifications for DALI lines are observed Only one x touchBOX may be connected to each DALI line since the bus supply is already integra...

Page 7: ... schedules 1 calendar controlled schedule list Real time clock calendar Configuring the buttons for manual call Designing the buttons for manual call Manual switching and dimming Frame light and adjustable display light only x touchPANEL Communication via interfaces Infrared IrDA Ethernet TCP IP only x touchPANEL The functions of x touchBOX and x touchPANEL are identical with only a few exceptions...

Page 8: ...ach their dimming value simultaneously The dimming range depends on the DALI operating device and is between 0 1 and 100 3 2 Software x touch The following explanations will help you understand the x touch software Term Meaning Operating device DALI operating device Group G The x touch software communicates with the operating devices max 64 for each DALI line via groups max 16 A group can be switc...

Page 9: ...e grouping of the operating devices In the x touch software each RGB RGBW operating device is assigned to a colour scale red green blue white of a zone Four zones with 4 colour scales are available The colour scale of a zone corresponds to a group In the Home menu the white light can be switched and dimmed via groups 1 to 4 The table shows the assignment of the 16 groups to the four colours of the...

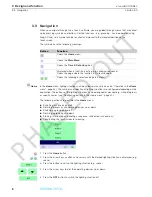
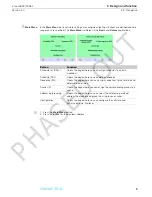
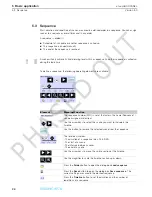
Page 10: ...ing buttons in the Home menu page 37 The following actions are possible in the Home menu Switching a scene on and off Dimming group s or all operating devices up or down Switching a group on and off Dimming a group up and down Starting interrupting and ending a sequence schedule or schedule list Deactivating the touchscreen for cleaning 1 Press the Home button 2 Press the arrow keys as often as ne...

Page 11: ...list SDLL Opens the page where you can assign schedules to certain weekdays Schedule SDL Opens the page where you can define schedules Sequence SQ Opens the page where you can assign sequences to the timeline and determine fade times Scenes S Opens the page where you can assign the corresponding groups to a scene Addressing grouping Opens the page where you can select the addressing method address...

Page 12: ...ocking or releasing the touchscreen password protected System Program version Indicates the x touch software version Display name Enter name for x touchBOX PANEL for identification when several devices are used Reset to factory defaults Resetting the values to the factory default values e g Layout Names Action at net recovery Controlling the behaviour after a power supply interruption Application ...

Page 13: ... are possible in the Colour application Cleaning Selecting buttons Clean OFF and ON for the Home menu Clean deactivates the touchscreen for 20 seconds during cleaning The OFF and ON buttons are used for switching configured lighting situations IrDA Infrared devices Field that displays the IrDA device that communicates with x touchBOX PANEL Reset Repeat establishing the connection Send Starting tra...

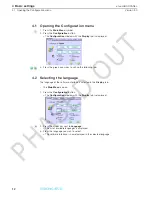
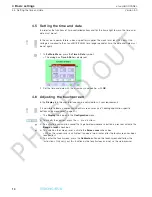
Page 14: ...n arrow key to call up the following tab 4 2 Selecting the language The language of the software interface is selected in the Display tab The Main Menu is open 1 Press the Configuration button The Configuration window with the Display tab is displayed 2 Press the arrow key next to Language The list of available languages is displayed 3 Press the language you wish to select The software interface i...

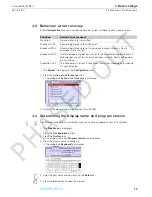
Page 15: ...3 Press the display name to change it The dialog box Keyboard is displayed 4 Enter the new name and confirm with the Enter key 5 Press the Esc button to abort the process Function Action at net recovery No action No commands are transmitted Broadcast OFF All operating devices are switched off Broadcast MAX All operating devices are set to maximum luminous intensity Somfy components are started Bro...

Page 16: ...mation sound that is generated whenever a button is pressed activate the Beep on touch check box To switch on the screen saver activate the Screen saver check box When the screen saver is activated it appears two minutes after the touchscreen has been touched last To center the touchscreen press the Calibrate button on the touchscreen and follow the instructions Only carry out this function on the...

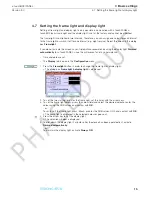
Page 17: ... prevent an image persistence Time and date are set The Display tab is open in the Configuration menu 1 Press the Framelight button in order to change the frame light or display light The dialog box Framelight display light is displayed 2 To set the two starting times for the frame light set the times with the arrow keys 3 To set the frame light colour press the colour field and select the desired...

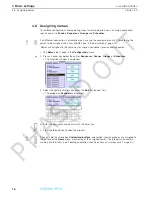
Page 18: ...layed 2 Select the lighting situation and press the Edit button next to it The dialog box Keyboard is displayed 3 Enter the new name and confirm with the Enter key 4 Press the Esc button to abort the process Hint If an Ethernet connection is established you can use the keyboard of your PC for entering the names to be assigned with x touchPANEL see Ethernet interface page 44 Hint If you activate th...

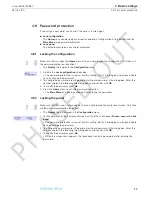
Page 19: ... 4 Press the Home menu to activate password protection The Main Menu can only be called up after entering the password 4 9 2 Locking the panel The Display tab is displayed in the Configuration menu 1 To lock operation of the entire touchscreen activate the check boxes Screen saver and Lock panel The password protection is now set factory setting 5678 A dialog box is displayed where you can change ...

Page 20: ...in the Configuration menu 1 Press the Clean button The touchscreen is deactivated for 20 seconds The remaining time is indicated 2 Clean the touchscreen with a soft damp cloth Hint If you activate the Clean check box in the Display tab of the Configuration menu a button is displayed in the Home menu which also deactivates the touchscreen for cleaning Cleaning is then also possible without a enteri...

Page 21: ...umber is supplemented with the specific abbreviation Identification of the components is only displayed if this is supported by the units EM HID LV INC CONF LED Somfy The dialog box Addressing method provides two ways of addressing System extension Only newly added operating devices are addressed The existing addresses remain unchanged Reinitialization All operating devices of the system are re ad...

Page 22: ... Meaning Function The group number G1 is set at the factory the group name Group 1 can be assigned as desired Use the arrow keys to select the operating device that you want to assign to a group Use this button to remove the selected device from the group The Folder button opens the dialog box Load group The Save button opens the dialog box Save as group You select a group to save the current sett...

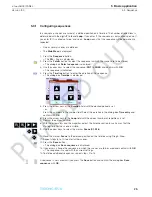
Page 23: ...th the arrow keys and confirm with OK The group is indicated 7 Select the address of the operating unit using the arrow keys 8 Move the address of the operating device 1 to the group field using Drag Drop The device address is displayed in the group field of the currently selected group 9 Select further addresses using the arrow keys and drag them to the same group field 10 Press the Save button T...

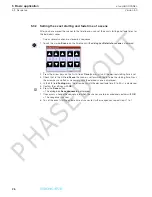
Page 24: ... of the dimming value Use the arrow keys or the black field on the scroll bar to change the dimming value The dimming value appears below the scroll bar in percent 51 If a group is occupied by Somfy components the OPEN and CLOSE buttons are displayed in this group Use these buttons to open or close the blinds If the Mask button is activated the settings for this group are maintained independent of...

Page 25: ...tton so that the settings of the scene do not influence the first group or Press the OFF button to switch off the first group 5 Repeat steps 3 to 4 for the three remaining groups 6 Press the Save button The dialog box Save as scene is displayed 7 If necessary change the scene in which the groups are to be saved and confirm with OK The scene is saved 8 To define further groups for this scene press ...

Page 26: ...ning Function The sequence number SQ1 is set at the factory the name Sequence 1 can be assigned as desired Use the arrow keys to select the scene you want to include in the timeline Use this button to remove the selected scene from the sequence The timeline visualizes The duration of a sequence max 23 59 59 The start of a scene The intervals between scenes The end of a scene Use the arrow keys to ...

Page 27: ...e is displayed 5 Press the arrow keys of the Duration field until the desired period is set or Press the numbers in the number field Select the duration in the dialog box Time entry and confirm with OK 6 Press the arrow keys in the Loop field until the correct number of repetitions is set 7 Confirm the entries with OK 8 With the arrow keys and the magnifier adjust the timeline section in such a wa...

Page 28: ...mm ss until the desired starting time is set 3 Check that in the 4th field Scene the scene is set for which this is to be the starting time Press the arrow keys as often as necessary until the desired scene is displayed 4 In the 5th field Fading press the arrow keys until the desired fade time 0 to 90 s is displayed 5 Confirm the settings with OK 6 Press the Save button The dialog box Save sequenc...

Page 29: ... be assigned as desired Use the arrow keys to select the sequences and scenes you want to include in the timeline After S16 the marker Off is displayed The marker Off ends a scene sequence or schedule and can be set several times Use this button to remove the selected scene or sequence from the schedule The timeline visualizes The complete schedule 0 00 to 23 59 The start of a scene sequence The d...

Page 30: ... repeat steps 4 and 5 7 Press the Save button The dialog box Save is displayed 8 If necessary change the schedule in which the scenes sequences are to be saved and confirm with OK The schedule is displayed 9 To define additional schedules repeat steps 2 to 8 5 4 2 Loading or checking a schedule Time and date are set Scenes and or sequences are defined The Main Menu is displayed 1 Press the Schedul...

Page 31: ...ys One or several schedules are defined The Main Menu is displayed 1 Press the Schedule list SDLL button 2 Press the black arrow key The selection window is displayed showing SDL1 to SDL7 and Off 3 Select the required schedule or Select Off 4 Repeat steps 2 to 5 for each weekday The schedule list is now saved without confirmation Hint A schedule list is started ended or interrupted in the Home men...

Page 32: ...s automatically restarted The System window is open in the Configuration menu 1 Press the Application button The dialog box Application is displayed 2 Press the arrow key The BASIC COLOUR selection window is displayed 3 Press the COLOUR button and confirm with OK 4 Confirm the security enquiry with OK After restarting the Colour application is set 6 2 Addressing and zone assignment Addressing Addr...

Page 33: ...ton The x touch software indicates the number of the operating devices it has detected 4 When the message Search completed is displayed press the Complete button Every operating device is addressed The Addressing of Z window is displayed 5 Press the Folder button to select the zone in which the operating devices are to be saved The dialog box Select zone is displayed 6 Set the zone with the arrow ...

Page 34: ...r button to select the colour sequence in which the scenes are to be stored The dialog box Load sequence is displayed 3 Select the colour sequence with the arrow keys and confirm with OK The sequence is indicated 4 Press the Timeline button to enter the Duration of the colour sequence The dialog box Timeline is displayed 5 Press the arrow keys of the Duration field until the desired period is set ...

Page 35: ...nce SQ button 2 Touch the marker Colour event on the timeline until the dialog box Details for colour event is displayed The dialog box Details for colour event is displayed 3 To determine the RGB value using a colour table press a colour in the first RGB tab or To enter the RGB value numerically enter the RGB values in the second tab or To enter the RGBW values numerically enter the RGBW values i...

Page 36: ...hing a maximum of 4 pages with 4 scenes on and off and dimming them Switching a maximum of 2 pages with 8 scenes Switching a maximum of 4 pages with 4 groups on and off and dimming them 1 Page with the ON OFF and Clean buttons 1 Page with the selection window and the Scheduler and OFF buttons Hint The following rules apply for operation with the Home menu If an action is called up manually this is...

Page 37: ... colour scene 1 Page with 2 colour effects for a maximum of 4 zones for each colour effect 1 Page with 4 colour effects for a maximum of 4 zones for each colour effect Switching a maximum of 1 page with 4 groups on and off and dimming them group White in each of the 4 zones 1 Page with the ON OFF and Clean buttons 1 Page with the selection window and the Scheduler and OFF buttons P H A S E D O U T...

Page 38: ...f required see Password protection page 17 Use the Dim function to activate the dimming function for the buttons in the first column Use the Scheduler function to start and stop time controlled actions manually in the Home menu The Cleaning button deactivates the touchscreen for 20 seconds The ON and OFF buttons can be configured and e g switch all operating devices on or off or a frequently used ...

Page 39: ...aning page No function Broadcast OFF switch off all operating devices Group OFF G1 to G16 OFF on Cleaning page No function Broadcast OFF switch off all operating devices Zone OFF Zone 1 to 4 ON on Cleaning page No function Broadcast 100 switch on all operating devices Group 100 G1 to G16 ON on Cleaning page No function Broadcast 100 switch on all operating devices Zone 100 Zone 1 to 4 OFF on Scene...

Page 40: ...now displayed with the desired function and name in the Home menu 7 3 2 Configuring the Dim buttons The Dim buttons can only be configured in the Basic application Depending on the settings it is either possible to dim all operating devices or just the activated groups with these buttons The Layout tab is open in the Configuration menu 1 Activate the Dim check box The dialog box Config button DIM ...

Page 41: ...e1 until the dialog box with the four zones is displayed 2 To set the colour for the first zone press the zone The dialog box Details for colour event is displayed 3 Enter the colour using one of the three tabs or To leave this zone unchanged activate the check box MASK or Press the OFF button to switch off all operating devices of this zone 4 To switch the operating devices assigned to zone White...

Page 42: ...a Ethernet refer to Downloading uploading files page 48 Hint Only use the UI_Layout bmp template bitmap 256 colours and create a new design for the buttons and or screen saver if you want Do not change file names sizes or file properties Do not use any mobile logos When selecting the colours the differences in brightness should not be too big because otherwise there is the danger of image persiste...

Page 43: ...ghting situation is displayed and confirm with OK 5 Press the Start button to call up the lighting situation Button Operating function Opens the dialog box for selecting a lighting situation sequence 1 to 99 schedule 1 to 7 or schedule list Shows the lighting situation which is called up using the Start Pause Stop and Off buttons Shows the status Start Calls up the lighting situation and starts th...

Page 44: ...erface 8 1 1 Uploading and downloading files Via the infrared interface IrDA you can download files to a PC laptop or upload files from a PC laptop to x touchBOX PANEL To load e g a software update to the x touchBOX PANEL you must perform the following steps Determine the program version in x touchBOX PANEL see Determining the display name and program version page 13 Check if a higher version is a...

Page 45: ...h other They must be no more than 1 m apart and no more than 15 twisted against each other 6 Prepare the PC laptop for transmitting via infrared see operating instructions of the manufacturer If the conditions for receiving are met the name of the laptop is indicated in the field Infrared devices The infrared transmission symbol is displayed in the task bar of the laptop 7 Click on the infrared tr...

Page 46: ...s to be established a crossed network cable must be used SWITCH x touch PANEL x touch PANEL x touch PANEL SWITCH x touch PANEL x touch PANEL Ethernet CAT 5 cable max 100 m IP Address 192 168 123 10 Subnet Mask 255 255 255 0 Gateway 192 168 123 1 IP Address 192 168 123 11 Subnet Mask 255 255 255 0 Gateway 192 168 123 1 IP Address 192 168 123 12 Subnet Mask 255 255 255 0 Gateway 192 168 123 1 IP Add...

Page 47: ... this example 1 Connect the PC laptop and the x touchPANEL via the network switch using network cables 2 On the PC laptop the following values must be set for the NIC to which the switch for the x touchPANEL is connected IP address 192 168 123 10 Subnet Mask 255 255 255 0 Gateway 192 168 123 1 3 Set the following values for the first x touchPANEL IP address 192 168 123 11 Subnet Mask 255 255 255 0...

Page 48: ...le 1 Connect x touchPANEL with the PC laptop using a network cable 2 On the PC laptop the following values must be set for the NIC the x touchPANEL is connected to IP address 192 168 123 10 Subnet Mask 255 255 255 0 Gateway 192 168 123 1 3 Set the following values for x touchPANEL IP address 192 168 123 11 Subnet Mask 255 255 255 0 Gateway 192 168 123 1 4 Press the Main Menu symbol to store the IP...

Page 49: ...lled on the PC laptop www java com A standard web browser is used for the connection e g MS Explorer Firefox The web browser is opened Java Runtime Environment is installed Enter the IP address of x touchPANEL in the address field of the browser and confirm with the Enter key The x touch software appears in the browser and can be operated and configured using the mouse pointer and keyboard Hint Ca...

Page 50: ...k the link get config file The dialog box File download is displayed 3 To upload a configuration file firmware update or application specific graphic for the buttons to an x touchPANEL click the Search button 4 Open the file and click on the upload button The firmeware update configuration file or application specific graphic is stored in the x touchPANEL Hint To upload an application specific gra...

Page 51: ...ress the Configuration button 3 Press the Calibrate button 4 Touch the calibration symbol with a pen and ensure that you are touching the center of the calibration symbol 5 Repeat step 4 twice The touchscreen is now centered 9 3 Scenes cannot be defined 1 Press the Main Menu button Ensure that each device is assigned to exactly one group 2 Press the Addressing grouping button 3 Press the Folder bu...

Page 52: ...ss the Configuration button 3 Press the IrDA tab 4 Press the Reset button 9 5 Ethernet connection cannot be established Only x touchPANEL has an Ethernet interface Ensure that a crossed network cable was used for a point to point connection x touchPANEL directly connected with PC laptop Ensure that the IP address entered in x touchPANEL and in the browser is correct Setting the IP address in x tou...

Page 53: ...vices 64 64 2 x 64 Basic Colour Dimensions L x W x H 200 x 150 x 42 mm 200 x 150 x 20 mm Permissible ambient temperature 0 50 C Weight 0 92 kg Fastening distance D 155 mm Protection type IP 20 Protection class SK I Screen Touchpanel 5 7 320 x 240 pixels 256 colors Overvoltage when connecting the DALI lines to the power supply for x touchBOX Damage to the device With x touchBOX the DALI power suppl...

Page 54: ...ce with country specific regulations The device must not be disposed of in the domestic garbage or burnt DALI SC DALI GC PCA EXCEL one4all PCA EXCEL one4all x touchBOX DALI SCI L N L N DALI SC DALI GC 24 48 V DC 10 VA PCA EXCEL one4all PCA EXCEL one4all x touchPANEL DALI USB DALI PS PS1 DALI SC DALI GC PCA EXCEL one4all PCA EXCEL one4all DALI USB DALI PS PS1 L N PE L N DALI 1 DALI 2 P H A S E D O ...

Page 55: ...P H A S E D O U T ...

Page 56: ...www tridonicatco com 1030 0 05 08 EN We reserve the right to make technical changes without prior notice No liability can be assumed for the accuracy of data content P H A S E D O U T ...

Reviews: