11
Blade Replacement
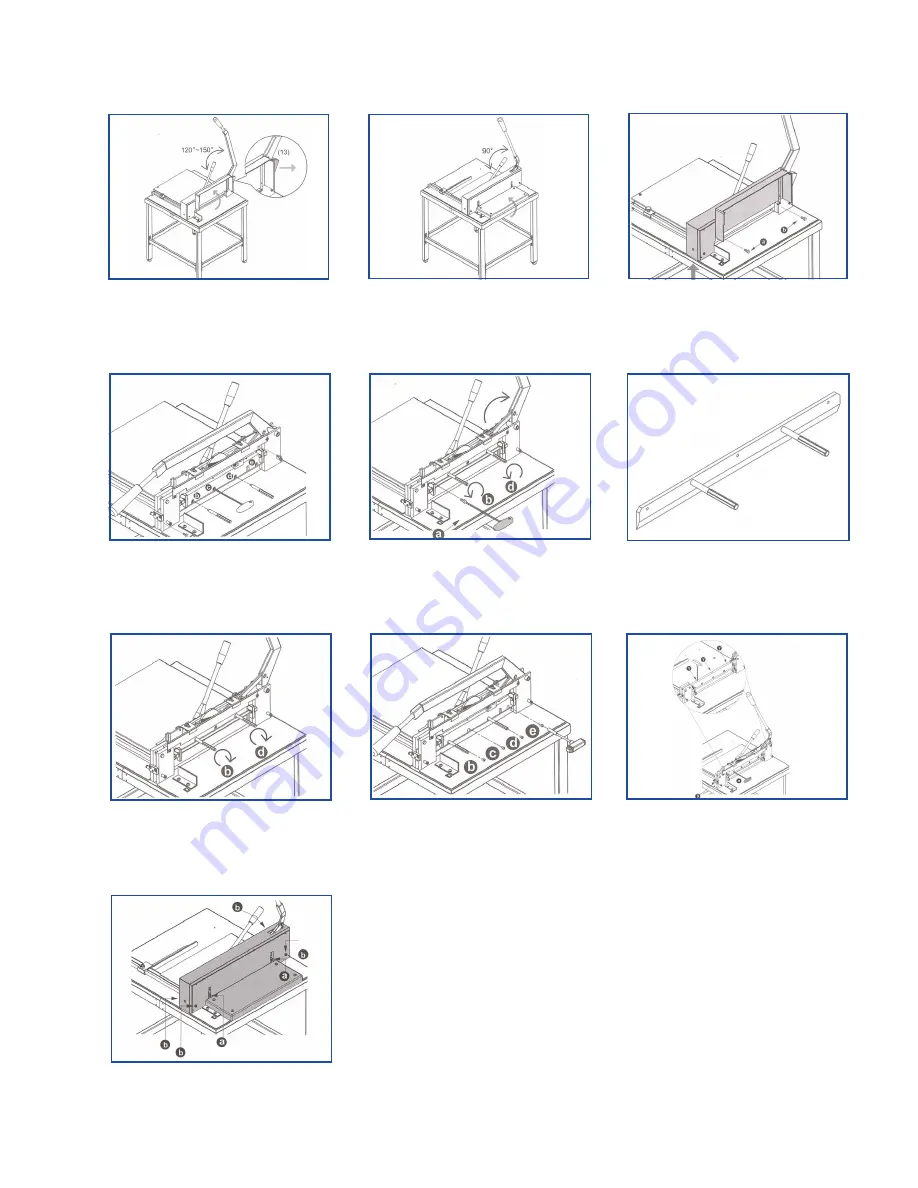
For Cutters with a Flick Action Clamping System:
5. Return the knife lever to its locked starting
position. Remove the knife screw
6. Loosen the knife holder by a half turn, and
lower the knife from the knife carrier. Remove
the worn blade and replace with a new one.
1. For 400 sheets: Put the knife lever to its
top position between 120 & 150 degrees and
loosen the soft PE handle to remove it. To take
off the safety gadget please refer to (13)
2. For 200 sheets: Put the knife lever to its top
position about 90 degrees and loosen the
knife lever to take it off.
4. Lower the knife lever to be horizontal.
Remove the knife screws (b & d) and replace
them with two knife holders from the tool box.
Tightly secure. Remove knife screws (c & e).
3. Remove the screws on the front safety guard
and cover (screws a & b). Remove the blade
housing cover and front safety guard.
8. Screw in knife screws (c & e) remove the
knife holders, then screw in the knife screw
(b & d)
7. Insert the knife holders into the second
& fourth threaded holes (b & d) of the knife.
Place the knife into the knife carrier and fasten
them securely with knife holders.
Lower the lever to be horizontal.
10. Ensure the knife is in its locked starting
position. Make a trial cut on one piece of
paper. If the paper does not cut, then the knife
will need adjusting via the screws.
Re-attach the blade housing cover and the
front safety guard.
9. Return the knife lever to its locked starting
position. Screw in the knife screw (a). Move
the knife carefully down to the cutting stick
via the knife lever. Turn the knife adjustment
(9) to the right - until you have a visible ray of
light between the knife edge and cutting stick.
Adjust the knife to touch the cutting stick by
adjusting the screws.


