12
Blade Replacement
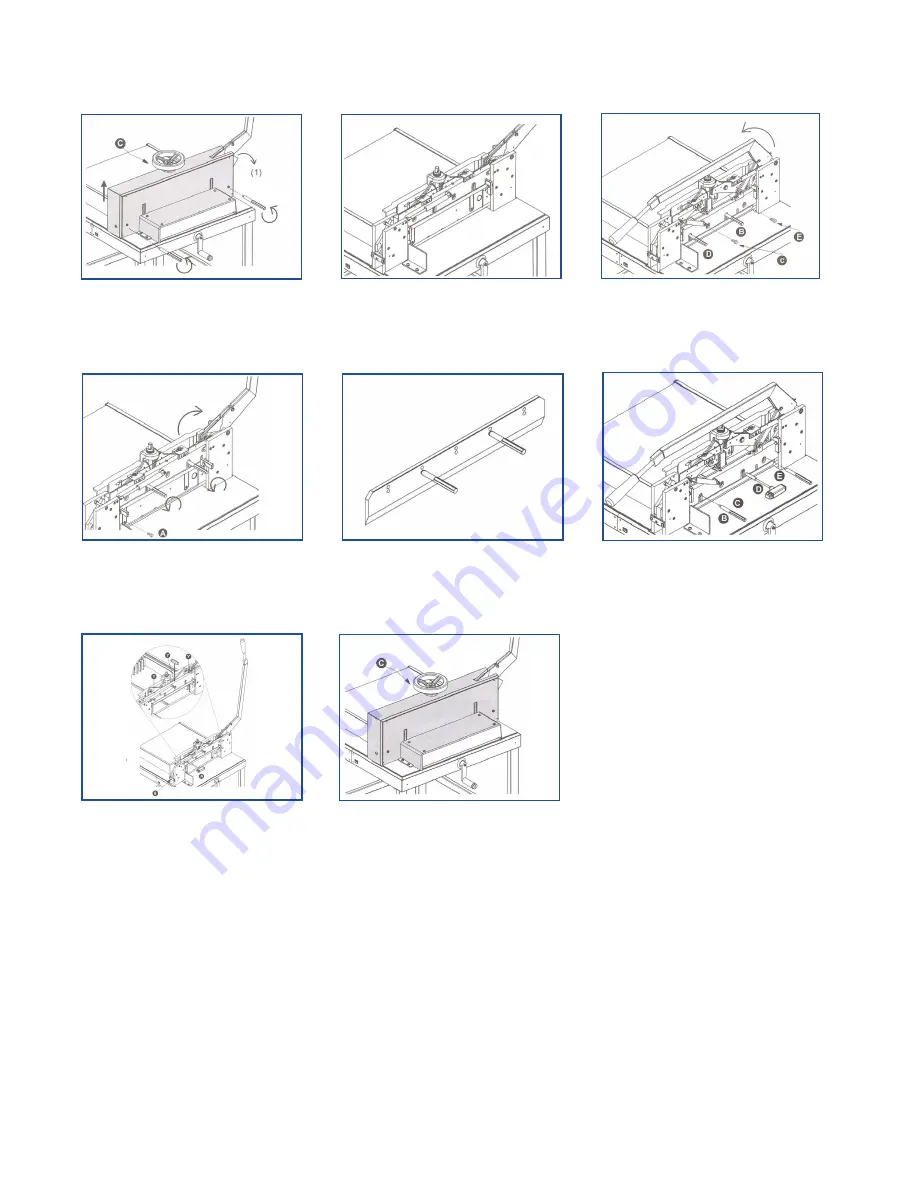
For Cutters with a Spindle Hand Wheel:
5. Remove the knife holders and the old blade,
replace this with a new blade. Screw the
knife holders back into place. Insert the knife
holders into the opened second & fourth hole
of the blade carrier and fasten.
6. Lower the knife lever until this is horizontal,
tighten the knife screws (c & e) remove the
knife holders, then fasten the knife screws
(b & d).
1. Remove the safety gadget (1). Raise the
knife lever. Remove the screw (c) on the clamp
wheel. Remove all the screws fixed on the
cover. Place the knife lever at 75 degrees and
remove the knife cover.
2. Lower the knife lever until this is horizontal.
4. Return the knife lever to its locked starting
position. Remove the knife screw (a). Loosen
the knife holders (by only half turn) and lower
the blade downwards from the blade carrier
and remove the blade carefully.
3. Remove the screws (b & d), replace them
with the two knife holders from the tool box
and tighten them securely. Remove the knife
screws (c & e).
7. Return the knife lever to its locked starting
position. Screw in the knife screw (a). Move
the knife carefully down to the cutting stick
via the knife lever. Turn the knife adjustment
(8) to the right - until you have a visible ray of
light between knife edge and cutting stick.
Adjust the knife to touch the cutting stick by
adjusting the screws. Move the knife lever to
its locked raised position. Make a trial cut with
one sheet of paper, if the paper does not cut
through totally, then the knife needs adjusting
using the screws (y & 8).
Please note. (8) is for minor up/down
adjustment. (y) is for horizontal adjustment.
8. Place the knife lever at 75 degrees and
assemble the cover. Tighten all screws on the
cover. Assemble the spindle clamp hand wheel
and screw (c) to fix tightly. Assemble the safety
gadget.


