9
10. Apply air over the piston to drive the plug
and lift the yoke off of the bonnet. The
yoke will lift approximately 1/16-inch
(1.60mm). If the space is not that size,
apply air under the piston to retract the
actuator stem and screw the plug in or out
as needed. Repeat until the 1/16-inch
(1.60mm) space is created.
11. To attach the yoke clamps and packing box
bolting, apply air under the piston. Tighten
the yoke clamp bolting firmly. The packing
box nuts should be just over finger-tight.
CAUTION:
Do not over-tighten
packing.
12. To seat the plug, apply air over the piston.
For all throttling valves, adjust the stem
clamp so that, with full instrument signal to
the positioner, the full signal scribe line on
the positioner cam points to the center of
the cam roller bearing.
Note:
For on/off valves, the bottom of the
stem clamp should line up with the bottom of
the actuator stem (±1/16-inch).
Tighten the stem clamp bolting to secure
the actuator stem to the plug stem. Adjust
the stroke plate so that the stem clamp
points to the "closed" position.
13. Reconnect the actuator/positioner tubing,
supply, and signal lines.
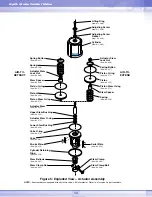
AIR-ACTION REVERSAL
Air-to-Open
To switch the air-action from air-to-close to air-
to-open continue as follows:
1. Adhere to the instructions for disassembly
of the actuator (see "Actuator Disassembly"
section).
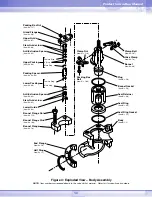
2. Reassemble the actuator with the spring,
actuator stem spacer, and spring button
over the piston. For proper alignment, the
center hole in the spring button should
engage the end of the adjusting screw.
3. The positioner must be changed as well, to
do so, refer to the appropriate positioner
manual.
Air-to-Close
To switch the air action from air-to-open to air-
to-close continue as follows:
1. Adhere to the instructions for disassembly
of the actuator (see "Actuator Disassembly"
section).
2. Reassemble the actuator with spring and
actuator stem spacer below the piston. The
spring should sit in the spring groove on top
of the yoke. The spring button is not used
on air-to-extend configurations and is
stored above the piston (the actuator stem
retaining nut holds the spring button in
place).
3. The positioner must be changed as well. To
do this, refer to the appropriate positioner
manual.
Product In
s
truction Manual


