background image

CRANKS AND PEDALS

- The pedals are securely tightened to the crank arms.
- The crank arms are secured to the axle and are not bent.
 

FRAME

- The frame is not bent or broken.
- The quick-release clamps are locked in place.
 

STEERING

- The handlebar and post are correctly adjusted and tightened, and allow proper steering.
- The handlebar binder bolt is tightened.
 

WHEELS AND TIRES

- The wheels are properly attached to the bicycle and axle.
- The tires are properly inflated within the recommended pressures displayed on the tires 
sidewall.
- The tires have the proper amount of tread, no bulges or excessive wear.

15

Summary of Contents for CARGO BIG

Page 1: ...ORIGINAL INSTRUCTIONS ENGLISH V 1 2 CARGO BIG ...

Page 2: ......

Page 3: ...artment is dedicated to your satisfaction with Triobike and its products If you have questions or need advice regarding assembly parts performance or returns please contact the experts at Triobike Enjoy the ride phone 45 36 70 00 70 email support triobike dk website www triobike com social medias youtube facebook hello new user let s ride our contacts ...

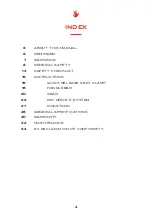
Page 4: ...WARNINGS GENERAL SAFETY SAFETY CHECKLIST INSTRUCTIONS QUICK RELEASE SEAT CLAMP HANDLEBAR GEAR MID DRIVE E SYSTEM KICKSTAND GENERAL SPECIFICATIONS WARRANTY MAINTENANCE EC DECLARATION OF CONFORMITY 6 6 7 8 14 16 16 18 20 22 27 28 30 32 34 ...

Page 5: ......

Page 6: ...mprehensive manual covering all aspects concerning bicycle ownership We recommend consulting a bicycle specialist if you have any doubts or concerns regarding your experience or ability to properly assemble and maintain the bicycle REMINDER All persons assembling using and maintaining the bicycle must read and understand the safety warnings and operating instructions in this manual before using th...

Page 7: ...S OF CONTROL INABILITY TO SAFELY REACH THE HANDLEBARS AND DISMOUNT THE BICYCLE MAY RESULT IN LOSS OF CONTROL OF THE BICYCLE IMPROPER SETUP OR MAINTENANCE OF THE BICYCLE MAY RESULT IN AN UNEXPECTED MOVEMENT LOSS OF CONTROL AND SERIOUS INJURY RIDING THE BICYCLE IN UNSAFE CONDITIONS IN AN UNSAFE MANNER OR DISREGARDING TRAFFIC LAWS MAY RESULT IN AN UNEXPECTED MOVEMENT LOSS OF CONTROL AND SERIOUS INJUR...

Page 8: ...r ride while under the influence of alcohol medication or drugs If you suffer from any health conditions please consult your doctor before riding Never endanger yourself or others by reckless riding The usage of bicycles or any accessories such as lamps bells etc is the user s own responsibility and TRIOBIKE cannot be held responsible for any damage accidents personal injury or fines caused by the...

Page 9: ...the prevailing weather conditions Do not lock up the brakes When braking always apply the rear brake first then the front The front brake is more powerful and if it is not correctly applied you may lose control and rise the rear wheel Always use the correct hand signals to indicate turning or stopping Obey the traffic laws e g stopping at a red light or stop sign giving way to pedestrians Wear pro...

Page 10: ...rlier it will take a longer distance to stop Pot holes and slippery surfaces such as line markings and train tracks all become more hazardous when wet This bike is for on road use only Do not use the bike off road or on rough terrain Be aware of road conditions Concentrate on the path ahead Avoid pot holes gravel wet road markings oil curbs speed bumps drain grates and other obstacles Cross train ...

Page 11: ...g down as required to maintain pedaling speed If you reach the lowest gear and are struggling don t stand up on your pedals since you may loose control of the bike You will then obtain more power from each pedal revolution On the descent use the high gears to avoid rapid pedaling Do not exceed a comfortable speed maintain control and take additional care Braking will require additional distance In...

Page 12: ...12 CORNERING TECHNIQUE GENERAL SAFETY Brake slightly before cornering and prepare to lean your body into the corner Decrease your riding speed avoid sudden braking and sharp turns ...

Page 13: ......

Page 14: ... fastened and functioning e g lights Rider s and passenger s clothing and items are properly constrained and not loose BEARINGS All bearings are lubricated run freely and display no excess movement grinding or rattling BRAKES The front and rear brakes work properly The brake control cables are lubricated correctly adjusted and display no obvious wear The brake control levers are lubricated and tig...

Page 15: ... locked in place STEERING The handlebar and post are correctly adjusted and tightened and allow proper steering The handlebar binder bolt is tightened WHEELS AND TIRES The wheels are properly attached to the bicycle and axle The tires are properly inflated within the recommended pressures displayed on the tires sidewall The tires have the proper amount of tread no bulges or excessive wear 15 ...

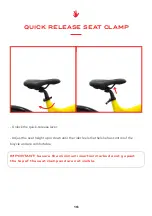
Page 16: ...quick release lever Adjust the seat height up or down until the rider feels that he she has control of the bicycle and are comfortable IMPORTANT be sure the minimum insertion marks do not go past the top of the seat clamp and are not visible ...

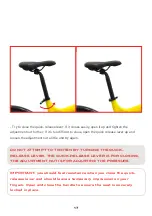
Page 17: ...ustment nut a little and try again DO NOT ATTEMPT TO TIGHTEN BY TURNING THE QUICK RELEASE LEVER THE QUICK RELEASE LEVER IS FOR CLOSING THE ADJUSTMENT NUT IS FOR ADJUSTING THE PRESSURE IMPORTANT you should feel resistance when you close the quick release lever and should leave a temporary impression on your fingers Open and close the handle to ensure the seat is securely locked in place 17 ...

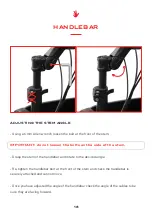
Page 18: ... the stem Grasp the stem of the handlebar and rotate to the desired angle Re tighten the handlebar bolt at the front of the stem and check the handlebar is securely attached and cannot move Once you have adjusted the angle of the handlebar check the angle of the cables to be sure they are facing forward ADJUSTING THE STEM ANGLE ...

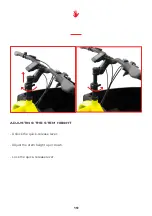
Page 19: ... Unlock the quick release lever Adjust the stem height up or down Lock the quick release lever ADJUSTING THE STEM HEIGHT 19 ...

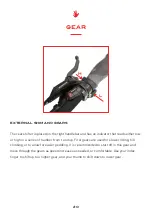
Page 20: ...rom 1 and up First gears are used for slower riding hill climbing or to allow for easier peddling It is recommended to start off in this gear and move through the gears as speed increases as needed or comfortable Use your index finger to shift up to a higher gear and your thumb to shift down to lower gear EXTERNAL SHIMANO GEARS H L ...

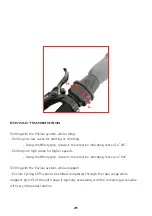
Page 21: ...more of a hill Shifting into high ratios for higher speeds Using the Nfinity grip rotate in the direction indicating more of a flat Shifting with the Enviolo system while stopped Enviolo Cycling CVPs cannot be shifted completely through the ratio range while stopped 50 70 of the shift range is typically accessible with the remaining accessible with very little pedal rotation 21 ...

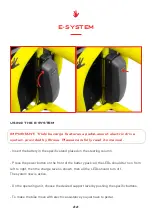
Page 22: ...ed on the steering column Press the power button on the front of the battery pack all the LEDs should turn on from left to right then the charge level is shown then all the LEDs should turn off The system now is active On the operating unit choose the desired support level by pushing the specific buttons To make the bike move with electric assistance you just have to pedal 22 E SYSTEM ...

Page 23: ...and rotate it Then rotate the battery to the left To charge the battery plug the charger magnetic connector in the specific socket The LED on the battery will start blinking When the charge is done all the 5 LEDs are on IMPORTANT don t leave the battery charging too much time after the full charge When the battery is fully charged disconnect it from the charger 23 ...

Page 24: ...c assistance you just have to pedal To activate the walk assist just press for 3 seconds the specific button on the handlebar control The bike will slowly move by itself without pedalling Integrated lights can be switched on and off pressing the specific button To turn off the system press the power button on the remote control for 3 seconds When the display is off the complete system is off too I...

Page 25: ...ween CRUISE less assistance TOUR SPORT max assistance To activate the walk assist just press for 3 seconds the button on the handlebar control The bike will slowly move by itself without pedalling Integrated lights can be switched on and off pressing the specific button To turn off the system press the power button on the display for 3 seconds When the display is off the complete system is off too...

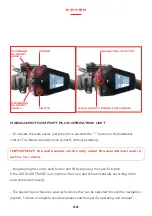
Page 26: ... by itself without pedalling IMPORTANT the walk assist works only when the assistance level is set to 1 or more Integrated lights can be switched on and off by pressing the specific button If the AUTO LIGHT MODE is on lights will turn on and off automatically according to the environment luminosity The operating unit features several functions that can be selected through the navigation joystick T...

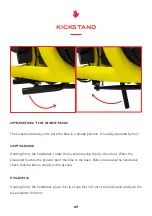
Page 27: ...the kickstand using the tip of one foot When the kickstand touches the ground push the bike to the back Before releasing the handlebar check that the bike is steady on the ground Holding firmly the handlebar place the tip of one foot in front of the kickstand and push the bike towards the front OPERATING THE KICKSTAND UNFOLDING FOLDING 27 ...

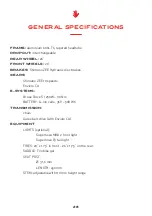
Page 28: ...himano ZEE 10 speeds Enviolo CA E SYSTEMS Brose Drive S 250W 90 Nm BATTERY Li Ion cells 36V 508 Wh TRANSMISSION chain Gates belt drive with Enviolo CA EQUIPMENT LIGHTS optional Supernova MINI 2 front light Supernova E3 tail light TIRES 20 x 1 75 in front 26 x 1 75 on the rear SADDLE Triobike gel SEAT POST Ø 31 6 mm LENGTH 450 mm STEM adjustable with 110 mm height range ...

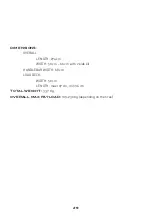
Page 29: ...ONS OVERALL LENGTH 274 cm WIDTH 50 cm 66 cm with 2 kids kit HANDLEBAR WIDTH 68 cm LOAD DECK WIDTH 50 cm LENGTH max 107 cm min 96 cm TOTAL WEIGHT 33 7 Kg OVERALL MAX PAYLOAD 189 230 Kg depending on the tires 29 ...

Page 30: ...s warranty The bicycles are intended to be used for city biking TRIOBIKE shall not be held responsible for any accidents injury losses or damage caused by use of the bicycle being that of responsibility of the owner The above limited warranty is conditional upon the bicycle being properly maintained and operated under normal conditions and use In case of warranty claim contact the original place o...

Page 31: ......

Page 32: ...bike mechanic Specific control points for each service brakes gears battery status spokes bearings TIRES It s important to have correct air pressure on tires It improves control and handling and it doesn t stress tires Correct pressure is 4 5 Bar 65 PSI BATTERIES Batteries have to be charged every 4 weeks also when the bike is parked and not in use For complete instructions please check the e syst...

Page 33: ...6210 miles brakes grears bearings spokes brakes grears bearings battery status tires check chain spokes brakes grears bearings battery status tires check chain spokes brakes grears bearings battery status tires check chain spokes brakes grears bearings battery status tires check chain spokes brakes grears bearings battery status tires check chain spokes operation checklist dealer stamp 33 ...

Page 34: ...tion Transport bike with electric support Year 2019 meets all the provisions of the Directive 2006 42 EC on machinery meets all the provisions of the Directive 2004 108EG Electromagnetic Compatibility meets the associated battery charger complies with all provisions of the Directive 2006 95 EC Low Voltage Triobike A S Copenhagen 4 January 2019 Sammy Eisinger managing director ...

Page 35: ...Copyright Triobike A S 2019 All Rights Reserved ...

Page 36: ...TRIOBIKE A S Gammel Kongevej 80 1850 Frederiksberg C Denmark phone 45 3670 0070 info triobike dk www triobike com ...

Reviews: