background image

Page 5

  •  Full Color 3.5” TFT-LCD Video Monitor
  •  12V 1A output to power cameras
  •  OSD (On Screen Display) of all Modes, Functions, and Settings
  •  Adjustable LCD Brightness / Contrast / Color Saturation
  •  BNC connectors match professional CCTV equipment
  •  Full Loop Thru capability or simultaneous View / Gen mode
  •  Auto NTSC / PAL detection and video display
  •  PTZ Keyboard allows fast access to Pan, Tilt, Zoom, Focus, and Iris
  •  Keyboard allows adjustment of Groups, Tours, and Presets
  •  Supports more than 30 PTZ Protocols including Pelco, Samsung, 
     Panasonic, and Sony formats
  •  Supports RS-485, RS-232, & RS-422. 
  •  Baud Rates from 150 to 19.2K
  •  Data Monitor mode verifies presence of PTZ signals
  •  PTZ Transmit / Receive LEDs
  •  Color Bar Generator produces NTSC and PAL video formats
  •  LAN Cable Test identifies Opens, Shorts, or Miswires
  •  Rechargeable Lithium Ion Polymer Battery provides 12 hour work time
  •  On screen battery life indicator and LED charging indicator
  •  Operates from battery or AC power pak
  •  Auto-Power-Off extends battery life (can be defeated)
  •  Carrying case with shoulder strap included
  •  Neck strap for CamView included
  •  BNC cable and RS-485 cable included
  •  Universal AC power pak and charger included

2.1  Features and Function

Summary of Contents for CamView PTZ 2

Page 1: ...REV A 10 13 CamView PTZ 2 TM Instruction Manual PN 8001 ...

Page 2: ......

Page 3: ...roller Please read the complete manual carefully before using the product To assure safe use of this product please read the section on Safety carefully and observe any Cautions or Warnings posted there and throughout this manual Please keep this manual for future reference Page 1 ...

Page 4: ...onitor Mode PTZ Controller Parameter Setting 3 3 Setting PTZ Parameters Overview 3 3 1 Setting PTZ Parameters Detail 3 3 2 Using Presets 3 3 3 Accessing a PTZ Camera Menu 3 3 4 Video Setting 3 4 Color Bar Generator 3 5 Cable Testing 3 6 Capturing PTZ Protocol 3 7 Device Setting User Settings 3 8 Auto Power Off 3 8 1 Prompt Sound 3 8 2 Language 3 8 3 Brightness 3 8 4 Automatic Address Search 3 8 5 ...

Page 5: ...harging the battery life number of charge discharge cycles of the product can be maximized by limiting charge time to 8 hours The product should not be used in the presence of flammable gases Do not disassemble There are no user serviceable components inside The product should not be used in the presence of strong electromagnetic fields Don t touch the product with wet hands Although the product i...

Page 6: ...test signal to check video cables video recorders and video monitors The video level and the signal format of an input signal can be measured Automatic Address Search is convenient for finding the address of a camera LAN cable can also be tested using the CamView s built in cable tester The rugged yet lightweight construction and ergonomic design maximizes convenience and portability and the 12 ho...

Page 7: ...cluding Pelco Samsung Panasonic and Sony formats Supports RS 485 RS 232 RS 422 Baud Rates from 150 to 19 2K Data Monitor mode verifies presence of PTZ signals PTZ Transmit Receive LEDs Color Bar Generator produces NTSC and PAL video formats LAN Cable Test identifies Opens Shorts or Miswires Rechargeable Lithium Ion Polymer Battery provides 12 hour work time On screen battery life indicator and LED...

Page 8: ...The following items are included with your Triplett CamView PTZ 2 2 Included Items Remote Terminator for LAN Cable Testing BNC to BNC Patch Cable AC Power Pak Audio Input Cable 12V 1A DC Output Cable PTZ Cable ...

Page 9: ...Page 7 2 2 Included Items Cont Carrying Case Shoulder Strap for Carrying Case Neck Strap for CamView Instruction Manual ...

Page 10: ...Page 8 2 3 Controls and Indicators 1 2 3 4 5 6 7 8 9 10 11 12 13 14 15 16 17 18 19 20 ...

Page 11: ...arging indicates FULL whencompletelycharged 5 LCD Screen Shows video images and On Screen Display functions 6 Menu Shows available Functions Settings Modes etc 7 POWER Button Press for 2 seconds to turn power on or off A short press Hides or Reveals the PTZ controller menu 8 MODE Button Press momentarily to select one of the 6 available test or setting options from a drop down menu 9 SET Button Pr...

Page 12: ... the controlled camera down Navigatedownwardonamenu Changeaparametervalue 14 ENTER OPEN Button Confirm the value or setting of various parameters OPEN the camera aperture iris 15 RETURN CLOSE Button Return or cancel while set ting parameters CLOSE the camera aperture iris 16 NEAR Button Adjust Focus for nearer objects 17 FAR Button Adjust Focus for farther objects 18 TELE Button Zoom In on an obje...

Page 13: ...ing an RS 232 control signal 25 Video input BNC Input for NTSC or PAL video signal from camera or other video device 26 Video output BNC Loopthrough from Video input 26 or NTSC PAL Color Bar video output 27 RS485 422 Connector PTZ control signal input output Connect to camera or other PTZ device 28 Audio Input 29 Page 11 2 3 Controls and Indicators 22 30 24 25 27 28 29 23 30 12 Volt 1 amp output T...

Page 14: ...o the circuit board see photo Replace the battery cover and screws 2 4 Connecting and Charging the Battery There is no need to unplug the battery if the CamView is being used regularly at least once every few weeks If the CamView will be unused for more than 1 month unplug the battery for storage For first time usage it is recommended that the battery be conditioned by operating the CamView until ...

Page 15: ... is approximately 90 charged The charging time can be extended for about 1 hour to top off the battery charge To obtain the best battery life limit charging time to about 8 hours Leaving the battery on continuous charge may reduce the battery life The CamView can be used while its batteries are being charged however the charging time will be increased Page 13 2 4 Connecting and Charging the Batter...

Page 16: ...ghlighted on the Menu You may also select a different Mode by pressing the or buttons when the Mode Menu is displayed Once a Mode is selected the or the buttons may be used to change settings and alter parameters If the PTZ Mode is selected the buttons directly con trol the motion and settings of the camera Notice that the indicator lights when any of these buttons are pressed in the PTZ mode This...

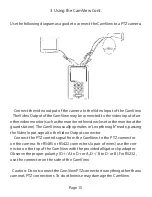
Page 17: ...y operates in Loopthrough mode passing the Video Input signal to the Video Output connector Connect the PTZ control signal from the CamView to the PTZ connector on the camera For RS485 or RS422 connectors a pair of wires use the con nector on the top of the CamView with the provided alligator clip adapter Observe the proper polarity D A to D or A D B to D or B For RS232 use the connector on the si...

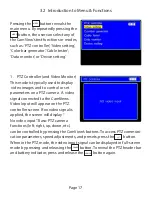
Page 18: ...ters on a PTZ camera A video signal connected to the CamViews Video Input will appear on the PTZ controller screen If no video signal is applied the screen will display No video input Basic PTZ camera functions left right up down etc can be controlled by pressing the CamView s buttons To access PTZ communi cation parameters speed adjustments and presets press the button When in the PTZ mode the vi...

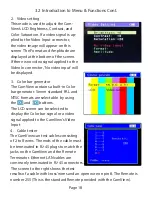
Page 19: ...acks on the CamView and the Remote Terminator Ethernet LAN cables are commonly terminated in RJ 45 connectors The screen to the right shows the test results of a cable with cross wires and an open wire on pin 8 The Remote is number 255 This is the standard Remote provided with the CamView 2 Video setting This mode is used to adjust the Cam View s LCD Brightness Contrast and Color Saturation If a v...

Page 20: ...n 5 Data Monitor The CamView will display incoming PTZ signals This allows the user to verify that the PTZ control wires have a PTZ signal present This is useful to determine if a non responsive PTZ camera is actually receiving a PTZ control signal 6 Device setting User Settings Auto power off Disable or set time for auto power off Keypad tone Turn keybeep on or off Language Select English French ...

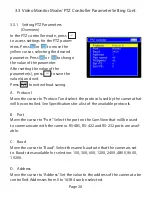
Page 21: ...CLOSE A Protocol Move the cursor to Protocol and select the protocol used by the camera that will be controlled See Specifications for a list of the available protocols B Port Move the cursor to Port Select the port on the CamView that will be used to communicate with the camera RS 485 RS 422 and RS 232 ports are avail able C Baud Move the cursor to Baud Select the same baud rate that the camera i...

Page 22: ... change depending on the camera F Tilt Speed Move the cursor to Tilt Speed Select a value for the Tilt speed from 0 to 63 Note The range of adjustment can change depending on the camera G Set ps Setup Preset Move the cursor to Set ps Choose a number from 0 to 255 to identify the preset location H Get ps Go to Preset Move the cursor to Get ps Select a preset number that will be activated ...

Page 23: ...ngs are often set with DIP switches located in the base of the camera Soft waresettingscanonlybeaccessedafterthecameraispoweredupandcommu nicating with its controller The Baud Rate must be known This is often determined by a DIP switch set tingonthecamera IftheCamViewandthecameraarenotsettothesameBaud Rate they will not communicate The camera Address must be known This is often determined by a DIP...

Page 24: ... controller mode press to access the PTZ settings Then press or to move the cursor to Address and set the address to match the camera address by pressing or as required Press to save the setting Press to exit D Setting the Protocol With the CamView in the PTZ controller mode press to access the PTZ settings Then press or to move the cursor to Protocol and select the camera s PTZ protocol by pressi...

Page 25: ...ouldbevisibleontheLCD screen Pressthebuttonsonthekeyboardtoverifythatthecamerarespondsto the CamView s commands Some cameras may not respond to the Aperture or Focus settings because these are automatically set by the camera There may be a software setting in the camera menu that allows the camera to respond to manual Aperture and Focus commands To allow manual operation of these settings the came...

Page 26: ...the cursor to Set ps Chose a preset number the number chosen must agree with available memory in the camera for example 10 Use and to set the value to 10 Press to save the setting Press to exit If preset 10 already exists it will be overwritten with the new location It is common for cameras to have from 20 to over 100 user selectable presets To activate a preset While in the PTZ controller mode pr...

Page 27: ...nu It is beyond the scope of this manual to give instructions on how to set the camera parameters The method varies depending on the manufacturer and the camera It is up to the user to understand the camera and its settings The following is for illustration only The main menu of the particular camera used as an example is accessed by preset 064 Other cameras use a different preset number to access...

Page 28: ...manufacturer Pleasereviewthemanufacturer scamerainformationfor detailed instructions Auto Scan Many PTZ cameras have an Auto Scan function This function usually com mandsthecameratoscan pan backandforthrepeatedlyoverapresetlocation To access this function the camera s Auto Scan command number must be known For the camera in this example the command is 098 The camera may havemorethanoneAutoScanrout...

Page 29: ...o stop the Auto Scan send the camera to any new com mand like momentarily press the button 3 4 Video Setting This mode is used to adjust the Brightness Contrast and Color Saturation of the video image If a video signal is applied to the Video Input connector the video image will appear on this screen and the video Format and Ampli tude will be displayed The Format will be in NTSC or PAL and the Am...

Page 30: ... Setting mode Adjust the video settings using the and buttons to select the desired parameter and set its value MODE The CamView PTZ automatically determines if the level is Weak Normal or too strong Exceed and displays a message below the level reading Weak is displayed when the signal is 20 low and Exceed is displayed when the signal is 20 too high 112 IRE 0 8 Volts and below Weak 140 IRE 1 0 Vo...

Page 31: ...r can also be used as a test signal for a video recorder verifying that video can be recorded and played back with acceptable quality In the Color bar generator mode the LCD screen can be selected to display the Color bar signal or a video signal applied to the CamView s Video Input Use the button to select the Color bar generator mode Use and to select the desired video format NTSC M RS170A is us...

Page 32: ...are commonly terminated in RJ 45 connectors Use the button to select Cable tester Connect one end of the cable to be testedtotheRJ 45connectoronthesideoftheCamView Connecttheotherend of the same cable to the RemoteTerminator View the test results on the Cable tester screen A good straight through LAN cable will test as shown The straight through cable is identified as a Pin to Pin cable connected ...

Page 33: ...al The actual codes are generally meaningless to the average user There is little chance of decodingtheirmeaningwithoutin depthknowledgeofthePTZcodingscheme What s important is that the PTZ codes are present in the PTZ control wires connected to a PTZ camera Page 32 Shorted or Open wires are indicated by a red X on the screen The cable in the following example is miswired and has Opens or Shorts o...

Page 34: ...s to be tested If PTZ signals are present a display similar to that shown will ap pear The display may update periodically and the values may change If no PTZ dataappearsontheLCD reversethepolarityofthePTZconnection Ifdatathen appears note the polarity of the PTZ wires They must be connected to the PTZ camera in the correct polarity or the camera may not respond to PTZ signals If the CamView s Por...

Page 35: ... CamView Use or to move the cursor to Language Then select English French Spanish or Chinese Symbols using the and buttons Apply the change by pressing 3 8 4 Brightness The brightness of the menus can be set as desired Use or to move the cursor to Brightness Then select a brightness from 0 to 7 using the and buttons Apply the change by pressing ENTER OPEN ENTER OPEN ENTER OPEN ENTER OPEN 3 8 5 Aut...

Page 36: ...to the Address search screen If no response is obtained the Address can be manually incremented or decremented or automatically incremented or decremented A message at the bottom of the screen is a reminder of how to access these functions Far Near Start search means that pressing the FAR or NEAR keys will start the automatic Ad dress Search Pressing the NEAR key causes the address setting to decr...

Page 37: ... Lilin MLP2 Molynx Minking A01 AD Fastrax CBC LC NEW WV CS850 SONY EVI LG MULTIX PEARMAIN Minking B01 ALEC DAT SD Vicon Vcltp Sanyo SSP Santachi DH YTC06 Bosch OSRD TeleEye DM2 HD600 Hikvision Kalatel 304 Address Range 0 to 16 384 Baud Rates 150 300 600 1200 2400 4800 9600 19200bps Connections RS232 15 pin D sub RS485 RS422 Alligator clips on provided adaptor cable Color bar Generator Pattern 8 ve...

Page 38: ...ctions RS232 9 pin D sub DB9 RS485 RS422 Alligator clips on provided adaptor cable Settings Port selection and Baud rate POWER AC Adaptor Charger Input 100 to 240VAC 50 60Hz 0 30A American Blade Output DC5V 2A 5 5mm x 2 1mm coaxial center positive Battery Built in 3 7V Lithium polymer battery 3000mAh Charging Time Approximately 4 hours for 90 charge the Charge indicator LED turns off Additional 1 ...

Page 39: ...vironmental Working Temperature 30F to 160F Working Humidity 0 90 RH Physical Dimensions 2 x 4 x 6 Weight 10oz CamView only Certifications CE and FCC Page 38 4 Specifications Cont Triplett Product Return Instructions In the unlikely event that you must fix your Triplett equipment please Call 1 800 TRIPLETT ...

Page 40: ...l purchase Thiswarrantydoesnotapplytoanyofourproductswhichhavebeenrepairedor alteredbyunauthorizedpersonsinanywaysoas inoursolejudgment toinjure their stability or reliability or which have been subject to misuse abuse misap plication negligence accident or which have had the serial numbers altered defaced or removed Accessories including batteries and fuses not of our manufacture used with this p...

Page 41: ...tes USA ONLY do not allow the exclusion or limitation of incidental or consequential damages so the above limitation or exclusion may not apply to you No representative of Triplett Jewell Instruments or any other person is authorized to extend the liability of Triplett in connection with the sale of its products beyond the terms hereof Triplettreservestherighttodiscontinuemodelsatanytime orchanges...

Page 42: ... shorted together the breaker will open removing power from the wires It may take several minutes for the breaker to cool and repower the 12V output During this time the rest of the product will operate normally If the 12V wires are accidentally shorted to the video circuit electronic protection automatically shuts the entire product down When this happens the product will not power up until the c...

Page 43: ...Notes ...

Page 44: ......

Reviews: