

24
1
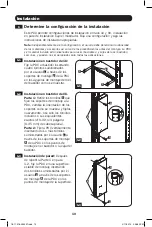
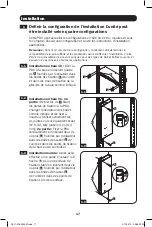
Определение установочной конфигурации
Данная модель PDU подходит для вертикального монтажа в стойку (высота 0U), монтажа в стойку
высотой 1U, настенного монтажа и монтажа под прилавком. Выберите одну из комплектаций и
выполните монтаж согласно соответствующей инструкции.
Примечание.
Независимо от типа установочной конфигурации, пользователь должен установить пригодность
оснастки и предполагаемых процедур до начала монтажа. PDU и входящая в его комплект оснастка предназначены
для обычных типов шкафов и могут не подходить для всех целей применения. Установочные конфигурации могут
различаться в деталях.
Установка
1-3
1-1
1-2
1-1
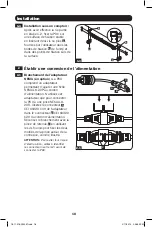
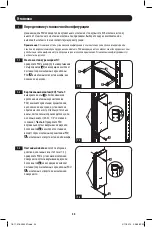
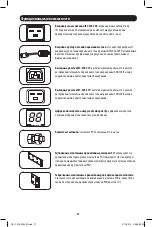
Монтаж в стойку размером 1U:
прикрепите PDU к шкафу путем ввертывания
четырех винтов
A
(не входящих в комплект
поставки) через монтажные кронштейны
PDU
B
в монтажные отверстия шкафа, как
показано на рисунке.
1-2
Вертикальный монтаж (0U). Часть 1:
выверните винты
C
, обеспечивающие
крепление монтажных кронштейнов к
PDU, измените ориентацию кронштейнов,
как показано на рисунке, и установите их
обратно на свое место. Используйте только
винты, поставляемые производителем, или
их полный аналог (#6-32, 1/4” с потайной
головкой).
Часть 2.
Прикрепите PDU
вертикально путем ввертывания двух или
более винтов
A
(в комплект поставки не
входят) через монтажные кронштейны PDU
B
в монтажные отверстия стойки или шкафа.
1-3
Настенный монтаж:
после повторения
действий, описанных в части 1 (шаг 1-2),
прикрепите PDU к устойчивой монтажной
поверхности путем ввертывания двух или
более винтов
A
(не входящих в комплект
поставки) через монтажные кронштейны PDU
B
в монтажные отверстия на монтажной
поверхности.
A
A
A
A
A
A
B
B
B
C
C
18-11-316-933051.indb 24
2/11/2019 2:06:56 PM