background image

5

Panel Descriptions

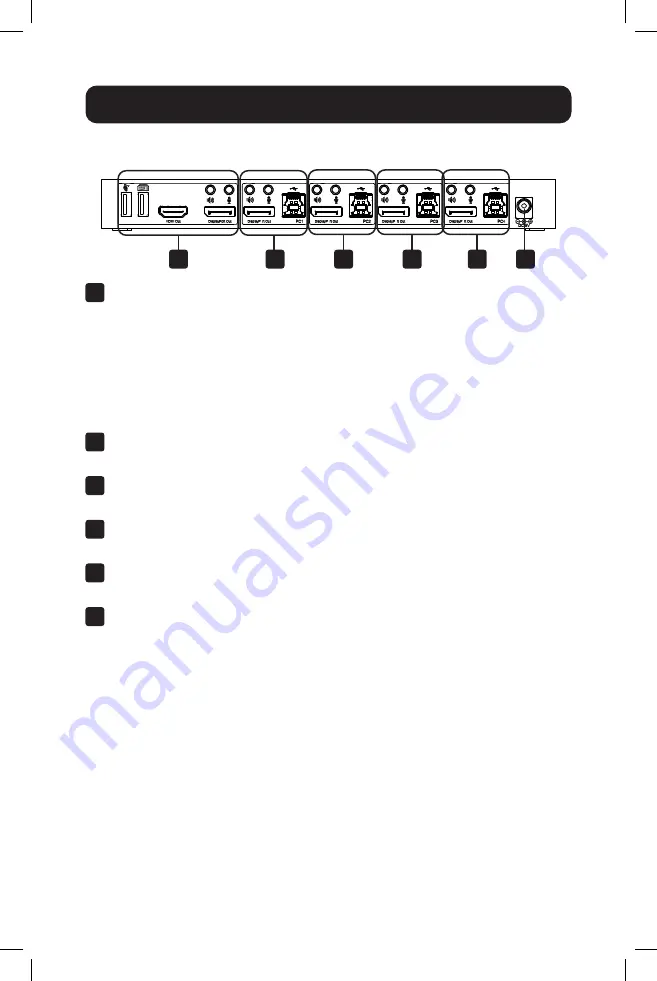
Rear Panel

9

 Outputs

a.  Connect a mouse and keyboard to the USB 2.0 ports.
b.  Connect an amplifier to the 3.5 mm stereo port.
c.  Connect a microphone to the 3.5 mm microphone port.
d.  Connect a local HDMI monitor to the HDMI Out port.
e.  Connect a local DisplayPort monitor to the DisplayPort Out port.

10

  PC1 Input

 – Connect to a computer’s DisplayPort, USB, stereo audio 

and microphone ports.

11

  PC2 Input

 – Connect to a second computer’s DisplayPort, USB, stereo 

audio and microphone ports.

12

  PC3 Input

 – Connect to a third computer’s DisplayPort, USB, stereo 

audio and microphone ports.

13

  PC4 Input

 – Connect to a fourth computer’s DisplayPort, USB, stereo 

audio and microphone ports.

14

  DC 5V Input

 – Connect the included 5V/3A DC power supply.

9

10

11

12

13

14

Summary of Contents for B005-DPUA4

Page 1: ...ION Register your product today and be automatically entered to win an ISOBAR surge protector in our monthly drawing tripplite com warranty Este manual esta disponible en español en la página de Tripp Lite tripplite com support Ce manuel est disponible en français sur le site Web de Tripp Lite tripplite com support Русскоязычная версия настоящего руководства представлена на веб сайте компании Trip...

Page 2: ... DisplayPort Cables with Latches P568 Series High Speed HDMI Cables Console DisplayPort monitor capable of supporting the highest resolution of any computer in the installation USB keyboard and mouse Microphone and speakers with 3 5 mm mini stereo connectors optional Computer DisplayPort input USB Type A port 3 5 mm mini stereo microphone and speaker jacks optional Windows 2000 XP Vista Win7 Win8 ...

Page 3: ...devices to be shared between computers connected to the KVM switch 3 5mm mini stereo jacks allow a microphone to provide audio input to each connected computer and let you listen to audio output on a set of speakers Additional console audio jacks are conveniently located on the front panel making them ideal for use with speakers and microphones Switch between connected computers via front panel pu...

Page 4: ...has been selected Select LEDs flash in a loop during automatic switching mode Online LEDs illuminate when the corresponding USB B port is connected 4 IR EXT Connect the included IR Extender for IR signal reception from the included IR Remote Control 5 IR Signal reception point for the IR Remote Control 6 3 5 mm Microphone Connect a microphone 7 3 5 mm Stereo Connect a stereo audio device 8 USB A 3...

Page 5: ... monitor to the DisplayPort Out port 10 PC1 Input Connect to a computer s DisplayPort USB stereo audio and microphone ports 11 PC2 Input Connect to a second computer s DisplayPort USB stereo audio and microphone ports 12 PC3 Input Connect to a third computer s DisplayPort USB stereo audio and microphone ports 13 PC4 Input Connect to a fourth computer s DisplayPort USB stereo audio and microphone p...

Page 6: ...s to the DisplayPort In ports using DisplayPort cables 2 Connect a keyboard and mouse to the USB A ports on the rear panel Connect a microphone and amplifier to the microphone and stereo audio ports using 3 5 mm audio cables Connect a monitor to DisplayPort Out using a DisplayPort cable maximum 2 m or to HDMI Out using an HDMI cable Note When either DisplayPort Out or HDMI Out is connected video i...

Page 7: ...Select LED will illuminate to indicate which computer is currently selected The monitor will show the corresponding image and the selected computer can by controlled via keyboard and mouse 5 The included IR Remote Control works the same as the pushbuttons a For input 1 specifies PC1 2 specifies PC2 3 specifies PC3 and 4 specifies PC4 b For loop switching Order is PC1 PC2 PC3 PC4 PC1 6 USB peripher...

Page 8: ... Lock Scroll Lock or Switch to the next port 2 Scroll Lock Scroll Lock or Switch to the previous port 3 Scroll Lock Scroll Lock X Switch to PC X 4 Scroll Lock Scroll Lock S Enable Automatic Switching Default 15 seconds 5 Scroll Lock Scroll Lock I N 4 Enter Set the Automatic Switching Interval Between 5 999 Seconds 6 Scroll Lock Scroll Lock B 1 0 5 Buzzer On Off Default On 7 Scroll Lock Scroll Lock...

Page 9: ...exit to the port used prior to the automatic switching sequence Press Spacebar to stay at the port currently in use When automatic switching mode is enabled the corresponding Select LED of the port currently in use will flash 4 N indicates the number of switching interval which can be 5 seconds to 999 seconds 5 1 means On 0 means Off 6 This mode only relates to hotkey function 4 and 6 ...

Page 10: ...ctors Female USB 3 0 A x2 Front Video Resolution Maximum Resolution 4K x 2K 60 Hz 4K UHD Operating Bandwidth HDMI Bandwidth 18 Gb DisplayPort Bandwidth 32 4 Gb Environmental Operating Temperature Range 32 113 F 0 45 C Operating Humidity Range 10 85 RH No Condensation Storage Temperature Range 14 176 F 10 80 C Storage Humidity Range 5 90 RH No Condensation Power Requirement External Power Supply DC...

Page 11: ...ations on how long an implied warranty lasts and some states do not allow the exclusion or limitation of incidental or consequential damages so the above limitations or exclusions may not apply to you This warranty gives you specific legal rights and you may have other rights which vary from jurisdiction to jurisdiction WARNING The individual user should take care to determine prior to use whether...

Page 12: ...12 1111 W 35th Street Chicago IL 60609 USA tripplite com support 20 04 030 93 3C90_RevA ...

Reviews: