5
Operation
(continued)
LOAD
LOW
MED
HIGH
ATTERY
HIGH
MED
LOW
REMOTE
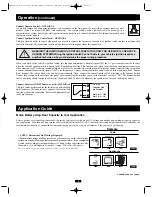
Connect Inverter ON/OFF Indicator Jack—OPTIONAL
This jack can be used to connect the Inverter to a user-supplied
on/off indicator. This connection is optional; the Inverter will
function without this connection. Refer to the diagram for the
jack's pin functions.
Connect Remote Control—OPTIONAL
All models feature an 8-conductor telephone style receptacle on the front panel for use with an optional remote control
module (Tripp Lite model APSRM4, sold separately). The remote module allows the Inverter to be mounted in a
compartment or cabinet out of sight, while operated conveniently from a vehicle’s dashboard. See instructions packed with
the remote control module.
Connect Ignition Switch Control Jack—OPTIONAL
This jack (located on the Inverter’s side panel) can be used to connect the Inverter to your vehicle's ignition switch in order to automatically
control the Inverter. This connection is optional; the Inverter will function without this connection.
WARNING! THE IGNITION SWITCH CONTROL FUNCTION IS ONLY FOR USE WITH 12V NEGATIVE
GROUND SYSTEMS. Wiring the Ignition Switch Control Cable to your vehicle's ignition requires a
qualified technician, who must determine the proper wiring procedure.
When connected to the vehicle's ignition switch, this function automatically disables (turns OFF) the AC power output from the Inverter
when the vehicle's ignition switch is placed in the "Engine Run" position. This function will satisfy local codes and requirements concerning
video monitors (or TVs) that are located within a driver's view by automatically turning them off when the engine is started. Tripp Lite makes
a current-limited cable assembly (part # 73-0977) for this purpose. Connect the current-limited cable's red wire to the ignition switch's "Engine
Run" terminal. The cable's black wire can be left unterminated. Then, connect the current-limited cable's mini-plug to the Ignition Switch
Control Jack located on the Inverter's side panel. After connecting the interface cable, set the Inverter's switch to "ON". The current-limited
cable's mini-plug should remain in the Inverter's Ignition Switch Control Jack whenever the ignition is on to avoid shorting the battery.
Application Guide
Match Battery Amp-Hour Capacity to Your Application
Select a battery or system of batteries that will provide your Inverter with proper DC voltage and an adequate amp-hour capacity to power
your application. Even though Tripp Lite Inverters are highly-efficient at DC-to-AC inversion, their rated output capacities are limited by the
total amp-hour capacity of connected batteries and the support of your vehicle’s alternator if the engine is kept running.
• STEP 1: Determine Total Wattage Required
Add the wattage ratings of all equipment you will connect to your Inverter. Wattage
ratings are usually listed in equipment manuals or on nameplates. If your equipment
is rated in amps, multiply that number times AC utility voltage to determine watts.
(Example: a ¼ in. drill requires 2½ amps. 2½ amps × 120 volts = 300 watts .)
Note: Your Inverter will operate at higher efficiencies at about 75% - 80% of nameplate rating.
Example
Tools
300W + 220W + 20W =
540W
¼" Drill
Orbital Sander
Cordless Tool Charger
Appliances
300W + 140W + 100W =
540W
Blender
Color TV
Laptop Computer
Pins 2 & 3 = OFF
Pins 2 & 4 = ON
ON/OFF
Indicator Jack
Pin Diagram
Continued on next page.
2
3
4
200702194 PowerVerter DC-AC Owner’s Manual CH.qxd 2/23/2007 4:02 PM Page 5

