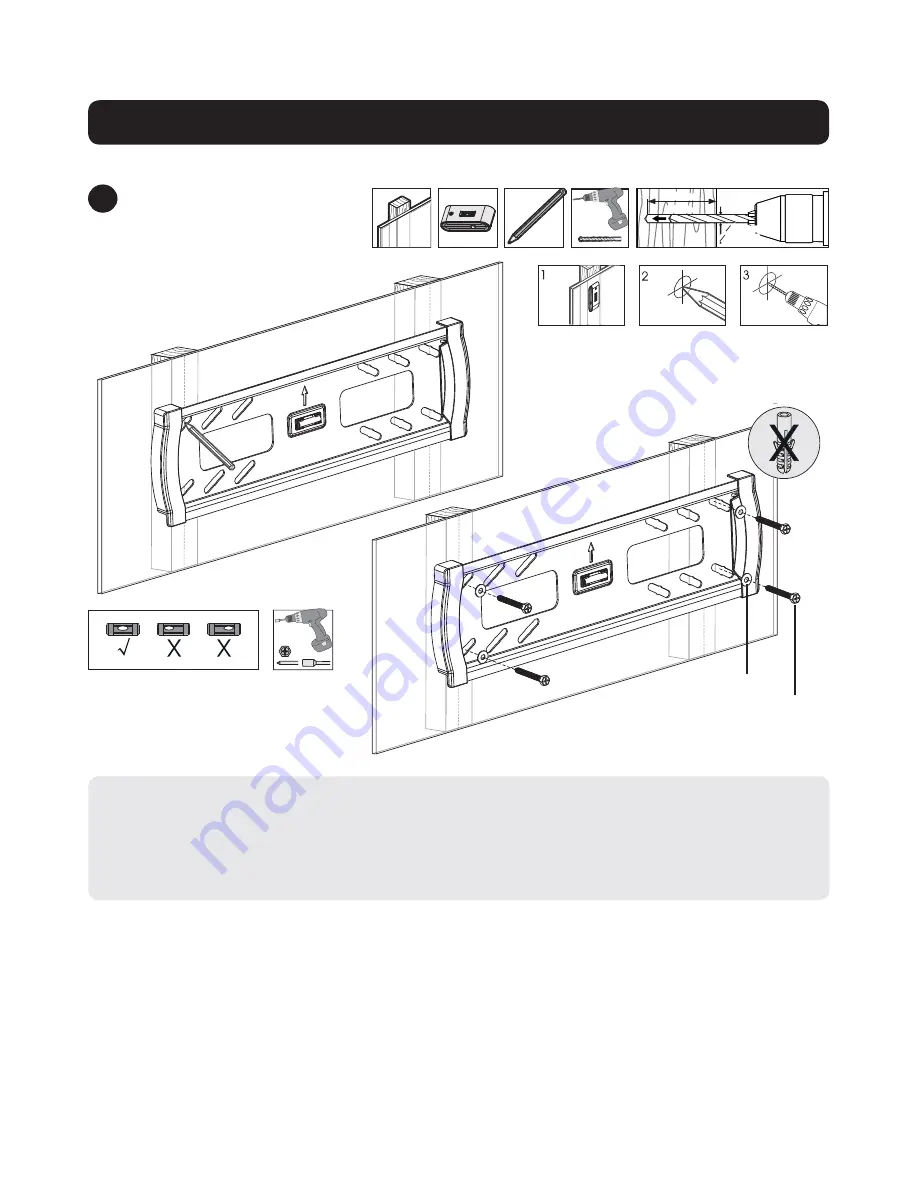
background image

4

Installation

2A

 Mount on Wood Stud Wall

WARNING

• Make sure that mounting screws are anchored into the center of the studs. Use of a stud finder is highly recommended. 

• Installers are responsible to provide hardware for other types of mounting situations.

• Installers must verify that the supporting surface will safely support the combined load of the equipment and all attached 

hardware and components.

20 mm 
Washer

Anchor 

Bolt 

55 mm

(2.2 in.)

O4.5 mm

O(3/16 in.)

Find and mark the exact  

location of mounting holes

Screw the 

assembled wall 

plate onto the 

wall

Drill pilot holes

Summary of Contents for DWFSC3255MUL

Page 1: ...ɪɭɤɨɜɨɞɫɬɜɚ ɩɪɟɞɫɬɚɜɥɟɧɚ ɧɚ ɜɟɛ ɫɚɣɬɟ ɤɨɦɩɚɧɢɢ 7ULSS LWH ɩɨ ɚɞɪɟɫɭ ZZZ WULSSOLWH FRP Fixed Wall Mount for Flat and Curved Screens Security Version Model DWFSC3255MUL PROTECT YOUR INVESTMENT Register your product for quicker service and ultimate peace of mind You could also win an ISOBAR6ULTRA surge protector a 100 value www tripplite com warranty 1111 W 35th Street Chicago IL 60609 USA www trippli...

Page 2: ...years from the date of initial purchase If the product should prove defective in material or workmanship within that period Seller will repair or replace the product in its sole discretion THIS WARRANTY DOES NOT APPLY TO NORMAL WEAR OR TO DAMAGE RESULTING FROM ACCIDENT MISUSE ABUSE OR NEGLECT SELLER MAKES NO EXPRESS WARRANTIES OTHER THAN THE WARRANTY EXPRESSLY SET FORTH HEREIN EXCEPT TO THE EXTENT...

Page 3: ...m support for service Component Checklist Wall Plate x1 M5 x 14 x4 M6 x 14 x4 M6 x 30 x4 M8 x 30 x4 M8 x 50 x4 Washer x4 Small Spacer x8 Big Spacer x8 Anchor Bolt x4 Concrete Anchor x4 20 mm Washer x4 Adapter Bracket x2 Security Bar x1 Hex Key x1 Right End Cap x1 Left End Cap x1 Combo Lock x1 End Cap Screws x4 Installation 1 Assemble the Wall Plate End Cap Screws ...

Page 4: ...ponsible to provide hardware for other types of mounting situations Installers must verify that the supporting surface will safely support the combined load of the equipment and all attached hardware and components 20 mm Washer Anchor Bolt 55 mm 2 2 in O4 5 mm O 3 16 in Find and mark the exact location of mounting holes Screw the assembled wall plate onto the wall Drill pilot holes ...

Page 5: ...tions of the blocks The solid sections can generally be found 25 mm 1 toward the middle of the block from either end An electric drill on a slow setting is suggested to drill the hole rather than a hammer drill so as to avoid breaking out the back of the hole when entering a hollow section Installers must verify that the supporting surface will safely support the combined load of the equipment and...

Page 6: ...en or Recessed Back Screen M5 x 14 M6 x 14 Washer Note Choose appropriate screws washers and spacers if necessary according to the type of screen Position the adapter brackets as close as possible to the center of the display Screw the adapter brackets onto the display Firmly secure all screws Do not over tighten ...

Page 7: ...d wall plate Push the safety clamps on the bottom of the adapter brackets upward and tighten the two screws to lock each bracket to the wall plate M6 x 30 M8 x 30 M6 x 30 M8 x 30 M6 x 30 M8 x 30 M8 x 50 M8 x 50 M8 x 50 Washer Washer Washer Washer Wall Wall Washer Washer Small Spacer Small Spacer Small Spacer Big Spacer Big Spacer Big Spacer Big Spacer Big Spacer Small Spacer ...

Page 8: ...ecure and safe to use at regular intervals at least every three months Please visit www tripplite com support if you have any questions Installation 5 Slide Security Bar through the Mounting Brackets and Attach Combo Lock to Secure 5 Use the Included Hex Key to Secure the Mounting Brackets to the Wall Plate Combo Lock Security Bar Hex Key ...

Reviews: