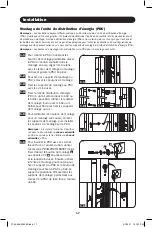
background image

27

Техническое обслуживание

На приобретенное вами изделие марки Tripp Lite распространяется действие гарантии, условия которой изложены в настоящем 
руководстве. Кроме того, компания Tripp Lite предлагает ряд Программ расширенной гарантии и обслуживания на объекте. 
Более подробная информация о техническом обслуживании изложена на странице www.tripplite.com/support. Перед 
возвратом своего изделия в целях технического обслуживания просьба выполнить следующие действия:
1.   Внимательно изучите порядок монтажа и эксплуатации устройства, приведенный в настоящем руководстве, во 

избежание проблем, которые могут возникнуть в ходе работы из-за неправильного понимания приведенных в 
руководстве указаний.

2.   Если проблему решить не удалось, не обращайтесь к продавцу и не возвращайте изделие ему. В этом случае посетите 

интернет-страницу по адресу: www.tripplite.com/support.

3.   Если возникшая проблема требует проведения ремонта или технического обслуживания, зайдите на страницу www.

tripplite.com/support и нажмите на ссылку Product Returns (Возврат изделий). Здесь вы можете запросить номер Returned 
Material Authorization (RMA) (разрешение на возврат материалов), который необходим для проведения технического 
обслуживания. Для заполнения этой простой онлайн-формы потребуется указать номер модели и серийный номер 
вашего изделия, а также общие сведения о покупателе. Номер RMA вместе с указаниями по транспортировке будет 
направлен вам по электронной почте. На какие бы то ни было убытки (прямые, косвенные, последующие или вызванные 
особыми обстоятельствами), связанные с транспортировкой изделия в адрес компании Tripp Lite или ее уполномоченного 
сервисного центра, действие гарантии не распространяется. Стоимость транспортировки изделий в адрес компании Tripp 
Lite или ее уполномоченного сервисного центра должна быть оплачена авансом. Номер RMA должен быть указан на 
внешней стороне упаковки. Если возврат изделия производится в период действия гарантии, то необходимо приложить 
копию товарного чека продавца. Возврат изделия для проведения ремонта или технического обслуживания должен 
производиться застрахованным перевозчиком по адресу, указанному в ответе на ваш запрос номера RMA.

21-03-406-93338D.indb   27

21-03-406-93338D.indb   27

4/1/2021   1:41:36 PM

4/1/2021   1:41:36 PM

Summary of Contents for PDUMV30HV2

Page 1: ...W 35th Street Chicago IL 60609 USA www tripplite com support Copyright 2018 Tripp Lite All rights reserved PDUMV30HV2 Series Number AG 013F PDUMV32HV Series Number AG 0140 PROTECT YOUR INVESTMENT Register your product for quicker service and ultimate peace of mind You could also win an ISOBAR6ULTRA surge protector a 100 value www tripplite com warranty 21 03 406 93338D indb 1 21 03 406 93338D indb...

Page 2: ...dance with National Electrical Code standards Be sure to use the proper overcurrent protection for the installation in accordance with the plug equipment rating Connect the PDU to an outlet that is in accordance with your local building codes and that is adequately protected against excess currents short circuits and earth faults The electrical outlets supplying power to the equipment should be in...

Page 3: ...e mounting buttons 1 3 Attach the mounting brackets to the PDU with the included screws 1 4 Attach the PDU to a vertical rail in your rack or rack enclosure Use the mounting hardware that came with your rack or rack enclosure to attach the mounting brackets to the rail 1 5 To reinstall the mounting buttons for toolless mounting remove the mounting brackets then install the mounting buttons onto th...

Page 4: ...ut plug to your facility s compatible AC power source 2 3 Connect your equipment s input plugs to the appropriate outlets on the PDU Note It is recommended that you do not connect a live load to the PDU If the load you intend to connect has an ON OFF switch please turn the switch to OFF prior to connection 2 4 Optional Cord Retention Procedure Use the included C14 and C20 plastic sleeves to secure...

Page 5: ...lless mounting Note Four additional mounting buttons are included for alternate rack styles Push to Reset Guard PDUMVROTATEBRKT Mounting Accessory Use these V shaped brackets to mount the PDU with its outlets facing the rear of the rack Ground Screw Use this to connect any equipment that requires a chassis ground C20 Plug Sleeve Optional Use the included C20 plastic sleeves to secure plugs to rece...

Page 6: ...n request a Returned Material Authorization RMA number which is required for service This simple on line form will ask for your unit s model and serial numbers along with other general purchaser information The RMA number along with shipping instructions will be emailed to you Any damages direct indirect special or consequential to the product incurred during shipment to Tripp Lite or an authorize...

Page 7: ...ass A This device complies with part 15 of the FCC Rules Operation is subject to the following two conditions 1 This device may not cause harmful interference and 2 this device must accept any interference received including interference that may cause undesired operation Note This equipment has been tested and found to comply with the limits for a Class A digital device pursuant to part 15 of the...

Page 8: ...ad 9 Instalación 10 Características 12 Servicio 13 Garantía 14 English 1 Français 15 Русский 22 1111 W 35th Street Chicago IL 60609 USA www tripplite com support Copyright 2018 Tripp Lite Todos los derechos reservados PDUMV30HV2 Número de Serie AG 013F PDUMV32HV Número de Serie AG 0140 21 03 406 93338D indb 8 21 03 406 93338D indb 8 4 1 2021 1 41 29 PM 4 1 2021 1 41 29 PM ...

Page 9: ...estable o no segura Instale de acuerdo con los estándares del Código Eléctrico Nacional NEC Asegúrese de usar para la instalación la protección adecuada contra sobrecorriente de acuerdo con la especificación de la clavija o del equipo Conecte el PDU a un tomacorriente que esté de acuerdo a los códigos locales de construcción y que esté correctamente protegido contra corrientes excesivas cortocircu...

Page 10: ...stalación 1 3 Fije los soportes de instalación al PDU con los tornillos incluidos 1 4 Acople el PDU a un riel vertical en su rack o gabinete Use los accesorios de instalación que vienen con su rack o gabinete para acoplar los soportes de instalación al riel 1 5 Para reinstalar los botones de instalación para instalación sin herramienta retírelos soportes de instalación y entonces instale los boton...

Page 11: ...ación de CA de su instalación onnect the input plug to your facility s compatible AC power source 2 3 Conecte las clavijas de entrada de sus equipos a los tomacorrientes apropiados en el PDU Nota Se recomienda no conectar una carga viva al PDU Si la carga que pretende conectar tiene un interruptor de encendido apagado coloque por favor el interruptor en apagado antes de la conexión 2 4 Procedimien...

Page 12: ...tilos alternos de rack Guarda de oprima para reestablecer Accesorio de Instalación PDUMVROTATEBRKT Use estos soportes con perfil en V para instalar el PDU con sus tomacorrientes viendo a la parte posterior del rack Tornillo de Conexión a Tierra Úselo para conectar cualquier equipo que requiera una conexión de tierra a chasís Manguito de Clavija C20 Opcional Use los manguitos plásticos C20 incluido...

Page 13: ... de Autorización de Material Devuelto RMA que se necesita para el servicio técnico En este sencillo formulario en línea se le solicitarán los números de serie y modelo de la unidad junto con otra información general del comprador El número RMA y las instrucciones para el envío se le enviarán por correo electrónico La presente garantía no cubre ningún daño directo indirecto especial o consecuencial...

Page 14: ...ener otros derechos que varían de una jurisdicción a otra ADVERTENCIA Antes de usar este dispositivo cada usuario debe ocuparse de determinar si es apto adecuado o seguro para el uso que pretende darle Dado que las aplicaciones individuales están sujetas a diversas variaciones el fabricante no representa ni garantiza la idoneidad o condición de estos dispositivos para cualquier aplicación específi...

Page 15: ...tantes 16 Installation 17 Caractéristiques 19 Entretien 20 Garantie 21 English 1 Español 8 Русский 22 1111 W 35th Street Chicago IL 60609 USA www tripplite com support Copyright 2018 Tripp Lite Tous droits réservés PDUMV30HV2 Número de Série AG 013F PDUMV32HV Número de Série AG 0140 21 03 406 93338D indb 15 21 03 406 93338D indb 15 4 1 2021 1 41 32 PM 4 1 2021 1 41 32 PM ...

Page 16: ... électriques qui alimentent l équipement doivent être installées à proximité de l équipement et être facilement accessibles Ne pas connecter la PDU dans une prise non mise à la masse ou des rallonges électriques ou des adaptateurs qui éliminent la connexion à la masse S assurer de fournir un dispositif de déconnexion local pour tous les modèles qui sont installés en permanence sans fiche facilemen...

Page 17: ...ntage au PDU enlever les boutons de montage 1 3 Fixer les supports de montage au PDU avec les vis incluses 1 4 Fixer l unité de distribution d énergie PDU à un rail vertical dans le bâti ou le boîtier pour bâti Utiliser le matériel de montage fourni avec le bâti ou le boîtier pour bâti pour fixer les supports de montage au rail 1 5 Pour réinstaller les boutons de montage pour un montage sans outil...

Page 18: ...compatible de l installation 2 3 Brancher les fiches d entrée de l équipement dans les sorties appropriées sur la PDU Remarque Il est recommandé de ne pas brancher une charge sous tension à la PDU Si la charge à brancher comporte un commutateur ON OFF marche arrêt veuillez mettre le commutateur en position OFF arrêt avant d effectuer le branchement 2 4 Procédures de rétention du cordon en option U...

Page 19: ...tyles de bâtis Protection à bouton poussoir Accessoire de montage du PDUMVROTATEBRKT Utiliser ces supports en forme de V pour monter la PDU avec ses sorties faisant face à l arrière du bâti Vis de mise à la terre utiliser cette vis pour brancher n importe quel équipement nécessitant une mise à la terre au châssis Manchon de fiche C20 facultatif Utiliser les manchons en plastique C20 inclus pour re...

Page 20: ...endroit vous pouvez demander un numéro d autorisation de retour de matériel RMA qui est exigé pour une réparation Ce formulaire en ligne simple vous demandera le numéro de modèle et le numéro de série de votre unité ainsi que d autres renseignements généraux concernant l acheteur Le numéro RMA ainsi que les instructions concernant le transport vous seront acheminées par courriel Tout dommage direc...

Page 21: ...tie vous donne des droits légaux spécifiques et vous pourriez avoir d autres droits selon les juridictions MISE EN GARDE L utilisateur devra prendre soin de déterminer avant de l utiliser si cet appareil convient est adéquat et sûr pour l usage prévu Puisque les applications individuelles sont sujettes à de grandes variations le fabricant ne fait aucune représentation ni n offre de garantie quand ...

Page 22: ...а 24 Функциональные возможности 26 Техническое обслуживание 27 Гарантийные обязательства 28 English 1 Español 8 Français 15 1111W 35th Street Chicago IL 60609 USA www tripplite com support Охраняется авторским правом 2018Tripp Lite Перепечатка запрещается PDUMV30HV2 номер серии AG 013F PDUMV32HV номер серии AG 0140 21 03 406 93338D indb 22 21 03 406 93338D indb 22 4 1 2021 1 41 34 PM 4 1 2021 1 41...

Page 23: ...очных токов коротких замыканий и замыканий на землю Электрические розетки через которые осуществляется электропитание оборудования должны быть установлены в легкодоступном месте вблизи него Не подключайте PDU к незаземленной розетке а также к удлинителям или переходникам не имеющим заземления Любые модели устанавливаемые на постоянной основе без легкодоступного штепсельного разъема должны в обязат...

Page 24: ...защелки 1 3 Прикрепите монтажные кронштейны к PDU при помощи винтов поставляемых в комплекте с ним 1 4 Прикрепите PDU к вертикальной шине стойки или шкафа для крепления монтажных кронштейнов к направляющей используйте монтажную оснастку входящую в комплект стойки или шкафа 1 5 Для установки на место монтажных защелок используемых для безынструментального монтажа снимите монтажные кронштейны а зате...

Page 25: ...13 2 2 Подключите входной разъем к совместимому источнику питания переменного тока на вашем объекте 2 3 Подключите входные разъемы вашего оборудования к соответствующим выходным розеткам PDU Примечание Не рекомендуется подключать к PDU потребителей находящихся под напряжением Если подключаемый потребитель снабженвыключателемON OFF ВКЛ ВЫКЛ то перед подключением переведите его в положение OFF ВЫКЛ ...

Page 26: ...товителем и используются для его монтажа без помощи инструментов Примечание Для монтажа в стойки различного типа в комплекте поставляются четыре дополнительные монтажные защелки Предохранитель возврата в исходное положение Вспомогательное монтажное приспособление PDUMVROTATEBRKT этиV образные кронштейны следует использовать для установки PDU таким образом чтобы его розетки были обращены к задней с...

Page 27: ...ns Возврат изделий Здесь вы можете запросить номер Returned Material Authorization RMA разрешение на возврат материалов который необходим для проведения технического обслуживания Для заполнения этой простой онлайн формы потребуется указать номер модели и серийный номер вашего изделия а также общие сведения о покупателе Номер RMA вместе с указаниями по транспортировке будет направлен вам по электро...

Page 28: ...астоящая Гарантия предоставляет вам конкретные юридические права а набор других ваших прав может быть различным в зависимости от юрисдикции ВНИМАНИЕ Доначалаиспользованияданногоустройствапользовательдолженубедитьсявтом чтооноявляетсяпригодным соответствующим илибезопаснымдляпредполагаемогоприменения Всвязисбольшимразнообразиемконкретныхпримененийпроизводительнедаеткаких либо заверенийилигарантийот...

Reviews: