background image

10

Connection

 (continued)

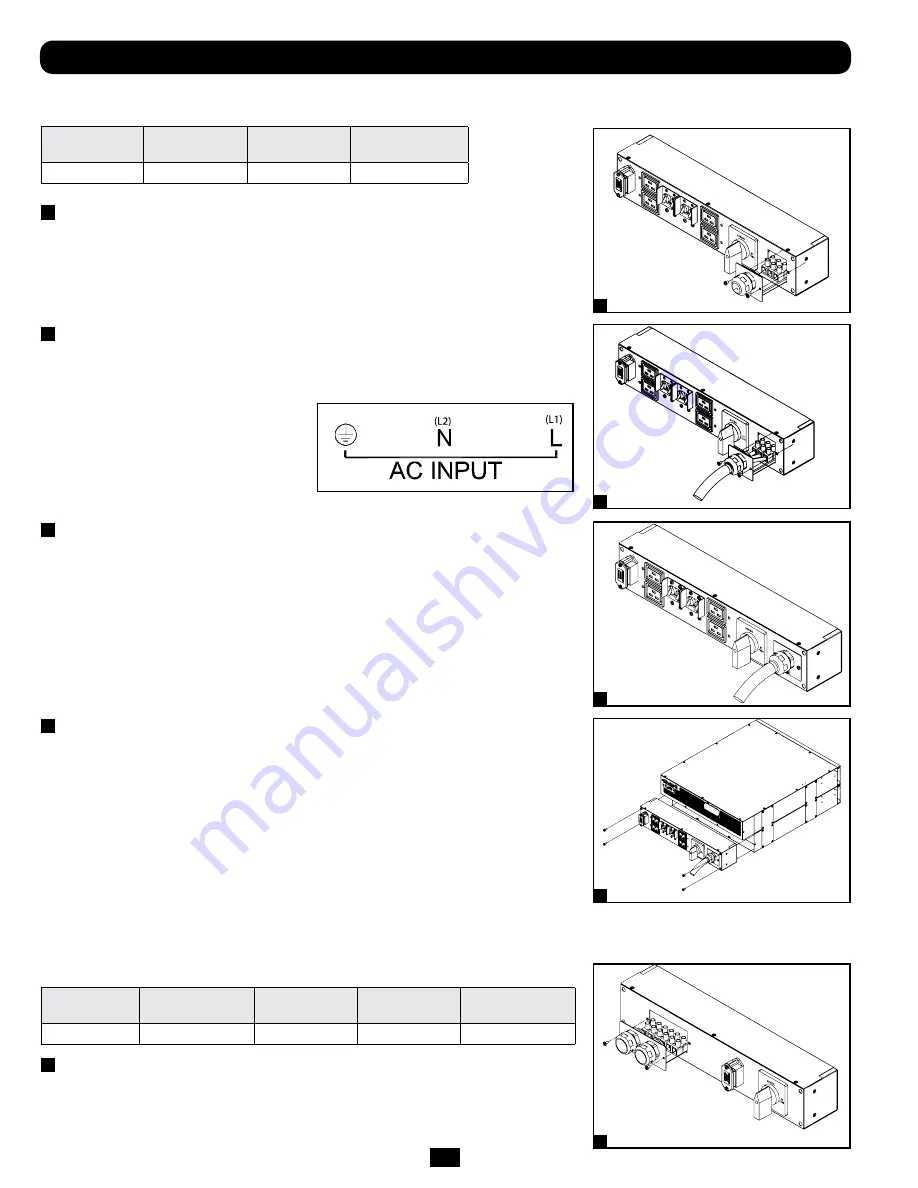
Terminal Strip Connection—Hardwire PDU Module  

(SU6000RT4UHVHW, SU6000RT4UTHFHW)

Model

Input Voltage

Maximum Rated 

Input Current

Maximum Rated 

Output Current

Typical Wire Size

SUPDMB6KHW

200~240V (L-N)

32A

30A

8 mm2

1

  Unscrew 3 screws to remove the terminal strip cover and slide 


  out as seen in diagram 1.

2


Connect the L1, L2 and Ground wires (Hardwire-In, 


  Receptacle-Out) according to markings on the connectors 


  as seen in diagram 2.

3


Slide in and reattach the terminal strip cover with the 3 


  screws from Step 1.

4


Attach the PDU to the UPS system using 4 screws as seen in 


  diagram 4.

Terminal Strip Connection—IEC PDU Module (SU6000RT4UHVG)

Model

Input Voltage

Maximum Rated 

Input Current

Typical Wire Size

SUPDMB6KIEC

200~240V (L-N)

30A

8 mm2

1


Unscrew 3 screws to remove the terminal strip cover and slide 


  out as seen in diagram 1.

1

2

3

4

1

Summary of Contents for SmartOnline 5KVA

Page 1: ...PDU and detachable parallel PDU modules 6kVA Rackmount and tower adaptable Not suitable for mobile applications Important Safety Warnings 2 Mounting 3 Connection 9 Features 4 Internal Battery Replacement 27 Storage and Service 28 Warranty and Warranty Registration 28 Optional Connection 12 Manual Bypass Operation 13 Operation 14 W a r r a n t y R e g i s t r a t i o n r e g i s t e r o n l i n e t...

Page 2: ...l shock and burn from high short circuit current Observe proper precautions Do not dispose of the batteries in a fire Do not open the UPS or batteries Do not short or bridge the battery terminals with any object Unplug and turn off the UPS before performing battery replacement Use tools with insulated handles There are no user serviceable parts inside the UPS Battery replacement should be performe...

Page 3: ...internal batteries of the UPS prior to installation This will remove excess weight and will allow safer handling of equipment See Internal Battery Replacement section for battery removal instructions Mount your equipment in either a 4 post or 2 post rack or rack enclosure The user must determine the fitness of hardware and procedures before mounting If hardware and procedures are not suitable for ...

Page 4: ...nd to exit setup mode 4 SCROLL UP SELECT BUTTON This button allows you to browse through different options and power readings on the LCD display Momentarily pressing it causes the LCD screen to display a different power reading see Operation Section Pressing it and the SCROLL DOWN button together puts the UPS in setup mode where this button is used to select setup options 5 OFF BUTTON Press this b...

Page 5: ...re PDU 1 EPO PARALLEL RS 232 RS 232 ACC SLOT AC INPUT BATTERY CABLE UNDER LOAD DO NOT DISCONNECT 192VDC CONNECTOR BATTERY CAUTION BREAKER 20A OUTPUT 2 200 240Vac OUTPUT 1 200 240Vac 30A USB 14 EPO PARALLEL RS 232 RS 232 ACC SLOT USB NORMAL BY PASS EPO PARALLEL RS 232 RS 232 ACC SLOT USB NORMAL BY PASS 9 9 9 8 7 4 8 6 5 4 3 7 16 15 4 5 6 3 10 10 10 11 11 11 12 12 12 13 13 13 1 1 1 2 ...

Page 6: ... System and Parallel PDU Modules Note See the manual included with the Parallel PDU for 12kVA installation configuration and setup instructions EPO PARALLEL RS 232 RS 232 USB EPO PARALLEL RS 232 RS 232 USB EPO PARALLEL RS 232 RS 232 USB NORMAL BY PASS 9 9 4 4 20 20 19 18 17 16 21 21 7 7 5 15 10 10 11 11 12 12 13 13 4 1 1 15 2 2 18 17 11 23 22 ...

Page 7: ...tiion for feature descriptions SU6000RT4UTF 6kVA UPS with NEMA PDU and 6KVA Isolation Transformer EPO PARALLEL RS 232 RS 232 ACC SLOT USB NORMAL BY PASS 16 15 SU6000RT4UTFHW 6kVA UPS with Hardwire PDU and 6kVA Isolation Step Down Transformer SU6000XFMR2U 4 5 10 9 1 2 11 12 13 8 6 5 4 3 7 1 9 13 10 11 12 14 ...

Page 8: ...s used with Tripp Lite software and the included serial cable to monitor and manage the UPS remotely over a network and to automatically save open files and shut down equipment during a blackout See Optional Connection section for details 10 Mini Slot USB connector disabled by default DIP switches in the RS 232 position to enable move both DIP switches to the USB position An optional Contact Closu...

Page 9: ...tem is in standby mode 5 UPS Cold Start Optional To use your UPS as a stand alone power source when AC input power is unavailable i e during a blackout you can cold start your UPS and power connected equipment from the UPS s battery Your UPS s battery must be at least partially charged for this operation to succeed Press and hold the ON button until you hear a beep to cold start your UPS The LCD D...

Page 10: ...Connect the L1 L2 and Ground wires Hardwire In Receptacle Out according to markings on the connectors as seen in diagram 2 3 Slide in and reattach the terminal strip cover with the 3 screws from Step 1 4 Attach the PDU to the UPS system using 4 screws as seen in diagram 4 Terminal Strip Connection IEC PDU Module SU6000RT4UHVG Model Input Voltage Maximum Rated Input Current Typical Wire Size SUPDMB...

Page 11: ... terminals and the other set to the output terminals Hardwiring the Transformer Bundle Input Output Set Front Panel Selector Switch to Proper Voltage Before Making Connections 208 240V Input 120V Output Branch A 120V Output Branch B L1 G L2 L G N N G L SU6000RT4UTF 1 Plug the XFMR into the UPS 2 Connect the transformer to the UPS This can be a hardwire connection outlet connection or both provided...

Page 12: ...rd can be used simultaneously with the USB communication module 2 EPO Port Connection This optional feature is only for those applications that require connection to a facility s Emergency Power Off EPO circuit When the power module is connected to this circuit it enables emergency shutdown of the output Using the included cable connect the UPS s EPO port to a user supplied normally open switch In...

Page 13: ...on the UPS STEP 2 Press UPS s OFF button B if the UPS is powered until you hear a beep and see a BYPASS MODE message shown in its LCD Display C on the front of the power module You will be prompted to enter BYPASS MODE Press UPS OFF button again to activate BYPASS MODE STEP 3 Turn the detachable PDU s Bypass Switch D to BYPASS on the rear of the UPS PDU STEP 4 If an external battery module is conn...

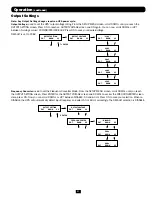
Page 14: ...down Frequency Conversion Mode With an EPO shutdown with no output present you will see the following LED sequence EPO Shutdown AC Mode With an EPO shutdown having AC power present you will see the following LED sequence Battery Independent Mode In Battery Independent Mode the same LED sequence as ONLINE Mode will display but a Bad Battery Alarm will sound AC DC BATTERY DC AC O P IP BYPASS BATTERY...

Page 15: ... STARTED WITH AC INPUT COLD START BAD BATTERY CALL FOR SERVICE CHARGE BATT FAIL CALL FOR SERVICE AC DC FAILURE CALL FOR SERVICE INVERTER FAILURE CALL FOR SERVICE OUTPUT FAILURE CALL FOR SERVICE FAN FAILURE CALL FOR SERVICE DIAGNOSTIC MODE FREQ OUT 50Hz DIAGNOSTIC MODE FREQ OUT 50Hz DIAGNOSTIC MODE INPUT 000V 00Hz DIAGNOSTIC MODE INPUT 000V 00Hz DIAGNOSTIC MODE RECTIFIER OK DIAGNOSTIC MODE RECTIFIE...

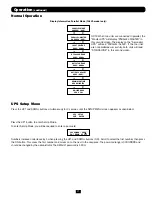
Page 16: ...the Parallel PDU Kit for more information The second line of the LCD Display shows basic power conditions In each operating mode you can push the SCROLL buttons to browse through these basic power conditions in the sequences shown below Operation continued ONLINE MODE 00 00KW 000 STANDALONE 00 00KVA 000 INPUT VOLTAGE 000V 00 0Hz BYPASS VOLTAGE 000V 00 0Hz OUTPUT VOLTAGE 000V 00 0Hz BATTERY CAPACIT...

Page 17: ...0 9999 and should be changed by the administrator The DEFAULT password is 1234 NOTE When two units are connected in parallel the Master UPS will display PARALLEL MASTER in this second screen The display on the Secondary UPS will read PARALLEL SLAVE If the two units are not paralleled successfully both units will read STANDALONE in this second screen Operation continued UPS SETUP EXIT ENTER PASSWOR...

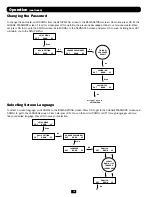
Page 18: ...roll DOWNi to the BASIS SETTING screen Press ON to get to the CHANGE PASSWORD screen and DOWNi to get to the LANGUAGE screen From here press ON You can then scroll DOWNi or UPh through languages until you find your desired language Press ON to save your selection Operation continued SETUP MENU ENT DOWN UP BASIS SETTING ENT DOWN UP CHANGE PASSWORD ENT DOWN UP Scroll uph back to SETUP MENU Down Down...

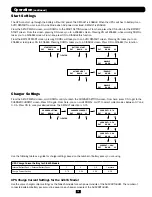
Page 19: ...ess ON to get to the CHARGER CURRENT screen Press ON again From here you can scroll DOWNi or UPh to select current values between 0 7 and 4 0 A Press ON to save your desired value The DEFAULT selection is 0 7A Use the following table as a guide for charger settings based on the number of battery packs you are using UPS Charge Current Setting for 5 6kVA Models Internal Battery Pack External Battery...

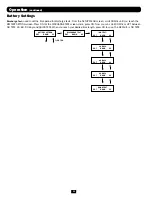
Page 20: ...he DISCHARGE TEST screen Here press ON Now you can scroll DOWNi or UPh between NO TEST 30 60 90 days and QUICK TEST When you reach your desired time length press ON to save The DEFAULT is NO TEST Operation continued BATTERY SETTING ENT DOWN UP DISCHARGE TEST ENT DOWN UP NO TEST ENT DOWN UP 30 DAYS ENT DOWN UP 60 DAYS ENT DOWN UP 90 DAYS ENT DOWN UP QUICK TEST ENT DOWN UP To ENTER ...

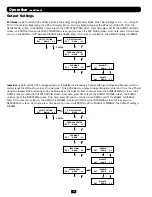
Page 21: ...en scroll DOWNi until you reach the OUTPUT SETTING screen Press ENTER for the OUTPUT VOLTAGE screen and DOWNi to access the FREQ CONVERTER screen Here press ON Now you can scroll DOWNi or UPh between DISABLE 50 and 60 Hz Press ON to save your selection When on DISABLE the UPS will automatically detect input frequency and select 50 or 60 Hz accordingly The DEFAULT selection is DISABLE Operation con...

Page 22: ...ctuation more than 5 ms the UPS will transfer to Bypass Mode returning to On Line Mode when the output is back to normal From the STARTUP MENU screen scroll DOWNi until you reach the OUTPUT SETTING screen From here press ON to reach the OUTPUT VOLTAGE screen and DOWNi until you reach the INDUSTRIAL screen From here press ON and you can now scroll DOWNi or UPh for ENABLE or DISABLE Press ON to save...

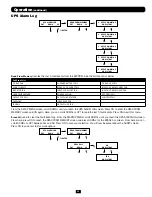
Page 23: ... DOWNi or UPh to read the last 5 fault events Press ON to exit this menu Erase All used to clear the Fault Event Log From the STARTUP MENU scroll DOWNi until you reach the UPS ALARM LOG screen From here press ON to reach the READ FROM MEMORY screen and press DOWNi for the ERASE ALL screen From here you can scroll DOWNi or UPh between Yes and No Press ON to save your selection You will now be prese...

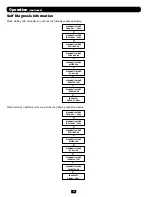
Page 24: ...IC MODE FREQ OUT 50Hz DIAGNOSTIC MODE INPUT 000V 00Hz DIAGNOSTIC MODE INPUT 000V 00Hz DIAGNOSTIC MODE RECTIFIER OK DIAGNOSTIC MODE RECTIFIER OK DIAGNOSTIC MODE CHARGER OK DIAGNOSTIC MODE BATTERY OK DIAGNOSTIC MODE BATTERY OK DIAGNOSTIC MODE DC BUS OK DIAGNOSTIC MODE DC BUS OK DIAGNOSTIC MODE INVERTER TEST DIAGNOSTIC MODE INVERTER TEST DIAGNOSTIC MODE INVERTER OK DIAGNOSTIC MODE INVERTER OK LOAD LE...

Page 25: ...er module will beep continuously To silence the On Battery Alarm press the ON MUTE button Overload Messages When the UPS detects an output overload its LCD will switch to the following display The UPS will then begin a countdown If the UPS is still overloaded at the end of the countdown the UPS will automatically go to Bypass Mode to protect its inverter The duration of the countdown varies with t...

Page 26: ...t Output SCR Failure Input Fuse Open Output Fuse Open Parallel Wire Connection Failure SHUTDOWN CONDITIONS LCD DISPLAY MESSAGES Internal Faults SHUT DOWN OVERLOAD XXX SHUT DOWN O P SHORT CIRCUIT SHUT DOWN BYPASS SCR FAIL SHUT DOWN RECTIFIER SCR FAIL SHUT DOWN INVERTER FAIL SHUT DOWN OUTPUT SCR FAIL SHUT DOWN I P FUSE BROKEN SHUT DOWN O P FUSE BROKEN SHUT DOWN PARALLEL FAULT SHUT DOWN DC BUS HIGH S...

Page 27: ... battery connector snap covers Save these covers for reuse 4 Disconnect the battery connectors C and remove the screws D that secure the battery retention bracket in place 5 Remove the battery retention bracket E and remove recycle the middle battery pack F 6 Remove recycle the side battery packs G 7 Replace the battery packs F and G 8 Re attach the battery retention bracket E 9 Replace the screws...

Page 28: ...9 USA Seller will pay return shipping charges Visit www tripplite com support before sending any equipment back for repair THIS WARRANTY DOES NOT APPLY TO NORMAL WEAR OR TO DAMAGE RESULTING FROM ACCIDENT MISUSE ABUSE OR NEGLECT SELLER MAKES NO EXPRESS WARRANTIES OTHER THAN THE WARRANTY EXPRESSLY SET FORTH HEREIN EXCEPT TO THE EXTENT PROHIBITED BY APPLICABLE LAW ALL IMPLIED WARRANTIES INCLUDING ALL...

Reviews: