10
5. Enclosure Configuration
6. Combination Locks
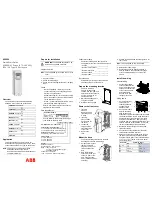
180°
15°
Locked Position
Unlocked Position
4
C
D
6.1 Setting and Resetting the Combination Lock
Note:
To set or reset the combination lock feature, the lock must be engaged and the existing combination must
be known. The lock comes with the combination factory preset to 0-0-0.
a. Dial in the existing combination.
b. Turn wing knob 180 degrees counterclockwise so that lock indicator arrow points UP.
c. Turn wing knob an additional 15 degrees counterclockwise.
d. Enter the new combination.
e. Turn wing knob 15 degrees clockwise. The new combination is now set.
f. To re-lock, turn wing knob 180 degrees clockwise so that lock indicator arrow points DOWN as
shown; then scramble the combination.
6.2 Using the Combination Lock
Dial in the combination. Turn wing knob 180 degrees counterclockwise so that lock indicator arrow
points UP as shown. Lift handle and turn. To re-lock, turn wing knob 180 degrees clockwise so that
the indicator arrow points DOWN as shown; then scramble the combination.
1
2
3
Insert key into lock. Turn key 180 degrees counterclockwise so that indicator arrow points UP as shown.
Lift handle and turn. To re-lock, turn key 180 degrees clockwise so that lock indicator arrow points DOWN
as shown and remove key. (Note: Using the key overrides the combination lock feature.)
Note:
One key is provided for side panels, and another is used for combination locks. Using the key overrides the
combination lock feature. Typically, the rack’s owner will have access to this key, while subsequent users will have
access to their own sections of the rack via the Combination Lock Feature.
1
Combination Lock Dials
2
Lock Indicator Arrow
3
Wing Knob
4
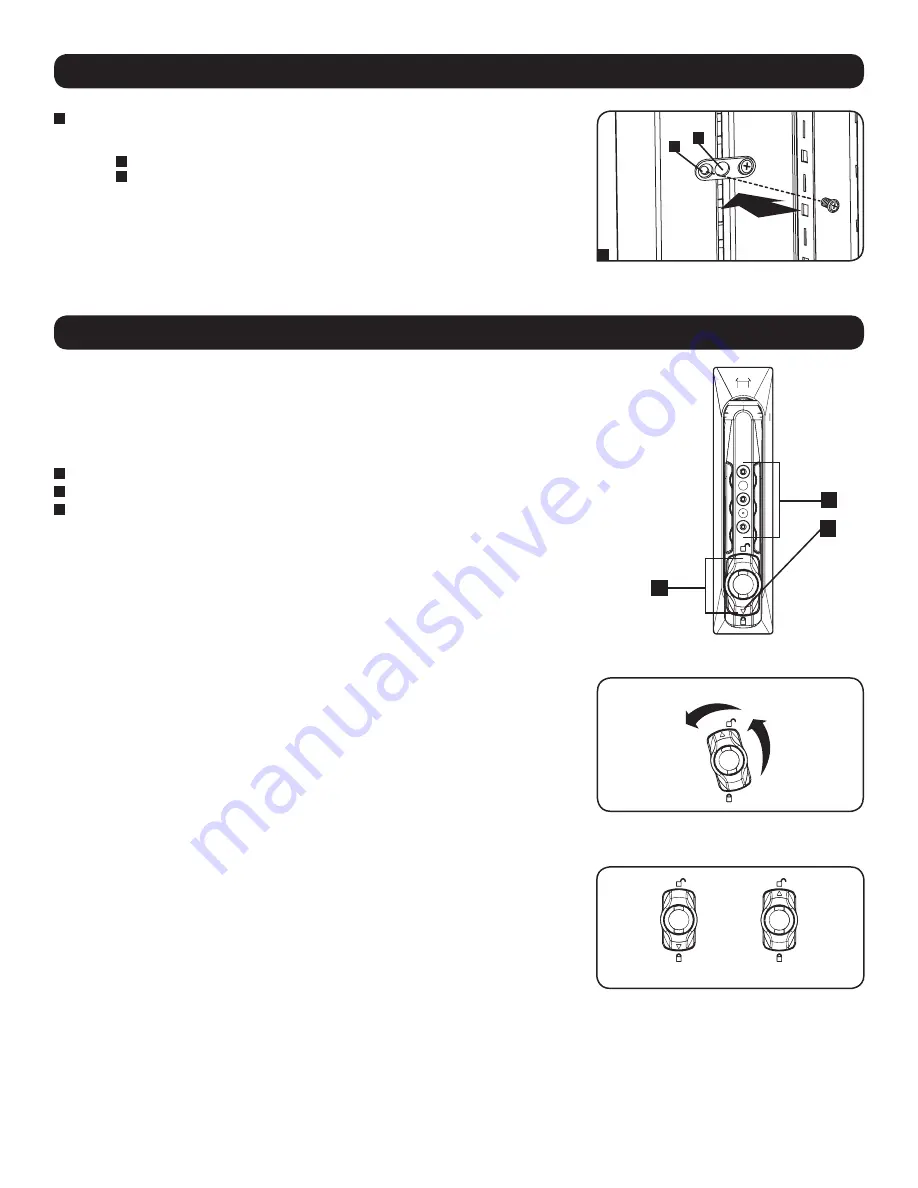
Connect each bracket to the adjoining enclosure using the screws you removed in step 2, but do
not tighten the screws completely. Adjust the position of the enclosures as needed. If you want
the centers of the enclosures to be 24 inches (61 cm) apart, use the outside hole of the
bracket
C
. If you want the centers to be 60 cm (23.6 inches) apart, use the middle hole of the
bracket
D
. After connecting all brackets and confirming that the enclosures do not need further
adjustment, tighten all screws.
Note:
You may wish to remove the doors from the enclosures before combining them. Reinstalling the doors
afterward is optional. Remove the interior side panels before baying enclosures if you wish to enable access
between enclosures.


