background image

3

48U

42U

A

A

B

B

C

C

D

D

M

F

M

M

E

M

M

E

G

1-2

1-3

1-4

1-5

1 – Frame Assembly 

(continued)

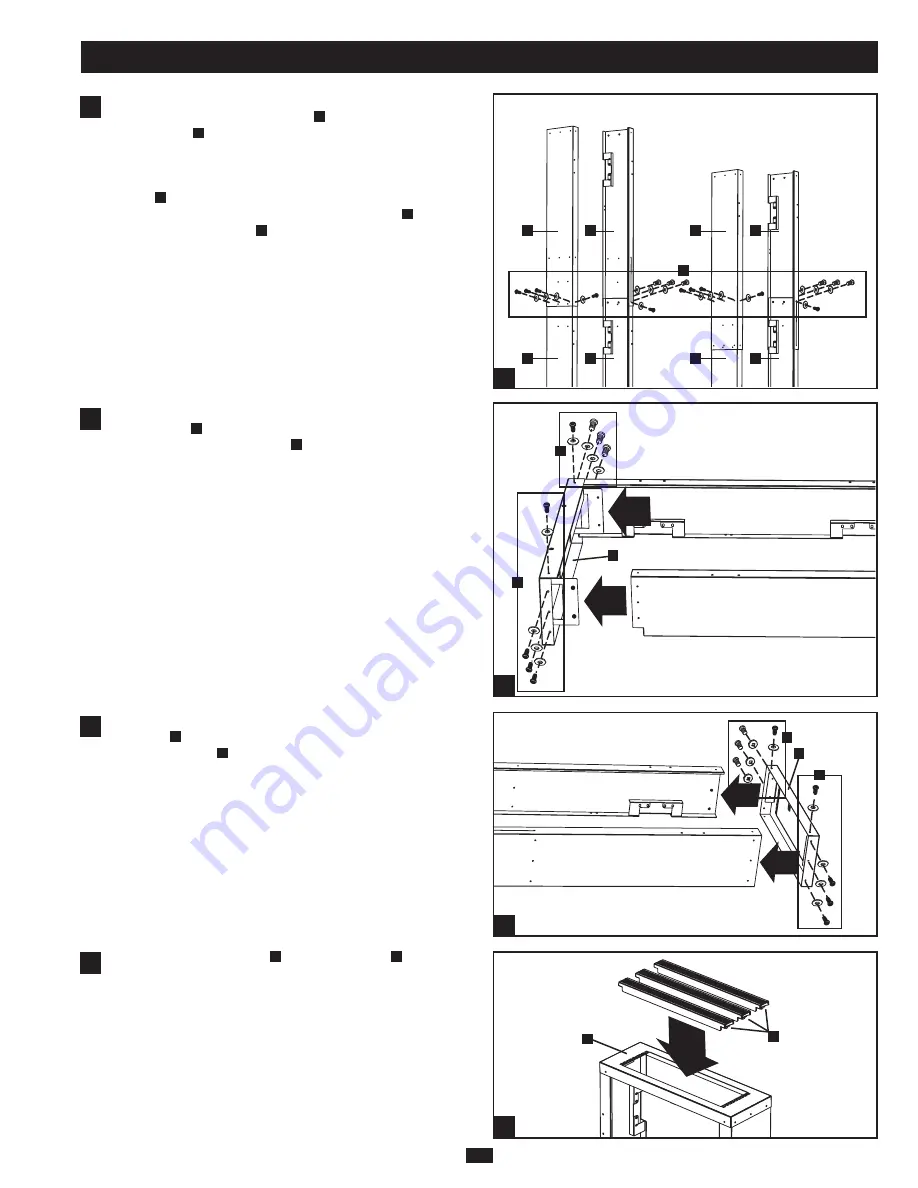
(For 25U enclosures, skip this step.) Align the set of four screw 

holes in the lower left vertical section 

A

 and the upper left 

vertical section 

C

. Use the lower set of screw holes for 48U 

enclosures (this will make the vertical section longer). Use the 
upper set of screw holes for 42U enclosures (this will make the 
vertical section shorter). Insert four M5 x 10 mm screws and 

washers 

M

 and tighten securely. (Start all the screws before 

tightening.) Repeat for the lower right vertical section 

B

 and the 

upper right vertical section 

D

.

Insert the lower end of the left vertical section into the 
bottom section 

F

 as shown. Align the screw holes, insert four 

M5 x 10 mm screws and washers 

M

 and tighten securely. (Start 

all the screws before tightening.) Repeat this step for the right 

vertical section.

Insert the upper end of the left and right vertical sections into the 
top section 

E

. Align the screw holes, insert eight M5 x 10 mm 

screws and washers 

M

 and tighten securely. (Start all the screws 

before tightening.)

Insert the 1U blanking panels 

G

 into the top section 

E

.  

Each blanking panel will snap into place with the Tripp Lite logo 
facing outward. The blanking panels may be removed to install 
standard 19-inch rack accessories up to 3U – contact Tripp Lite 

for more information.

1-2

1-3

1-4

1-5

Summary of Contents for SREXTENDER

Page 1: ...a solution Rackmount equipment may be extremely heavy be careful when moving or lifting equipment Use one or more assistants if necessary Preparation Note Tripp Lite recommends using an assistant during installation Descriptions of left and right are relative to the rear of your rack enclosure Illustrations may differ slightly from your enclosure but procedures are similar for 48U 42U and 25U encl...

Page 2: ...Head Screws and Washers 14 total 12 pre installed M M5 x 10 mm Pan Head Screws and Washers 40 N Grounding Cable 1 O M5 x 20 mm Pan Head Screws and Washers 4 P M4 x 8 mm Pan Head Screws and Washers 8 1 Frame Assembly Note For 25U enclosures you will use only the lower vertical sections A and B You will not use the upper vertical sections C and D For 48U and 42U enclosures you will use all four vert...

Page 3: ...upper right vertical section D Insert the lower end of the left vertical section into the bottom section F as shown Align the screw holes insert four M5 x 10 mm screws and washers M and tighten securely Start all the screws before tightening Repeat this step for the right vertical section Insert the upper end of the left and right vertical sections into the top section E Align the screw holes inse...

Page 4: ... vertical sections with four M5 x 10 mm screws and washers M as shown For 48U enclosures use the upper set of holes For 42U enclosures use the lower set of holes The brackets will face downward Use two M6 x 12 mm flat head screws K to attach each hinge I as shown Orient each hinge so that the pin is closer to the outside of the frame than the inside 1 6 1 7 ...

Page 5: ... washers for later use Open the right rear door until it is perpendicular 90 degrees to the rear of the enclosure lift it from the hinges and set it aside Repeat for the left rear door If the enclosure is joined to another enclosure turn the door back toward the enclosure as you lift it from the hinges With the aid of an assistant lift the frame align the frame s hinge swivels with the rack enclos...

Page 6: ...e extension frame Reverse step 2 2 to attach the rear doors to the extension frame Attach the grounding cable of each rear door to the grounding points of the extension frame as shown Use the screws and washers removed in step 2 1 For 25U enclosures skip this step Use four M5 x 20 mm screws and washers O to secure the frame to the rear of the rack enclosure 2 5 2 6 2 7 2 8 ...

Page 7: ...anty for your new Tripp Lite product You ll be automatically entered into a drawing for a chance to win a FREE Tripp Lite product No purchase necessary Void where prohibited Some restrictions apply See website for details Tripp Lite has a policy of continuous improvement Specifications are subject to change without notice Made in China 2 Frame Attachment continued 2 9 1111 W 35th Street Chicago IL...

Reviews: