background image

3

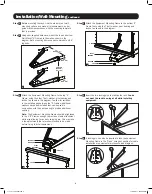
that is provided.

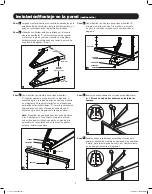
Step 

2

 Using user-supplied hardware, mount the top and bottom 

Wall-Mount “A” Frames to the wall as shown in the 
diagram. Both mounting frames can accommodate 5/16” 

lag bolts.

Step 

3

 Attach the Equipment Mounting Frame to the bottom “A” 

Frame first, using the T bolt, washer, pivot bearing and 
locknut as shown in the diagram.

Step 

1

 Before mounting the rack, find the studs in your wall/

mounting surface and make all measurements, and or 
guide marks in accordance with the mounting template 

Step 

4

 Attach the Equipment Mounting Frame to the top “A” 

Frame, using the other T bolt, washer, pivot bearing and 
locknut as shown in the diagram. To allow for variation 

in the installed gap between the “A” Frames, additional 
washers have been included that can be used in 
conjunction with the pivot bearing to provide additional 

spacing.


Note:

 The Equipment Mounting Frame should be tightened 

to the 2 “A” Frames enough to provide a stable attachment 
while also allowing for an easy swinging arc. This may take 
a few adjustments that are recommended to be made 

before trying to install equipment.

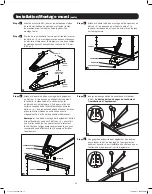
Step 

5

 Insert the two locking pins to stabilize the rack. 

You do 

not want the rack to swing at all while installing 

equipment.

Step 

6

 A locking pin can also be inserted to lock the Equipment 

Mounting Frame in the “Open” swing out position for cable 

installation or equipment maintenance (see diagram).

Installation/Wall-Mounting 

continued

2.2” 

(56.2 mm)

2.2” 

(56.2 mm)

2

4

3

LOCKNUT

LOCKNUT

WASHER

WASHER

T bolt

T bolt

PIVOT 

BEARING

PIVOT 

BEARING

(Optional)

16” 

(406.4 mm)

25.8125” 

(656 mm) 

(hole to hole)

5

6

17-11-211 93-2993.indb   3

11/29/2017   10:16:46 AM

Summary of Contents for SRWO12US

Page 1: ...IL 60609 USA www tripplite com support Copyright 2017 Tripp Lite All rights reserved Tripp Lite s SRWO12US is the perfect 2 post open frame rack solution for applications where space is limited Space...

Page 2: ...e warranty Do not attempt to install the rack unassisted Do not attempt to install equipment without first wall mounting and stabilizing the rack Use of this equipment in life support applications whe...

Page 3: ...tional washers have been included that can be used in conjunction with the pivot bearing to provide additional spacing Note The Equipment Mounting Frame should be tightened to the 2 A Frames enough to...

Page 4: ...p to 150 lb maximum Also be sure the two locking pins have been inserted to stabilize the rack You do not want the rack to swing at all while installing equipment see Installation section For all othe...

Page 5: ...upport Copyright 2017 Tripp Lite Todos los derechos reservados SRWO12US de Tripp Lite es la soluci n de rack de bastidor abierto de 2 puestos ideal para aplicaciones en donde el espacio es limitado La...

Page 6: ...ntes montar en la pared y estabilizar el rack No se recomienda usar este equipo en aplicaciones de mantenimiento artificial de la vida donde se puede esperar razonablemente que su falla cause la falla...

Page 7: ...stalaci n entre los bastidores A se incluyen arandelas adicionales que pueden utilizarse en conjunto con el cojinete de giro para proporcionar espacio adicional Nota El bastidor de montaje de equipos...

Page 8: ...lan los equipos consulte la secci n de Instalaci n Para el montaje de todos los otros equipos consulte el Manual del propietario de dichos equipos para obtener instrucciones de instalaci n En general...

Page 9: ...tripplite com support Copyright 2017 Tripp Lite Tous droits r serv s Le SRWO12US de Tripp Lite est la solution parfaite pour un b ti cadre ouvert 2 supports pour des applications o l espace est limit...

Page 10: ...pourraient annuler la garantie Ne pas tenter d installer le b ti sans aide Ne pas tenter d installer de l quipement sans avoir d abord mont au mur et stabilis le b ti Il est d conseill d utiliser cet...

Page 11: ...on entre les b tis en A des rondelles additionnelles sont incluses et peuvent tre utilis es en conjonction avec la crapaudine afin d offrir de l espacement additionnel Remarque Le b ti de montage de l...

Page 12: ...out autre quipement veuillez vous r f rer au Guide de l utilisateur pr vu pour cet quipement pour des instructions relatives l installation de l quipement Normalement ces informations sont disponibles...

Reviews: