background image


OV-1414


41

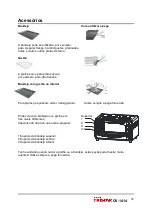
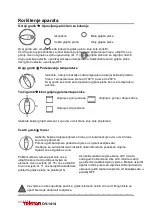
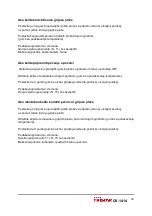
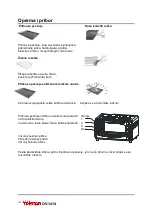
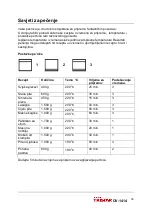
Oprema i pribor 

 Plitica za pe

č

enje    


     Kako koristiti ru

č

ku 


Plitica za pe

č

enje, koja se koristi za primjerice:  

pripremanje pili

ć

a, hamburgera, gratina, 

biskvita za tortu i mnogih drugih vrsta hrane. 
 
Ži

č

ana rešetka 


Ži

č

ana rešetka, za suhu hranu,  

kao što je (Francuski) kruh 
 
Plitica za pe

č

enje sa ži

č

anom mrežom unutra 


Za hranu koja ispušta velike koli

č

ine masno

ć

e.     Uvijek se za to koristite ru

č

kom.    


Plo

č

u za pe

č

enje ili ži

č

anu mrežu morate staviti     Gornje 

na tri razli

č

ite razine,   


u ovisnosti o tome kakvu hranu želite pripremati.  2 


Dno 

 
1 Gornji oslonac plitice 
2 Srednji oslonac plitice 
3 Donji oslonac plitice 
 
 
Pazite kad skidate ži

č

anu policu ili pliticu za pe

č

enje, jer one 

ć

e biti vrlo vru

ć

e! Uvijek se za 

to koristite ru

č

kom. 


Summary of Contents for OV-1414

Page 1: ...OV 1414 ...

Page 2: ... voor hun veiligheid Om kinderen te beschermen tegen de gevaren van elektrische apparatuur mag u ze nooit zonder toezicht bij het apparaat laten Selecteer daarom een plek voor uw apparaat op dusdanige wijze dat kinderen er niet bij kunnen Zorg er voor dat de kabel niet naar beneden hangt Test het apparaat de stekker en de kabel regelmatig op schade Als er schade is dan dient het apparaat niet gebr...

Page 3: ...en boven en onder warmte spiraal voor temperatuur gevoelige gerechten en knapperig gebraden vlees of om uw favoriete taarten te bakken Tevens een zeer eenvoudige kookplaat bediening voor het bereiden van heerlijke maaltijden Leest u voor het gebruik aandachtig deze gebruikshandleiding Gebruik dit product nooit zonder notitie te hebben genomen van de veiligheidsvoorschriften Bewaar deze handleiding...

Page 4: ...neel 05 Handvat deur 06 Bovenzijde oven 07 Grote verwarmingsplaat 800W 08 Kleine verwarmingsplaat 500W 09 Snoer stekker 10 Regelknop kookplaten 11 Waarschuwingslampje kookplaten 12 Temeratuur regelknop 13 Regelknop ovenstanden 14 Tijdregelaar oven en kookplaten 15 Waarschuwingslampje oven 16 Voetsteun 17 Rooster 18 Handgreep 19 Bakplaat ...

Page 5: ...ts dergelijks niet in contact kunnen komen met het apparaat Leg niets tussen de onderkant van het apparaat en het oppervlak waarop u het apparaat plaatst om te voorkomen dat dit zal verbranden 2 Schakel de bovenste knop op de stand 3 Schakel de tweede knop op 250 C in 4 Schakel de derde knop op de stand De verwarmingselementen boven en onder zijn nu geselecteerd 5 Schakel de vierde knop op 20 minu...

Page 6: ...armingselement welke u wilt gebruiken afhankelijk van het gerecht dat u wilt bereiden Vierde knop Timer Tijdschakelaar Selecteer de gewenste kooktijd in minuten met de timer afhankelijk van het gerecht dat u wilt bereiden Selecteer de tijd door de tijdknop met de klok mee te draaien Het apparaat zal automatisch uitschakelen aan het eind van de door u geselecteerde tijd Er zal dan een belletje gaan...

Page 7: ...tel met de tweede knop de temperatuur instellingsknop de gewenste temperatuur in Stel met de derde knop ovenverwarmingselement knop de gewenste oven stand in Stel de gewenste tijd in Het onderste rode controle lampje nr 15 gaat branden U wilt de oven en de kookplaten tegelijk gebruiken Selecteer de bovenste knop de kookplaatcontrole knop op de gewenste stand een of twee kookplaten gebruiken Stel d...

Page 8: ...ooster erin Voor gerechten waar veel vet uit kan vrijkomen Gebruik altijd de bijgeleverde handgreep U kunt de bakplaat of rooster op drie Bovenkant verschillende hoogten plaatsen 1 Afhankelijk van welk gerecht u wilt 2 bereiden 3 Bodem 1 Bovenste plaat geleider 2 Midden plaat geleider 3 Laagste plaat geleider Wees voorzichtig met het eruit halen van de het rooster of de bakplaat deze kunnen zeer h...

Page 9: ...onmiddellijk verwijderen Pas op dit gedeelte is heet De kookplaten met een sopje schoonmaken De platen korte tijd verwarmen ze kunnen anders gaan roesten Met een onderhoudsmiddel behandelen Oven schoonmaken Zo gaat u te werk Gebruik geen harde schuursponsjes Vruchtensap dat van het bakblik afdruipt veroorzaakt vlekken die ook met een ovenreiniger niet te verwijderen zijn Bij het bakken van vochtig...

Page 10: ...aken Indien de oven heet is gebruik dan geen water op de glasplaat dit kan tot gevolg hebben dat de glasplaat breekt Indien u het elektriciteitssnoer uit het stopcontact wilt halen trek dan altijd aan de stekker Trek nooit aan het snoer Dit kan draadbreuk in het snoer veroorzaken Gebruik het apparaat niet met natte handen Zorg ervoor dat het elektra snoer niet nat wordt Haal altijd de stekker uit ...

Page 11: ... niet in acht werd genomen Het apparaat niet verplaatsen tijdens de werking Gebruik het apparaat niet wanneer het elektriciteitssnoer beschadigd is het apparaat gevallen is zichtbare schade vertoont of niet goed werkt In dergelijke gevallen en om risico s te vermijden het apparaat direct terug brengen naar uw verkooppunt Gebruik het apparaat niet als warmtebron Doe nooit papier karton of plastic i...

Page 12: ...et dient niet voor andere doelstellingen te worden gebruikt Het product mag niet worden gewijzigd of veranderd Indien zich problemen zouden voordoen gedurende 1 jaar na aankoopdatum welke gedekt zijn door de fabrieksgarantie zal TRISTAR middels haar servicebureau het apparaat repareren of vervangen Uitsluitend materiaal en of fabricagefouten zijn voorbegrepen in deze garantie TRISTAR is niet veran...

Page 13: ...en de ingrediënten Ovenstanden 1 2 3 Voeg aan de bereidingstijd circa 5 minuten toe voor de voorverwarming van de oven Recept Hoeveelheid Temp C Bereidingstijd Ovenstand Verse pizza 400 g 200 C 25 min 3 Gezouten taart 600 g 200 C 35 min 3 Diepgevroren pizza 450 g 220 C 15 min 3 Lasagne 1500 g 200 C 40 min 3 Hele kip 1500 g 220 C 90 min 3 Gehaktballen 1000 g 200 C 60 min 3 Aubergines met kaas 1700 ...

Page 14: ... te voorkomen EG conformiteitsverklaring Dit apparaat is ontworpen om in contact te komen met levensmiddelen en is ontworpen in overeenstemming met de EG richtlijn 89 109 EEC Dit apparaat is ontworpen vervaardigd en in de handel gebracht in overeenstemming met de veiligheidsdoeleinden van de laagspanningsrichtlijn nr 73 23 EG de beschermingsvoorschriften van de EMC richtlijn 89 336 EG Electromagne...

Page 15: ...ble for their safety In order to protect children from the dangers of electrical appliances never leave them unsupervised with the device Consequently when selecting the location for your device do so in such a way that children do not have access to the device Take care to ensure that the cable does not hang down Test the device plug and the cable regularly for damage If there is damage of any ki...

Page 16: ...offer The oven has a top and a bottom heating element for temperature sensitive dishes and meat with a crispy crust or to bake your favorite pies Apart from that it has very easy cook plate controls for preparing delicious meals Please read this user manual carefully before using the oven Never use this product without reading the safety instructions first Keep this manual in a safe place Always k...

Page 17: ...port 04 Side panel 05 Door handle 06 Oven top 07 Large cook plate 800W 08 Small cook plate 500W 09 Cord plug 10 Turning knob cook plates 11 Warning light cook plates 12 Turning knob temperature 13 Turning knob oven modes 14 Timer oven and cook plates 15 Warning light oven 16 Stand 17 Wire rack 18 Handle 19 Baking tray ...

Page 18: ...o curtains or similar materials can come in contact with the appliance Don t put anything between the bottom of the appliance and the surface you put it on to prevent it from burning 2 Set the upper knob to position 3 Set the second knob to 250 C 4 Set the third knob to position The top and bottom heating elements are now selected 5 Set the fourth know to 20 minutes The oven and cook plates will s...

Page 19: ...m heating Select the desired heating element which depends on the dish you are preparing Fourth knob Timer Select the desired cooking time in minutes with the timer which depends on the dish you are preparing Select the time by turning the timer knob clockwise The appliance will turn off automatically after the time you selected is over A bell will sound When selecting the time the oven will If yo...

Page 20: ... the second knob the temperature setting knob Set the third knob oven heating element selection knob to the desired oven setting Set the desired time The bottom warning light no 15 will light up You want to use the oven and cook plates at the same time Set the upper knob the cook plate control knob to the desired setting using one or two cook plates Set the desired temperature of the cook plates a...

Page 21: ...ead Baking tray with wire rack inside For dishes that could be leaking a lot of grease Always use the supplied handle You can place the baking tray or wire rack on Top three different levels 1 depending on which dish you are preparing 2 3 Bottom 1 Upper tray support 2 Middle tray support 3 Lower tray support Be careful when removing the wire rack or the baking tray these can be very hot Always use...

Page 22: ...ns immediately Attention This part is hot Clean the cook plates with dishwashing liquid and some water Heat the cook plates up for a short time otherwise they could rust Treat with maintenance solution Cleaning the oven This is how to do it Do not use any hard scrubbing pads Fruit juice leaking down the baking tray will make stains that cannot be removed even with oven cleaner Do not overfill the ...

Page 23: ...h bare hands can cause serious burns When the oven is hot then use no water on the glass door this could cause the glass to break When unplugging the electricity always pull the plug Never pull the wire this could cause the cord to break Don t use the appliance with wet hands Make sure the electric cord does not get wet Always unplug the appliance when it s not being used When the appliance is bei...

Page 24: ...ve the appliance during use Do not use the appliance when the cord is damaged the appliance fell down shows signs of damage or doesn t function correctly In such cases immediately take the appliance back to its place of purchase to prevent risks Do not use the appliance as a heat source Never put paper cardboard or plastic in the appliance and do not put any other objects in it like kitchen applia...

Page 25: ...hould not be used for any other purpose The product cannot be changed or altered If any problems occur within 1 year after the date of purchase which are covered by the manufacturer s warranty TRISTAR will by means of its service department repair or replace the appliance Only material and or manufacturing defects are covered by this warranty TRISTAR cannot be held responsible for damage 1 Caused ...

Page 26: ...used and the ingredients Oven settings 1 2 3 Add about 5 minutes to the preparation time for preheating the oven Recipe Quantity Temp C Cooking time Oven setting Fresh pizza 400 g 200 C 25 min 3 Salted pie 600 g 200 C 35 min 3 Frozen pizza 450 g 220 C 15 min 3 Lasagna 1500 g 200 C 40 min 3 Whole chicken 1500 g 220 C 90 min 3 Meatballs 1000 g 200 C 60 min 3 Eggplant with cheese 1700 g 200 C 30 min ...

Page 27: ...ent and human health EC Declaration of conformity This appliance has been designed to come in contact with food products and is designed in accordance with EG Guideline 89 109 EEC This appliance has been designed manufactured and put on the market in agreement with the safety purposes of the low voltage guideline no 73 23 EG the protection directions of the EMC guideline 89 336 EG Electromagnetic ...

Page 28: ...dem Gerät um sie vor den Gefahren im Umgang mit elektrischen Geräten zu schützen Suchen Sie für das Gerät also einen Platz aus der für Kinder unzugänglich ist Achten Sie darauf dass das Kabel nicht herunterhängt Überprüfen Sie das Gerät den Stecker und das Kabel regelmäßig auf Schäden Verwenden Sie das Gerät nicht bei Vorhandensein irgendwelcher Schäden sondern lassen Sie es von einem Techniker re...

Page 29: ...sitzt Ober und Unterhitze für temperaturempfindliches Geschirr und zum Braten von Fleisch mit einer knusprigen Kruste oder zum Backen Ihrer Lieblingskuchen Abgesehen davon besitzt das Gerät einfach zu bedienende Kochplatten für schmackhafte Gerichte Bitte lesen Sie diese Bedienungsanleitung sorgfältig durch bevor Sie den Ofen in Betrieb nehmen Verwenden dieses Gerät niemals ohne vorher die Sicherh...

Page 30: ... des Ofens 07 Große Kochplatte 800W 08 Kleine Kochplatte 500W 09 Netzkabel und Netzstecker 10 Drehknopf für die Kochplatten 11 Kontrolllampe für die Kochplatten 12 Temperaturregler 13 Drehknopf für die Ofenfunktionen 14 Zeitschaltuhr für Ofen und Kochplatten 15 Kontrolllampe für den Ofen 16 Standfüße 17 Drahtrost 18 Haltegriff 19 Backblech ...

Page 31: ...che Verfärbung der Wand Halten Sie Vorhänge oder andere brennbare Materialien vom Gerät fern Legen Sie nichts zwischen Boden des Geräts und seiner Stellfläche damit diese nicht verbrannt wird 2 Stellen Sie den oberen Knopf auf die Position 3 Stellen Sie den zweiten Knopf auf 250 C 4 Stellen Sie den dritten Knopf auf die Position Das obere und untere Heizelement sind nun ausgewählt 5 Stellen Sie de...

Page 32: ...pf Auswahl des Heizelements Oberhitze Ober und Unterhitze Unterhitze Wählen Sie entsprechend zu den zu kochenden Gerichten das gewünschte Heizelement Vierter Knopf Zeitschaltuhr Wählen Sie mit der Zeitschaltuhr die gewünschte Zeit die der Kochzeit Minuten der Gerichte entspricht Wählen Sie die Zeit durch Drehen des Knopfs der Zeitschaltuhr im Uhrzeigersinn Das Gerät schaltet sich nach Ablauf der e...

Page 33: ...hplattenauswahl in der AUS Position Stellen Sie mit dem zweiten Knopf Temperaturregler die gewünschte Temperatur ein Stellen Sie mit dem dritten Knopf Heizelementauswahl die gewünschte Ofenfunktion ein Wählen Sie die gewünschte Zeit Die untere Kontrolllampe 15 leuchtet auf Gleichzeitige Verwendung von Ofen und Kochplatten Wählen Sie mit dem oberen Knopf Kochplattenauswahl eine oder zwei Kochplatte...

Page 34: ...ch und Drahtrost kombiniert Für Speisen bei denen viel Fett abtropfen kann Verwenden Sie stets den mitgelieferten Haltegriff Sie können das Blech oder den Rost in Oben Drei verschiedenen Schienen setzen 1 entsprechend zu den Gerichten die Sie 2 zubereiten möchten 3 Unten 1 Obere Schiene 2 Mittlere Schiene 3 Untere Schiene Vorsicht beim Entnehmen des Drahtrosts oder Backblechs diese können sehr hei...

Page 35: ...ng Diese Komponenten sind heiß Reinigen Sie die Kochplatten mit Geschirrspüler und etwas Wasser Erhitzen Sie die Kochplatten für kurze Zeit andernfalls fangen sie an zu rosten Mit einer Pflegelösung behandeln Reinigung des Ofens Vorgehen Verwenden Sie keine harten Scheuerschwämme Vom Backblech herabtropfender Fruchtsaft erzeugt Flecken die nicht entfernt werden können auch nicht mit Backofenreinig...

Page 36: ...Verbrennungen führen Bei heißem Ofen kein Wasser auf die Glastür gelangen lassen Es kann zu einem Glasbruch kommen Fassen Sie zum Ziehen des Netzsteckers stets am Stecker an Niemals am Kabel ziehen es kann zu einem Kabelbruch kommen Bedienen Sie das Gerät nicht mit nassen Händen Lassen Sie das Netzkabel nicht nass werden Bei Nichtbenutzung stets den Netzstecker des Geräts ziehen Nehmen Sie das Ger...

Page 37: ...itshinweise nicht beachtet werden Setzen Sie das Gerät während des Betriebs nicht um Nehmen Sie das Gerät nicht in Betrieb wenn das Netzkabel Schäden aufweist falls das Gerät auf den Boden gefallen sein sollte nicht richtig funktioniert oder anderweitig beschädigt wurde Um Risiken zu vermeiden bringen Sie in solchen Fällen das Gerät sofort dorthin zurück wo Sie es erworben haben Verwenden Sie das ...

Page 38: ...ere Zwecke verwendet werden Das Produkt darf nicht verändert oder umgeändert werden Sollte es innerhalb eines Jahres nach dem Kaufdatum an Ihrem Gerät zu einer Störung kommen die durch die Herstellergarantie abgedeckt ist wird TRISTAR das Gerät mittels seiner Serviceabteilung reparieren oder austauschen Es werden nur Material und oder Herstellungsfehler von dieser Garantie abgedeckt TRISTAR kann f...

Page 39: ... Kochgeschirr und den Zutaten ab Schienen im Ofen 1 2 3 Heizen Sie den Ofen etwa 5 Minuten vor Hinweise zum Umweltschutz Rezept Menge Temp C Kochzeit Schiene Frische Pizz 400 g 200 C 25 min 3 Gesalzene Pastete 600 g 200 C 35 min 3 Gefrorene Pizza 450 g 220 C 15 min 3 Lasagne 1500 g 200 C 40 min 3 Ganzes Huhn 1500 g 220 C 90 min 3 Fleischklößchen 1000 g 200 C 60 min 3 Aubergine mit Käse 1700 g 200 ...

Page 40: ...rung Dieses Gerät wurde für den Kontakt mit Lebensmitteln entworfen und stimmt mit der EG Richtlinie 89 109 EEC überein Dieses Gerät wurde entwickelt hergestellt und auf den Markt gebracht in Übereinstimmung mit Der Sicherheitsvorschrift 73 23 EG betreffs Schwachstrom der EMC Richtlinie 89 336 EG betreffs elektromagnetische Störungen und den Anforderungen der Richtlinie 93 68 EG Hinweise zum Umwel...

Page 41: ...ur s assurer qu ils ne jouent pas avec l appareil Afin de protéger les enfants des dangers des appareils électriques ne les laissez jamais sans surveillance à proximité de l appareil En conséquence lorsque vous choisissez l emplacement de l appareil faites le de telle manière que l enfant n aura pas accès à l appareil Vérifiez et assurez vous que les câbles ne pendent pas Testez régulièrement l ap...

Page 42: ... en haut et en bas pour les plats sensibles à la température les viandes rôties ou pour cuire vos tartes préférées De plus il présente des contrôles très simples pour préparer de délicieux repas Veuillez lire ce manuel d utilisation avec attention avant d utiliser le four N utilisez jamais ce produit sans respecter les instructions de sécurité Gardez ce manuel dans un endroit sûr Veuillez tenir l ...

Page 43: ... plat de cuisson 800 W 08 Petit plat de cuisson 500 W 09 Cordon d alimentation prise 10 Bouton tournant de choix des plats de cuisson 11 Avertissement lumineux concernant les plats de cuisson 12 Bouton tournant de choix de la température 13 Bouton tournant de choix des modes de four 14 Minuteur et plats de cuisson 15 Avertissement lumineux du four 16 Socle 17 Grille 18 Poignée 19 Plateau de cuisso...

Page 44: ... l appareil Ne mettez rien entre le fond de l appareil et la surface sous l appareil sous peine de faire brûler le matériau 2 Mettez le bouton tournant sur la position 3 Mettez le second bouton sur 250 C 4 Mettez le troisième bouton tournant sur la position Les éléments de chauffage en haut et en bas sont maintenant sélectionnés 5 Placez le quatrième bouton tournant sur 20 minutes Le four et les p...

Page 45: ...pérature du four Troisième bouton tournant Choix des éléments chauffants du four Chauffage par le haut Chauffage par le haut et par le bas Chauffage par le bas Choisissez l élément chauffant désiré suivant le plat que vous désirez préparer Quatrième bouton tournant Minuteur Choisissez l élément chauffant désiré en minutes à l aide du minuteur suivant le plat que vous désirez préparer Choisissez le...

Page 46: ... de contrôle de la plaque chauffante sur la position Arrêt Réglez la température désirée à l aide du second bouton tournant le bouton de réglage de la température Réglez le troisième bouton le bouton de choix de l élément chauffant au réglage désiré Choisissez la durée désirée L avertissement visuel inférieur n 15 s allumera Vous pouvez utiliser le four et les plaques de cuisson en même temps Régl...

Page 47: ...u de cuisson avec une grille Pour les plats qui pourraient laisser couler des graisses Utilisez toujours la poignée fournie Vous pouvez placer le plateau de cuisson ou la grille sur le niveau du haut Trois niveaux différents 1 suivant le plat que vous désirez préparer 2 3 Bas 1 Rail de support supérieur 2 Rail de support intermédiaire 3 Rail de support bas Attention lorsque vous retirez la grille ...

Page 48: ...yez les plats de cuisson à l aide d un nettoyant de vaisselle et d eau Chauffez les plateaux de cuisson pendant un court moment pour éviter qu ils ne rouillent Traitez avec des solutions de maintenance Nettoyage du four Méthodologie N utilisez aucune brosse éponge à récurer Si du jus de fruit coule sur le plateau de cuisson cela entrainera des tâches impossible à retirer même avec un nettoyant pou...

Page 49: ...four Toucher ces éléments à main nue peut causer de sévères brûlures Lorsque le four est chaud n utilisez pas d eau sur la porte vitrée cela pourrait provoquer la cassure de la vitre Lorsque vous débranchez le courant tirez toujours la prise Ne tirez jamais le câble car cela pourrait casser le codon N utilisez pas l appareil avec des mains mouillées Assurez vous que le cordon électrique ne soit pa...

Page 50: ...s toute responsabilité si cette précaution de sécurité n est pas respectée Ne déplacez pas l appareil pendant son utilisation N utilisez pas l appareil avec un cordon d alimentation endommagé si l appareil est tombé qu il montre des signes de dommage ou qu il ne fonctionne pas correctement Si c est le cas ramenez immédiatement l appareil au point d achat pour éviter tout risque N utilisez pas l ap...

Page 51: ...paration de nourriture Il ne peut être utilisé pour une quelconque autre utilisation Le produit ne doit pas être changé ou modifié Si tout problème couvert par la garantie du constructeur survient dans l année 1 suivant la date d achat TRISTAR remplacera ou réparera l appareil via son département service Seuls les défauts matériels et ou les défauts de constructions sont couverts par cette garanti...

Page 52: ... plats utilisés et les ingrédients Réglages du four 1 2 3 Ajoutez approximativement 5 minutes au temps de préparation pour préchauffer le four Recette Quantité Tempé C Temps de cuisson Réglage du four Pizza fraîche 400 g 200 C 25 min 3 Quiche 600 g 200 C 35 min 3 Pizza surgelée 450 g 220 C 15 min 3 Lasagnes 1500 g 200 C 40 min 3 Poulet entier 1500 g 220 C 90 min 3 Boules de viande 1000 g 200 C 60 ...

Page 53: ...atives pour l environnement et la santé humaine Déclaration de conformité CE Cet appareil a été conçu pour être en contact avec des produits alimentaires et respecte la directive EG 89 109 EEC Cet appareil a été conçu manufacturé et mis sur le marché en accord avec les intentions en matière de sécurité de la directive sur les basses tensions n 72 23 EG la directive EMC 89 336 EG Compatibilité élec...

Page 54: ... per la loro sicurezza Per proteggere i bambini dai pericoli degli apparecchi elettrici non lasciarli mai senza controllo con il dispositivo Di conseguenza quando si sceglie il luogo per il dispositivo si deve farlo in modo che i bambini non vi abbiano accesso Fare attenzione che il cavo non penzoli Controllare regolarmente che il dispositivo la spina e il cavo non siano danneggiati Se c è un qual...

Page 55: ...elemento riscaldante superiore e inferiore per pietanze sensibili alla temperatura e carne con una crosta croccante o cuocere al forno le vostre torte A parte questo ha comandi per cucinare molto semplici per preparare piatti deliziosi Si prega di leggere questo manuale dell utente attentamente prima di usare il forno Non usare mai questo prodotto senza leggere prima le istruzioni di sicurezza Ten...

Page 56: ...e 05 Maniglia porta 06 Forno superiore 07 Piatto di cottura grande 800W 08 Piatto di cottura piccolo 500W 09 Cavo spina 10 Manopole per i piatti di cottura 11 Luce di avvertimento dei piatti di cottura 12 Manopola temperatura 13 Manopola modalità forno 14 Timer Forno e piatti di cottura 15 Forno della luce di avvertimento 16 Stand 17 Griglia 18 Maniglia 19 Teglia ...

Page 57: ...i simili possa entrare in contatto con l apparecchio Non porre nulla tra la parte inferiore dell apparecchio e la superficie su cui la poggiate per prevenire che bruci 2 Impostare la manopola superiore in posizione 3 Impostare la seconda manopola a 250 C 4 Impostare la terza manopola in pozione Gli elementi riscaldanti inferiori e superiori sono ora selezionati 5 Impostare la quarta manopola per 2...

Page 58: ...ra del piatto di cottura come quella del forno Terza manopola Selezione elemento di surriscaldamento Riscaldamento in alto Riscaldamento in alto e in basso Riscaldamento in basso Selezionare l elemento di riscaldamento desiderato che dipende dal piatto che state preparando Quarta manopola Timer Selezionare il tempo di cottura desiderato in minuti con il timer che dipende da quale piatto state prep...

Page 59: ...ostare la temperatura desiderata con la seconda manopola la manopola di impostazione della temperatura Impostare la terza manopola la manopola di selezione dell elemento riscaldante forno all impostazione del forno desiderato Impostare il tempo desiderato La luce di avvertimento inferiore no 15 si accenderà Volete usare il forno e i piatti di cottura simultaneamente Impostare la manopola superiore...

Page 60: ... Teglia con all interno la griglia Per pietanze da cui può colare molto grasso Usare sempre la maniglia fornita Potete posizionare la teglia o la griglia su Alto tre diversi livelli a seconda di quale piatto state 1 preparando 2 3 Basso 1 Supporto teglia superiore 2 Supporto teglia media 3 Supporto teglia bassa Attenti quando rimuovete la griglia o la teglia possono essere bollenti Usare sempre il...

Page 61: ...e i piatti di cottura con il liquido per lavastoviglie e un po d acqua Riscaldare i piatti di cottura per un breve periodo di tempo altrimenti possono arrugginirsi Trattare con una soluzione di manutenzione Pulire il forno Questo è il procedimento Non usare alcuna retina Perdite di succhi di frutta nella teglia farà macchie che non possono essere rimosse anche con un detergente per forno Non riemp...

Page 62: ... causare serie ustioni Quando il forno è caldo non usare l acqua sulla porta di vetro questo può causarne la rottura Quando si scollega l elettricità tirare sempre la spina Non tirare mai il filo questo può causare la rottura del cavo Non usare l apparecchio con le mani bagnate Assicurarsi che il cavo elettrico non si bagni Scollegare sempre l apparecchio quando non viene usato Quando l apparecchi...

Page 63: ...te Non spostare l apparecchio durante l uso Non usare l apparecchio quando il cavo è danneggiato l apparecchio è caduto mostra segni di danneggiamento o non funziona correttamente In questi casi riportare l apparecchio immediatamente al luogo d acquisto per prevenire rischi Non usare l apparecchio come fonte di calore Non mettere mai carta cartone o plastica nell apparecchio e non mettere alcun al...

Page 64: ...razione del cibo Non deve essere usato per nessun altro scopo Il prodotto non può essere cambiato o alterato Se si verifica qualche problema entro 1 anno dopo la data di acquisto che sono coperti dalla garanzia del produttore TRISTAR riparerà o sostituirà l apparecchio per mezzo del dipartimento di manutenzione Solo un materiale e o i difetti di manutenzione sono coperti da questa garanzia TRISTAR...

Page 65: ... degli ingredienti Impostazioni del forno 1 2 3 Aggiungere circa 5 minuti al tempo di preparazione per il preriscaldamento del forno Ricetta Quantità Temp C Tempo di Cottura Impostazione del forno Pizza fresca 400 g 200 C 25 min 3 Pizza fresca 600 g 200 C 35 min 3 Pizza congelata 450 g 220 C 15 min 3 Lasagna 1500 g 200 C 40 min 3 Pollo intero 1500 g 220 C 90 min 3 Polpette 1000 g 200 C 60 min 3 Me...

Page 66: ...per l ambiente e la salute umana Dichiarazione di Conformità EG Quest apparecchio è stato progettato per entrare in contatto con prodotti alimentari ed è progettato in conformità con la Linea Guida EG 89 109 EEC Quest apparecchio è stato progettato prodotto e messo sul mercato in accordo con gli scopi della linea guida al basso voltaggio no 73 23 EG le direttive della protezione della linea guida ...

Page 67: ...proteger a los niños de los peligros de los aparatos eléctricos nunca los deje solos con el aparato sin supervisión Consecuentemente al seleccionar el emplazamiento del aparato piense en un lugar fuera del alcance de los niños Asegúrese de que el cable no quede colgando Pruebe el aparato el enchufe y el cable para detectar cualquier daño posible En caso de detectar cualquier tipo de daño no utilic...

Page 68: ... elementos calendadores superior e inferior para platos sensibles a la temperatura y para preparar carne tostada y crujiente o para preparar sus pasteles favoritos Además tiene unos controles de fogones muy sencillos para preparar deliciosas comidas Lea atentamente este manual antes de usar el horno No use nunca este producto sin leer primero las instrucciones de seguridad Guarde este manual en un...

Page 69: ...ndeja de comida 04 Panel lateral 05 Asa de la puerta 06 Plataforma del horno 07 Fogón grande 800W 08 Fogón pequeño 500W 09 Cable enchufe 10 Mando para fogones 11 Testigo de fogones 12 Mando de temperatura 13 Mando de modos del horno 14 Temporizador del horno y los fogones 15 Testigo del horno 16 Pata 17 Rejilla 18 Asa 19 Bandeja de cocción ...

Page 70: ...se de que las cortinas o materiales similares no puedan entrar en contacto con el aparato No ponga nada entre la parte inferior del aparato y la superficie sobre la que lo coloque para evitar incendios 2 Ponga el mando superior en posición 3 Ponga el segundo mando a 250ºC 4 Ponga el tercer mando superior en posición Quedarán seleccionados los elementos calentadores superior e inferior 5 Ponga el c...

Page 71: ...e inferior Calor inferior Seleccione el elemento calentador deseado según el plato que prepare Cuarto mando temporizador Seleccione el tiempo de cocción en minutos deseado con el temporizador según el plato que prepare Seleccione el tiempo girando el mando hacia la derecha El aparato se apagará automáticamente cuando pase el tiempo seleccionado Sonará un timbre Cuando seleccione el tiempo el horno...

Page 72: ...do mando mando de establecimiento de temperatura Ponga el tercer mando el mando de selección de elemento calentador en la posición del horno deseada Ponga el tiempo deseado El testigo inferior nº 15 se encenderá Si quiere usar el horno y los fogones a la vez Ponga el mando superior el mando de control de fogones en la posición deseada usando uno o dos fogones Ponga la temperatura deseada de los fo...

Page 73: ...mo pan francés Bandeja con rejilla dentro Para platos que suelten mucha grasa Use siempre el asa incluida Puede poner la bandeja de cocción o la rejilla en Superior tres niveles distintos 1 según el plato que esté preparando 2 3 Inferior 1 Soporte superior de bandeja 2 Soporte medio de bandeja 3 Soporte inferior de bandeja Tenga cuidado cuando saque la rejilla o bandeja pueden estar muy calientes ...

Page 74: ...mediato Atención Esta pieza está caliente Limpie los fogones con lavavajillas y algo de agua Caliente brevemente los fogones o podrían oxidarse Trátelos con una solución de mantenimiento Limpieza del horno Procedimiento No use estropajos Los jugos de frutas que pasen a la bandeja provocan manchas que no pueden limpiarse ni tan sólo con limpiahornos No llene en exceso la bandeja cuando prepare past...

Page 75: ...pre el asa incluida cuando saque una rejilla o bandeja del horno Tocarlas con las manos desnudas puede provocar quemaduras graves Cuando el horno esté caliente no use agua en la puerta de cristal el cristal podría romperse Cuando desconecte la electricidad tire siempre del enchufe No tire nunca del cable podría hacer que se rompiera No use el aparato con las manos mojadas Asegúrese de que el cable...

Page 76: ...tenga un mínimo de 16A y que tenga toma de tierra Rechazamos cualquier responsabilidad si no se sigue esta precaución de seguridad No mueva el aparato durante el uso No use el aparato cuando el cable esté dañado el aparato haya caído muestre indicios de daños o no funcione correctamente En estos casos devuelva de inmediato el aparato al lugar de compra para evitar riesgos No use el aparato como ca...

Page 77: ... diseñado para preparar alimentos No debe usarse para otros fines El producto no puede modificarse ni alterarse Si se produce cualquier problema en el término de 1 año posterior a la fecha de compra que esté cubierto por la garantía del fabricante TRISTAR mediante su departamento de servicio reparará o cambiará el aparato Esta garantía solamente cubre los defectos materiales y o de fabricación TRI...

Page 78: ...sados y los ingredientes Configuración del horno 1 2 3 Añada unos 5 minutos al tiempo de preparación para precalentar el horno Receta Cantidad Temp C Tiempo de cocción Posición del horno Pizza fresca 400 g 200 C 25 min 3 Tarta salada 600 g 200 C 35 min 3 Pizza congelada 450 g 220 C 15 min 3 Lasaña 1500 g 200 C 40 min 3 Pollo entero 1500 g 220 C 90 min 3 Albóndigas 1000 g 200 C 60 min 3 Berenjena c...

Page 79: ...na Declaración de cumplimiento EG Este aparato ha sido diseñado para entrar en contacto con productos alimentarios y está diseñado en cumplimiento con la Normativa EG 98 109 EEC Este aparato ha sido diseñado fabricado y comercializado en cumplimiento con Los fines de seguridad de la normativa de baja tensión nº 73 23 EG las directrices de protección de la normativa EMC 89 336 EG Compatibilidad ele...

Page 80: ...s dos aparelhos eléctricos nunca as deixe sem supervisão junto do aparelho Da mesma forma quando seleccionar o local onde vai colocar o aparelho faça o de modo a que as crianças não lhe consigam aceder Certifique se de que o cabo não fica suspenso Verifique regularmente se o dispositivo a ficha e o cabo estão danificados Se houver algum tipo de dano não deve utilizar o aparelho Deve entregá lo a u...

Page 81: ... O forno tem um elemento superior e inferior para pratos de temperatura moderada e carne com crosta crocante ou para cozedura das suas tartes favoritas Além disso tem controlos dos discos para fácil cozedura para preparar deliciosas refeições Leia este manual do utilizador atentamente antes de utilizar o forno Nunca utilize este produto sem ler antes as instruções de segurança Mantenha este manual...

Page 82: ... 05 Pega da porta 06 Topo do forno 07 Disco grande 800W 08 Disco pequeno 500W 09 Cabo ficha 10 Botão de regulação dos discos 11 Indicador luminoso de aviso dos discos 12 Botão de regulação da temperatura 13 Botão de regulação dos modos do forno 14 Temporizador do forno e dos discos 15 Indicador luminoso de aviso do forno 16 Base 17 Grelha 18 Pega 19 Bandeja ...

Page 83: ...xistem cortinas ou materiais semelhantes que possam entrar em contacto com o aparelho Não coloque nada entre a base do aparelho e a superfície sobre a qual o coloca para evitar que queime 2 Regule o botão superior para a posição 3 Regule o segundo botão para 250 C 4 Regule o terceiro botão para a posição Os elementos de aquecimento superior e inferior estão agora seleccionados 5 Regule o quarto bo...

Page 84: ...desejado dependendo do prato que está a preparar Quarto botão Temporizador Seleccione o tempo de cozedura desejado em minutos com o temporizador dependendo do prato que está a preparar Seleccione o tempo regulando o temporizador no sentido dos ponteiros do relógio O aparelho desligar se á automaticamente após o tempo que seleccionou ter terminado É emitido um aviso sonoro Quando seleccionar o temp...

Page 85: ...regulação da temperatura Regule o terceiro botão botão de selecção do elemento de aquecimento do forno para a definição do forno desejada Regule o tempo desejado O indicador luminoso superior Nº 15 acender se á Utilizar simultaneamente os discos e o forno Regule o botão superior o botão de regulação dos discos para a definição desejada utilizando um ou os dois discos Regule a temperatura desejada ...

Page 86: ...s Bandeja com grelha no interior Para pratos que possam verter muita gordura Utilize sempre a pega fornecida Pode colocar a bandeja ou a grelha em Superior três níveis diferentes 1 dependendo do prato que está a preparar 2 3 Inferior 1 Suporte da bandeja superior 2 Suporte da bandeja central 3 Suporte da bandeja inferior Tenha cuidado quando retirar a grelha ou a bandeja estas peças podem estar mu...

Page 87: ...sta peça está quente Limpe os discos com líquido de lavar a loiça e pouca água Aqueça os discos durante alguns minutos caso contrário podem enferrujar Limpe com uma solução de manutenção Limpar o forno Eis o que deve fazer Não utilize nenhum esfregão duro Os sumos de fruta que vertam para a bandeja formarão manchas que não podem ser retiradas mesmo com um produto de limpeza para fornos Não encha d...

Page 88: ... luvas pode causar queimaduras graves Quando o forno estiver quente não utilize água na porta de vidro isso poderia quebrar o vidro Quando desligar da electricidade retire sempre a ficha Nunca puxe pelo cabo isso poderia romper o cabo Não utilize o aparelho com as mãos molhadas Certifique se de que o cabo eléctrico não fica molhado Desligue sempre o aparelho quando não estiver a utilizá lo Quando ...

Page 89: ... se esta precaução de segurança não for seguida Não transporte o aparelho durante a sua utilização Não utilize o aparelho quando o cabo estiver danificado o aparelho ter caído mostrar sinais de danos ou não funcionar correctamente Nestes casos entregue imediatamente o aparelho no local onde o comprou para evitar riscos Não utilize o aparelho como uma fonte de calor Nunca coloque papel cartão ou pl...

Page 90: ...te aparelho foi concebido para preparação de alimentos Não deve ser utilizado para qualquer outro fim O produto não pode ser modificado ou alterado Se ocorrerem quaisquer problemas dentro do prazo de um 1 ano após a compra que estão cobertos pela garantia do fabricante a TRISTAR fará através do seu departamento de reparações reparar ou substituir o aparelho Só os defeitos de fabrico e ou de materi...

Page 91: ...dos ingredientes Definições do forno 1 2 3 Acrescente cerca de 5 minutos ao tempo de preparação para pré aquecer o forno Receita Quantidade Temperatura C Tempo cozedura Regulação do forno Pizza fresca 400 g 200 C 25 min 3 Tarte salteada 600 g 200 C 35 min 3 Pizza congelada 450 g 220 C 15 min 3 Lasanha 1500 g 200 C 40 min 3 Frango inteiro 1500 g 220 C 90 min 3 Almôndegas 1000 g 200 C 60 min 3 Berin...

Page 92: ...nte e saúde humana Declaração de conformidade EG Este aparelho tem sido concebido para estar em contacto com produtos alimentares e foi concebido de acordo com a Norma 89 109 EEC EG Este aparelho tem sido concebido fabricado e comercializado em conformidade com os objectivos de segurança da norma de baixa tensão nº 73 23 EG as instruções de protecção da norma EMC 89 336 EG Compatibilidade Electrom...

Page 93: ...jecu od opasnosti električnih ureñaja nikad ih ne ostavljate s ureñajem bez nadzora Nadalje kad birate mjesto na kojemu će biti vaš ureñaj neka to bude tako da mu ne mogu pristupiti djeca Pobrinite se da kabel ne visi prema dolje Redovito provjeravajte da na ureñaju utikaču i priključnom kabelu nema oštećenja Ako postoji ikakvo oštećenje ureñaj se ne smije koristiti već ga mora popraviti kvalifici...

Page 94: ...diti puno Pećnica raspolaže gornjim i donjim grijaćim elementom za hranu koja je osjetljiva na temperaturu kao i za meso s hrskavom korom ili za pečenje vaših omiljenih kolača Bez obzira na to posjeduje regulatore za lako pripremanje hrane i ukusnih jela Molimo pažljivo pročitajte ove upute prije korištenja pećnice Nemojte nikad koristiti proizvod ako niste prije toga prvo pročitali sigurnosne upu...

Page 95: ...ta Gornja strana pećnice Velika ploča za pripremu hrane 800 W Mala ploča za pripremu hrane 500 W Kabel utikač Okretni gumb grijaćih ploča Svjetlosno upozorenje grijaćih ploča Okretni gumb temperature Okretni gumb načina rada pećnice Pećnica s tajmerom i grijaće ploče Svjetlosno upozorenje pećnice Stalak Žičana polica Ručka Ladica za pečenje ...

Page 96: ...a zavjese ili sličan materijal ne doñe u dodir s aparatom Nemojte stavljati ništa izmeñu dna aparata i površine na koju ga stavljate moglo bi doći do požara 2 Gornji gumb postavite u položaj 3 Drugi gumb postavite na 250 C 4 Postavite treći gumb u položaj Gornji i donji grijaći elementi su sada izabrani 5 Četvrti gumb postavite na 20 minuta Pećnica i grijaće ploče će se uključiti Uključit će se ob...

Page 97: ...erite željeni grijaći element koji ovisi o vrsti hrane koju ćete pripremati Četvrti gumb Tajmer Izaberite željeno trajanje pripreme hrane u minutama koje ovisi o vrsti hrane koju ćete pripremati Pomoću gumba tajmera podesite vrijeme u smjeru kazaljke sata Ureñaj će se automatski sam isključiti nakon što isteče podešeno vrijeme Oglasit će se signalno zvono Prilikom izbora vremena pećnica će se uklj...

Page 98: ...jenu temperaturu drugim gumbom gumb za podešavanje temperature Postavite treći gumb gumb za izbor grijaćeg elementa pećnice u željeni položaj Podešavanje datuma i vremena Donje svjetlo upozorenja br 15 će zasvijetliti Ako istodobno želite koristiti pećnicu i grijaće ploče Postavite gornji gumb upravljački gumb ploče za pripremu hrane u željeni položaj uz pomoć jedne ili dvije grijaće ploče Odredit...

Page 99: ...uski kruh Plitica za pečenje sa žičanom mrežom unutra Za hranu koja ispušta velike količine masnoće Uvijek se za to koristite ručkom Ploču za pečenje ili žičanu mrežu morate staviti Gornje na tri različite razine 1 u ovisnosti o tome kakvu hranu želite pripremati 2 3 Dno 1 Gornji oslonac plitice 2 Srednji oslonac plitice 3 Donji oslonac plitice Pazite kad skidate žičanu policu ili pliticu za pečen...

Page 100: ...Ovaj dio je vruć Očistite grijaće ploče tekućinom za pranje posuña i vodom Zagrijte grijaće ploče nakratko u protivnom bi mogle zahrñati Pripremite otopinu za održavanje Očistite pećnicu Ovako čistite grijaće ploče Nemojte upotrebljavati nikakve jastučiće za grebanje SOk od voća koji se cijedi niz pliticu za pečenje će ostaviti mrlje koje se ne daju odstraniti čak niti čistačem za pećnicu Nemojte ...

Page 101: ... može izazvati ozbiljne opekline Kad je pećnica vruća nemojte koristiti vodu na staklenim vratima jer to će dovesti do pucanja stakla Uvijek prilikom iskopčavanja kabela iz utičnice povlačite za utikač Nikad ne vucite za kabel jer time ćete izazvati prekid kabela Ureñaj nemojte koristiti mokrim rukama Pobrinite se da se ne smoči električni kabel Uvijek iskopčavajte aparat dok nije u radu Kad se ap...

Page 102: ...nosti ako se ove mjere ne poštuju Nemojte pomicati ureñaj dok je u radu Aparat nemojte koristiti ako je priključni kabel oštećen ako vam aparat ispadne ako pokazuje znakove istrošenosti ili ako ne radi kako treba U takvim slučajevima odmah odnesite aparat natrag u trgovinu gdje ste ga kupili kako s njim više ne bi bilo problema Nemojte ureñaj koristiti kao izvor za grijanje Nikad nemojte unutra st...

Page 103: ...e smije koristiti ni za kakve druge svrhe Proizvod se ne smije mijenjati ili preinačivati Ako se u okviru perioda od 1 godine od datuma na računu jave ikakvi problemi koji su obuhvaćeni visokom kutijom od dana kupovine koyear nakon datuma kupovine koji je obuhvaćen jamstvom TRISTAR će svfojom servisnom politikom popraviti ili zamijeniti ureñaj Samo oštećenja i ili proizvodni efekti dolaze zajedno ...

Page 104: ...m receptu hrani i sastojcima Postavke pe nice 1 2 3 Dodajte 5 minuta na vrijeme za pripremu za zagrijavanje pećnice Recept Količina Temo C Vrijeme za pripremu Podešavanje vremena Svježa pizzavr 400 g 200 25 min 3 Slana pita 600 g 200 35 min 3 Smrznuta pizza 450 g 220 15 min 3 Lasagne 1 500 g 200 40 min 3 Cijelo pile 1 500 g 220 90 min 3 Mesne kuglice 1 000 g 200 60 min 3 Patlidžan sa sirom 1 700 g...

Page 105: ...je razvoja negativnoih poljedica za okoliš i zdravlje čovjeka EG Izjava o sukladnosti Ovaj aparat je predviñen za kontakt hrane s proizvodima s EG smjernicama 89 109 EEC Ovaj aparat je predviñen izrañen i plasiran na tržište u skladu sa sljedećim Sigurnosne svrhe niskonaponske direktive br 73 23 EG direktive za zaštitu of the EMC vodič 89 336 EG Elektromagnetska kompatibilnost i zahtjevi direktive...

Reviews: