background image

23.


If connecting rod is not in the down position plug unit in and cycle unit to get connecting rod into down 
position. 

24.


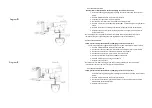
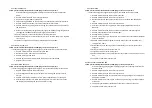
With piston slots aligned slide pump/filter manifold onto connecting rod #56 Diagram “B”.  Push 
pump/filter manifold towards crank housing # 53 to line up dowel pins then thread mounting bolts #25 
through pump filter manifold and thread into crank housing #53. Tighten firmly with5/16” Hex wrench. 

25.


Reattach transducer #30 to the back of pump/filer manifold. 

26.


Reinstall crankshaft cover plate #55 with 4 screws #40. See diagram “B”. 

27.


Reattach suction set. 

28.


Pour Trilube through slot in cover plate #55, diagram “B”. 
 

REPLACE BY-PASS VALVE 

1.


To replace the pressure relief valve #27 knock pin #29 through black handle #28. 

2.


Remove black plastic handle and cap with indexing pin which exposes pressure relief valve. 

3.


Using a 3/4” open end unthread by pressure relief valve. Inspect. Replace if worn. 

 
REPLACE FILTER 

1.


To replace the paint filter remove filter bowl #1 from fluid manifold by unthreading counter 
clockwise. 

2.


Remove filter #3 and spring support #4. Most times filter can just be cleaned but if damaged replace. 

 
REPLACE TRANSDUCER 

1.


To replace transducer hold wire tube of #31 with plyers, unthread transducer housing #30 from 
pump/filter manifold. 

2.


Remove mounting screws # 25. 

3.


Remove 4 screws for crank housing cover plate # 55. 

4.


With a flat blade screwdriver pry pump/filter manifold downward till it clears locating pins and slide 
forward but do not remove. 

5.


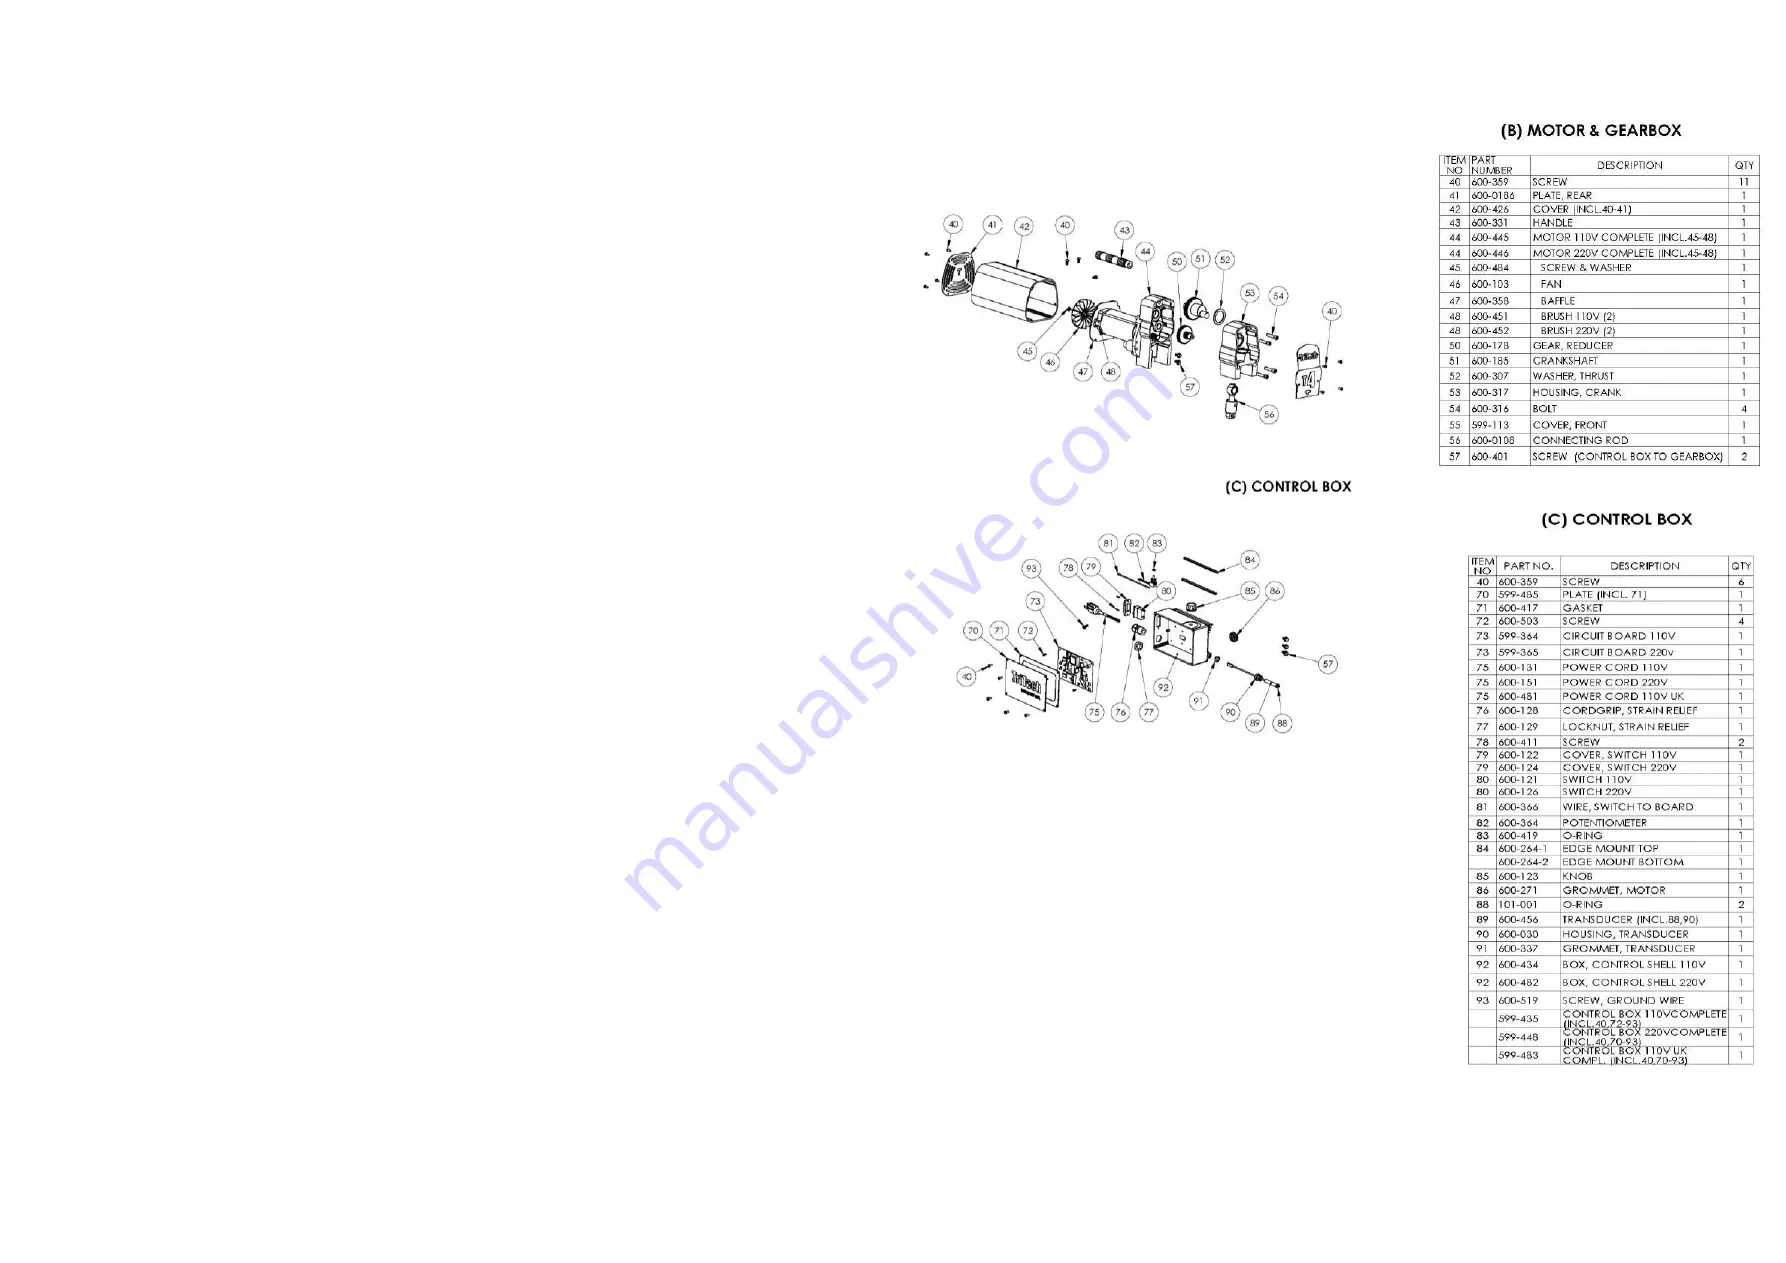
Remove 4 screws #40 and Control box cover plate #70. 

6.


Unplug transducer from circuit board. See diagram “B”. 

7.


Guide transducer wire out of control box. 

8.


To replace guide replacement transducer through grommet #91 and reconnect to circuit board. 

9.


Thread transducer into pump/filter housing. 

10.


Replacement of transducer requires no calibration of pressure control. To ensure new transducer 
functions properly follow Start up procedure. 


Summary of Contents for 200-517

Page 1: ...town Industrial Park Balbriggan County Dublin Ireland K32 KV26 Email sales aristospray com Web www tritechairless com Phone UK 01895 276751 Ireland 01 690 3162 International 353 1690 3162 2b creative 028 9266 9888 TriTechAirless Aristospray Aristospray USER MANUAL ...

Page 2: ...ck the terms and conditions of the purchase contract When purchased directly from TriTech Industries or a TriTech Industries Distributor you may contact technical support for disposal arrangements RoHS Compliance Statement TriTech Industries products are designed to meet Reduction of Hazardous Substance Directive 2011 65 EU 8June2011 the product manufactured by TriTech Industries do not contain ma...

Page 3: ...e to rain Store indoors SKIN INJECTION HAZARD High pressure fluid from tip gun hose leaks or ruptured components will pierce skin This may look like just a cut but it is a serious injury that can result in amputation Get immediate surgical treatment Do not point gun at anyone or at any part of the body Do not put your hand over the spray tip Use only spray tip specified by TriTech Do not stop or d...

Page 4: ...al code Use only conductive metal pails place on a grounded surface such as concrete Do not place pail on a nonconductive surface such as paper or cardboard which interrupt grounding continuity To maintain grounding continuity when flushing or relieving pressure hold metal part of the spray gun with the airless tip removed firmly to side of the grounded metal pail Then trigger gun START UP Through...

Page 5: ...ment install or clean spray tip PROCEDURE 1 Turn pressure control knob counterclockwise to stop 2 Turn sprayer off 3 Do not unplug power supply cord 4 Hold metal part of gun firmly to grounded metal container Trigger gun to relieve pressure 5 Lock gun safety latch 6 Open pressure relief valve Leave pressure relief valve open until ready to spray again NOTE Do not store unit for extended periods of...

Page 6: ......

Page 7: ...unit for extended periods of time with the Pressure relief valve open Store the unit in the spray position NOTE If suspected that spray tip or hose is completely clogged or that pressure has not been fully relieved after following steps above SLOWLY loosen tip guard or hose end coupling to relieve pressure gradually and then loosen completely Clear tip or hose obstruction 120V 15 AMP 100 200 300 1...

Page 8: ...all 17 and gaskets 22 and 21 6 Insert Hex key into piston valve assembly 16 and turn counter clockwise to remove piston valve 15 Inspect upper ball 13 and carbide seat of piston valve 15 Replace if worn or damaged Make sure to always replace upper ball 13 and o ring 14 if repacking unit 7 To remove the pump filter manifold housing use a 5 16 Hex wrench in the 2 mounting bolts 25 Then unthread tran...

Page 9: ...ead by pressure relief valve Inspect Replace if worn REPLACE FILTER 1 To replace the paint filter remove filter bowl 1 from fluid manifold by unthreading counter clockwise 2 Remove filter 3 and spring support 4 Most times filter can just be cleaned but if damaged replace REPLACE TRANSDUCER 1 To replace transducer hold wire tube of 31 with plyers unthread transducer housing 30 from pump filter mani...

Page 10: ...f procedure before attempting to service or repair unit If trouble shooting guide suggests replacing the Circuit Board follow the directions below 1 Remove 6 screws 40 and remover cover plate 70 2 Disconnect Transducer 89 from circuit board See diagram D E and for below 3 Disconnect the leads from potentiometer 82 to circuit board 4 Disconnect the leads from motor 44 to the circuit board 5 Disconn...

Page 11: ...lace if worn or damaged 4 Reassemble in reverse order When reinstalling motor brushes make sure to have red and black wire leads to the back of the motor housing REPLACE MOTOR Follow pressure relief procedure before attempting to service or repair unit If trouble shooting guide suggests replacing the motor follow the directions below 1 Remove 3 screws 40 and remove motor cover 42 2 Remove 4 screws...

Page 12: ...ushes and drive train are warranted to the original purchaser only under normal use and service against defects in craftsmanship or material for the lifetime of the product Wearing Parts Two Year Warranty Should the packings piston or prime valve need replacing within two years of the original purchase this will be carried out by an approved service agent at no cost to the purchaser this is limite...

Reviews: