background image

A

Q U A S E N S A T I O N

A S 2 0 0 0 T   /   A S 2 0 0 0

4

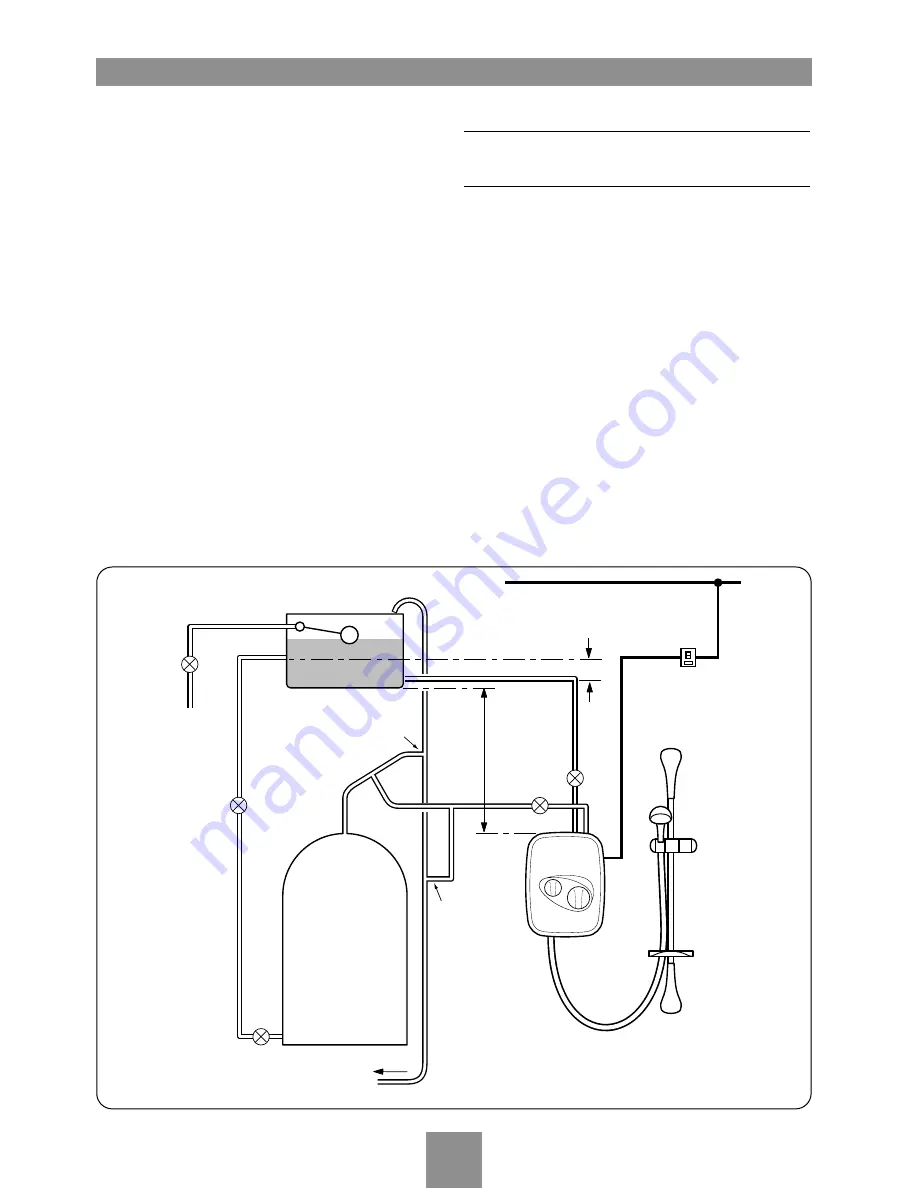
25mm min

75mm
min

Isolating

valves

Isolating

valve

Isolating

valve

Isolating spur

(3A fused)

outside bathroom

Ring main

Dedicated cold supply

Hot supply

Vent pipe

tee

Shower

unit

Mains supply

10m

max

Drain

valve

Alternative
connection

Other

hot water

draw-offs

Cold water cistern

Hot water

cylinder

SITE REQUIREMENTS

Water

The installation must be in accordance with Local
Water Company Regulations/Byelaws and BS6700.

For correct operation of this shower unit, both hot
and cold water supplies to the appliance must be
gravity fed, at nominally equal pressures, from a
cold water storage cistern and a hot water storage
cylinder.
The water circuit should be installed so that the
flow is not significantly affected by other taps and
appliances being operated elsewhere on the
premises.

Fig.2

shows a recommended installation where

the hot water supply for the shower is made via a
tee connection on the underside of the rising
horizontal section of pipework from the cylinder.
Alternatively, the connection can be taken from
the hot supply pipe to other outlets as long as it is
the first draw-off below the ventilation pipe tee.

Fig.3

illustrates all the incorrect connections that

must be avoided.

All pipework to the shower unit must be routed
where it remains below the level of water in the
cistern. In the case of horizontal sections of
pipework in lofts, it may be necessary to fit
automatic air vents at high points on the supplies
to remove the possibility of air locks.

For the operation of the shower only, it is
recommended that the cold water storage cistern
is capable of holding at least 114 litres (25
gallons). Where other hot and cold outlets are
likely to be in use simultaneously, the storage
capacity should be increased to 228 litres (50
gallons) in accordance with BS6700.

Do ensure compliance with all the local Water
Company Regulations/Byelaws.

Fig.2 

(Diagrammatic view – not to scale)

Summary of Contents for Aquasensation AS2000

Page 1: ...Installation and Operating Instructions INSTALLERS PLEASE NOTE THESE INSTRUCTIONS ARE TO BE LEFT WITH THE USER 2180237F Nov 2000 Aquasensation AS2000T AS2000 thermostatic and manual power shower ...

Page 2: ...ost with low interest rates PRICE MATCH always get the best deals available Boilers Radiators Heating controls Pipes ittings Cylinders Fires Renewable energy Bathroom suites Kitchen sinks taps Showers Wet rooms Towel warmers Bathroom furniture much more H U G E R E D U C T I O N S we have ON THOUSANDS OF ITEMS 0 8 4 4 8 0 0 3 4 6 0 CALL US ON visit our website plumbnation co uk ...

Page 3: ...cedure 12 13 Temperature control spindle setting 14 Fitting the riser rail 15 Fitting the soap dish and sprayhead 16 Operating the shower 17 Adjusting the sprayhead 18 Adjusting the maximum temperature stop 19 Cleaning shower and sprayhead 20 Cleaning the filters 21 Spare parts 22 23 Fault finding 24 Guarantee service policy etc rear cover To ensure the product suitability for commercial and multi...

Page 4: ...l result in air locking and must be avoided 1 11 Standard gate valves MUST be fitted on the hot and cold water supplies to the shower as an independent means of isolating the water supplies should maintenance or servicing be necessary DO NOT use stop taps or ball o fix type valves which restrict flow 1 12 If the shower unit is installed on a common supply which feeds an adjacent tap the maximum st...

Page 5: ... plastic pipe Where chrome plated pipe is used remove the first 25mm of plating NOTE The pump inside this product is rated 15 minutes on 45 minutes off duty cycle SAFETY WARNINGS a Do not insert fingers into the push in inlet fittings Doing so could cause injury b Under no circumstances must this product be connected to mains cold or hot water supplies Failure to comply will invalidate the guarant...

Page 6: ...structed in this book The full performance specification as below for the standard unit is achieved with a blend set between 35 C 40 C and supplies of 15 C cold and 65 C hot with nominally equal pressures 1 The blended water temperature is maintained within 2 C with a 10 C change in the hot and cold water supply 2 The sensor effects a shut down to seepage in approximately 2 seconds if the cold sup...

Page 7: ...ere the hot water supply for the shower is made via a tee connection on the underside of the rising horizontal section of pipework from the cylinder Alternatively the connection can be taken from the hot supply pipe to other outlets as long as it is the first draw off below the ventilation pipe tee Fig 3 illustrates all the incorrect connections that must be avoided All pipework to the shower unit...

Page 8: ...ection above vent tee Cold supply from cylinder feed Hot feed connection from horizontal vent pipe Strained hose No isolating valves Soap dish retaining ring not used Mains supply Supply taken from mains Drain valve Other cold draw offs from shower supply Cold water cistern Hot water cylinder Depicting incorrect connections Fig 3 Diagrammatic view not to scale 4 Shower control MUST be fed from a c...

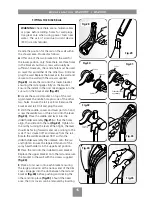
Page 9: ...e sprayhead NOTE Allow sufficient room between the ceiling and the shower unit to access the top cover screw Position the shower and sprayhead on the wall so that all controls can be comfortably reached whilst using the shower The sprayhead and riser rail can be positioned either side of the shower unit NOTE Water Regulations require the sprayhead be constrained by a fixed or sliding attachment so...

Page 10: ...e connected to anything other than the hose and sprayhead supplied DO NOT use jointing compounds on any pipe fittings for the installation When connecting pipework avoid using tight 90 elbows Swept or formed bends will ensure optimum performance Isolate the mains water supply to the cold water cistern Drain the hot and cold pipes by opening all taps The hot water supply can be taken from the hot s...

Page 11: ...ets are fully engaged with the pipe Dimensions are shown in figs 9 and 10 NOTE The pipe inlets are marked for hot and cold connections left side for hot inlet on bottom entry fig 11 but right side for hot inlet on top or rear entry fig 12 Important The fittings on the inlet elbows are the push in type The pipework must be cut with a pipe cutter and all burrs and rough edges removed from the end of...

Page 12: ...ory fitted blanking plugs are fitted to the top pipe inlets These should be left in position if bottom pipe entry is required But for top or rear pipe entry the two plugs must be removed and re fitted into the bottom pipe inlets Insert the pipe removal tool supplied between the flange of the plug and the grey collet and lever the plug outward fig 13 Whilst holding back on the collet pull out each ...

Page 13: ...mpleted pipework and manoeuvre so that the end of the pipes enter fully into the inlet fittings Mark positions for wall fixing holes using backplate as template fig 16 Note that four fixing holes are provided but using only two should be adequate for most site conditions Using the pipe removal tool supplied push back and hold the collects from the pipework fig 17 in order to disengage pipework fro...

Page 14: ...nal block screws and ensure that no cable insulation is trapped under the screws NOTE The supply cable earth conductor must be sleeved and the cable clamp fig 18 used to secure the cable The earth continuity conductor of the electrical installation must be effectively connected electrically to all exposed metal parts of other appliances and services in the room in which the shower is to be install...

Page 15: ...his is a push fit and will only fit one way On the PCB ensure the commissioning link is positioned on the middle two pins fig 20 Switch on electric supply at isolating switch Water will begin to flow under gravity pressure Once the unit has been commissioned disconnect the electricity supply before removing the commissioning link WARNING Be aware of live parts in the unit when the electricity is s...

Page 16: ... lead to the 4 pins on the PCB fig 23 it can fit either way Replacing the cover Fit the cover ensuring the connector is fitted to the PCB and the wires are clear of the setting adaptor Secure with the top and bottom fixing screws fig 8 Ensure the maximum temperature stop is still in position NOTE If adjustment of the maximum temperature stop is required refer to section Adjusting the maximum tempe...

Page 17: ... on the temperature scale when the cover is fitted fig 25 NOTE Incorrect positioning will result in excessive cold bleed AS2000 thermostatic valve With the adaptor removed use your fingers to adjust the brass splined spindle until the black line on the spindle lines up with the groove in the top of the valve spindle housing fig 26 Re fit the adaptor onto the brass splined spindle aligning the sing...

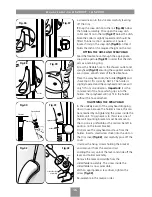
Page 18: ...e slider holder assembly fig 31 so that the holes align then slide onto the rail fig 32 Tighten to the rail by turning the lever When tight the lever should be facing forwards and not pointing to the wall If not slacken off and remove from the rail Rotate the saddle and lever 180 within the slider holder assembly then replace onto the rail and tighten Ensure the tapered thin end of the spray head ...

Page 19: ...nical end of the hose which grips into the holder The sprayhead will not fit in the holder without the hose attached TIGHTENING THE SPRAYHEAD In the unlikely event of the sprayhead dropping down in use because the holder is loose this can be remedied by re tightening the screw inside the holder unit To gain access to this screw one of the wall mounting brackets must be removed the top one is prefe...

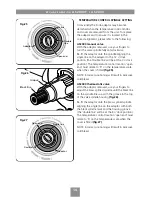
Page 20: ...ess the shower is to be used again immediately the shower should also be switched off at the electricity isolating switch As a safety feature the temperature control has a built in stop to prevent you accidentally exceeding your highest desired temperature If adjustment is required see section Adjusting the maximum temperature stop To override this stop depress the button fig 47 while the control ...

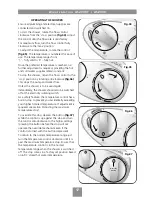
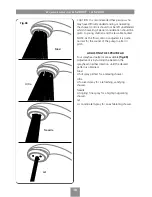
Page 21: ...NOTE As the flow control is adjusted it is quite normal for the sound of the pump to alter in pitch ADJUSTING THE SPRAYHEAD Four sprayhead patterns are available fig 48 Adjustment is by turning the bezel on the sprayhead in either direction until the desired pattern is obtained Maxi A full spray perfect for a relaxing shower Ultra A focused spray for a refreshing satisfying shower Needle A tinglin...

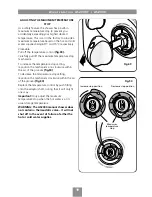
Page 22: ...se the temperature stop setting reposition the mechanism anti clockwise within the arc of the grooves fig 50 To decrease the temperature stop setting reposition the mechanism clockwise within the arc of the grooves fig 50 Replace the temperature control by push fitting onto the adaptor shaft noting that it will only fit one way Important Only adjust the maximum temperature stop when the hot water ...

Page 23: ... firmly and twist anti clockwise fig 52 This movement may turn the cartridge assembly as well until it reaches a stop Hold the cartridge firmly and continue to twist anti clockwise Having loosened the sprayplate sufficiently it can be unscrewed and removed completely fig 53 Clean the sprayplate with a suitable brush or preferably leave it to soak overnight in a mild proprietary descalent Ensure al...

Page 24: ...ad connected to the PCB unit Carefully pull off the lead from the PCB DO NOT let the cover dangle by the lead Remove the single retaining screw from either the upper or lower filter cover fig 54 depending upon whether top rear entry or bottom entry is used Pull off the filter cover Carefully hook out the filters together with O rings Thoroughly clean and replace ensuring the O rings are in positio...

Page 25: ...160 chrome 83306170 gold 83306180 3 Sprayhead holder white 83306190 chrome 83306200 gold 83306210 4 Flexible hose chrome 22003970 white 22003960 gold 22003980 5 Riser rail 430mm anodised chrome 7042409 white 7042411 gold 7042410 6 Soap dish white 22008960 7 Cover thermostatic 83305350 c w knob potentiometer 8 Cover manual 83305250 c w knob potentiometer 8 7 1 4 2 5 6 3 ...

Page 26: ...290 12 Temperature valve 83305270 thermostatic Temperature valve 83305280 manual 13 Pipe inlet elbow 83305320 c w filters check valves 14 PCB unit 7072177 15 Pipe removing tool 7052144 16 Pipe trim 7052146 17 Terminal block 22001320 18 Solenoid assembly 82300430 19 Cable clamp 7052145 20 Motor cover 83305300 21 Filter pair 83305330 _ Wire kit 83305340 11 17 9 10 12 13 15 14 16 19 20 18 21 ...

Page 27: ... the local Water Company 4 2 1 Switch off shower and contact Triton Customer Service 4 3 1 Clean sprayhead 4 4 1 Clean filters 5 1 1 Isolate water to unit Remove check valves Clean and replace 6 1 1 Call Triton Customer Service 6 2 1 Call Triton Customer Service 1 Water too hot 2 Water too cold 3 Pump does not operate 4 Water does not flow or is reduced 5 Cross flow of hot and cold water into syst...

Page 28: ...UKAS QUALITY MANAGEMENT 003 ...

Page 29: ...o forma invoice by cheque or money order 2 By telephone quoting credit card MasterCard or Visa details 3 By website order www tritonshowers co uk Triton Plc Shepperton Park Caldwell Road Nuneaton Warwickshire CV11 4NR Triton Plc guarantee this product against all mechanical and electrical defects arising from faulty workmanship or materials for a period of one year for domestic use only from the d...

Reviews: