background image

PLEASE FOLLOW THESE INSTRUCTIONS

WHEN USING YOUR TRITON

TM

 KEY CUTTER:

The equipment is designed to be operated at DC24V.  

The machine will only operate normally at 24VDC. 

Low/high voltage can harm the machine motor.

The cutter should be replaced on a regular basis.

Delayed replacement or using a dull cutting bit can  

lead to inaccurate key cutting. 

The cutting accuracy of the machine depends on the 

material type of the key blank. Select correct speed 

and cutting times to cut hardened key blanks.

Be sure to mount the machine on a solid secure 

surface.  Clean the machine with a brush only. Prevent 

any kind of water intrusion when cleaning.

Make sure to enter correct key data and input correct 

key bitting number.

When using a voltage inverter to run the machine off a 

vehicle, always leave the vehicle running when using 

the machine.

1

2

3

4

5

6

!

Summary of Contents for LockLabs Key Cutting Machine

Page 1: ...USER MANUAL W W W T R I T O N K E Y M A C H I N E C O M...

Page 2: ...o inaccurate key cutting The cutting accuracy of the machine depends on the material type of the key blank Select correct speed and cutting times to cut hardened key blanks Be sure to mount the machin...

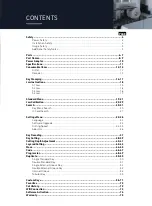
Page 3: ...earch 30 31 Key Blank Search 30 IC Card Search 31 Settings Menu 32 36 Language 32 Software Upgrade 33 Cutting Speed 34 35 About Us 36 Key Decoding 37 Key Cutting 38 39 Cutting Depth Adjustment 40 41 L...

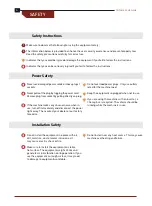
Page 4: ...isture dust or water intrusion as it may cause electric shock or fire Make sure to install the equipment on stable flat surface The equipment weighs 35 lbs and generates minor vibration during operati...

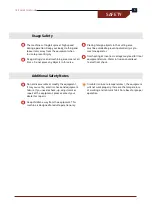
Page 5: ...emperature of working environment to 32 F or above for proper operation The machine cutting bit spins at high speed during operation Keep your body clothing and loose items away from the equipment whe...

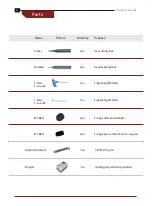
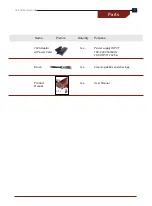
Page 6: ...c u t t e r a n d d e c o d e r M 3 B o l t 2EA F i x i n g k e y s o n S i d e C D o f 4 w a y j a w S t o p p e r a n d Ca l i b r a t i o n B l o c k 1EA Ca l i b r a t i n g j a w s a n d g u i d...

Page 7: ...t i c K e y Cu t t i n g M a c h i n e P a r t s T i p s Cu t t e r a n d d e c o d e r a r e c o n s u m a b l e i t e m s M a k e s u r e t o r e p l a c e i t a f t e r a c e r t a i n p e r i o d...

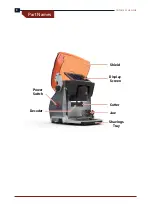
Page 8: ...8 TRITON KEY MACHINE Part Names T r i t o n A u t o m a t i c K e y Cu t t i n g M a c h i n e P a r t s N a m e 05 p a g e Shield Display Screen Cutter Jaw Decoder Power Switch Shavings Tray...

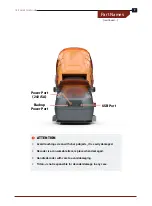
Page 9: ...p Power Port USB Port Avoid touching screen with sharp objects it is easily damaged Decoder is a consumable item replace when damaged Handle decoder with care to avoid damaging TritonTM is not respons...

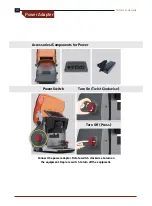
Page 10: ...p m e n t p r e s s s w i t c h t o t u r n o f f t h e e q u i p m e n t T u r n O f f P r e s s T r i t o n A u t o m a t i c K e y Cu t t i n g M a c h i n e P o w e r A d a p t e r 07 p a g e 10 T...

Page 11: ...D C24V 5A V o l t a g e P o w e r 120W S i z e 305 W x 300 H x 400 D m m W e i g h t 35 3 l b s A c c u r a c y X Y A x i s 0 0025m m Z A x i s 0 0025m m S p i n d l e S p e e d 12000 r p m W o r k i...

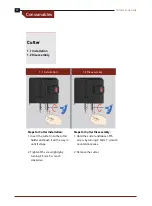
Page 12: ...bly Cutter 1 1 Installation 1 2 Disassembly Steps for Cutter Installation 1 Insert the cutter into the cutter holder and push it all the way in until it stops 2 Tighten M5 screw tightly by turning 2 5...

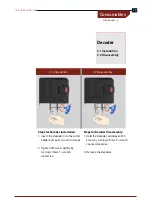
Page 13: ...y Decoder 2 1 Installation 2 2 Disassembly Steps for Decoder Installation 1 Insert the decoder into the cutter holder and push it in until it stops 2 Tighten M5 screw tightly by turning 2 5mm T wrench...

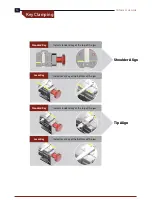
Page 14: ...t h e t o p o f t h e j a w P l e a s e f i x l a s e r k e y a t t h e b o t t o m o f t h e j a w T r i t o n A u t o m a t i c K e y Cu t t i n g M a c h i n e K e y F i x a t i o n 11 p a g e Key...

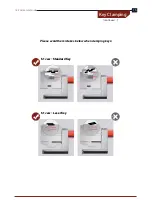
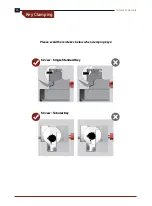
Page 15: ...on T r i t o n A u t o m a t i c K e y Cu t t i n g M a c h i n e P l e a s e a v o i d b e l o w m i s t a k e s w h e n f i x i n g t h e k e y s S1 Jaw Standard Key S1 Jaw Laser Key Please avoid th...

Page 16: ...ON KEY MACHINE Key Clamping P l e a s e a v o i d b e l o w m i s t a k e s w h e n f i x i n g t h e k e y s Please avoid the mistakes below when clamping keys S2 Jaw Single Standard Key S3 Jaw Tubul...

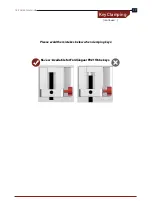
Page 17: ...17 TRITON KEY MACHINE Key Clamping Please avoid the mistakes below when clamping keys S4 Jaw Available for Ford Jaguar F021 Tibbe keys continued...

Page 18: ...J a w S 4 J a w Jaw Instructions Available for Double standard keys Single internal groove keys Single external groove keys Double internal groove keys Double external groove keys Dimple keys Availabl...

Page 19: ...t H i s t o r y D u p l i c a t e Cu s t o m K e y s F a v o r i t e s S u p p o r t M e n u M e s s a g e S e a r c h 16 p a g e T r i t o n A u t o m a t i c K e y Cu t t i n g M a c h i n e S t a...

Page 20: ...ers aw o e et bitting numbers by key code nput e isting bitting numbers to get unknown bitting number Decode key Cut key how basic in ormation Collect common keys riton utomatic Key Cutting achine tan...

Page 21: ...s the more cuts that will be needed Cutting depth Cutting depth ou can manually set the cutting depth when cutting laser keys ayered Cutting Cancel the operation tart cutting key 1 page riton utomatic...

Page 22: ...t t e r t o d e c o d e r p l a c e t h e c a l i b r a t i o n b l o c k a n d f i x J a w t i g h t l y t h e n c l i c k O K b u t t o n s h o w n a s p i c t u r e S t e p 3 1 Automobile Key Jaw S...

Page 23: ...p l a c e t h e c a l i b r a t i o n b l o c k a n d f i x J a w t i g h t l y t h e n c l i c k O K b u t t o n s h o w n a s p i c t u r e JawCalibration 2 Automobile Key Jaw S1 B Step 1 Step 2 St...

Page 24: ...e r p l a c e t h e c a l i b r a t i o n b l o c k a n d f i x J a w t i g h t l y t h e n c l i c k O K b u t t o n s h o w n a s p i c t u r e 3 Automobile Key Jaw S1 C Step 1 Step 2 Step 3 Choose...

Page 25: ...p l a c e t h e c a l i b r a t i o n b l o c k a n d f i x J a w t i g h t l y t h e n c l i c k O K b u t t o n s h o w n a s p i c t u r e 4 Automobile Key Jaw S1 D Step 1 Step 2 Step 3 Choose Aut...

Page 26: ...e c u t t e r t o d e c o d e r a n d f i x J a w t i g h t l y t h e n c l i c k O K b u t t o n s h o w n a s p i c t u r e 5 Single Standard Key Jaw S2 A Step 1 Step 2 Step 3 Choose Single Standard...

Page 27: ...u t t e r t o d e c o d e r a n d f i x J a w t i g h t l y t h e n c l i c k O K b u t t o n s h o w n a s p i c t u r e 6 Single Standard Key Jaw S2 B Step 1 Step 2 Step 3 Choose Single Standard Key...

Page 28: ...t t e r t o d e c o d e r a n d f i x J a w t i g h t l y t h e n c l i c k O K b u t t o n s h o w n a s p i c t u r e 7 Tubular Key Jaw S3 Step 1 Step 2 Step 3 Choose Tubular Key Jaw S3 Change cutte...

Page 29: ...e r t o d e c o d e r a n d f i x J a w t i g h t l y t h e n c l i c k O K b u t t o n s h o w n a s p i c t u r e 8 Ford Jaguar Tibbe Key Jaw S4 Step 2 Step 3 Choose Tibbe Key Jaw S4 Change cutter...

Page 30: ...button owe er you ha e to be amiliar with car key blank or using this unction Key Blank Search Example HU66 Volkswagen Audi Skoda You can search key data by key blank Step 1 Step 2 Step 4 Click butto...

Page 31: ...button owe er you ha e to be amiliar with D rom nstacode or using this unction ID Search Example 909 Volkswagen Audi Skoda You can search key data by ID Step 1 Step 2 Step 4 Click button You must be...

Page 32: ...32 TRITON KEY MACHINE Settings Menu anguage Click anguage button Choose the language you need Language Step 1 Step 2 Step 3 Choose the language you need Click Language button Click button...

Page 33: ...ingsMenu o tware pgrade Click o tware pgrade button Click upgrade button to upgrade your e uipment Software Upgrade Step 1 Step 2 Click Upgrade button to upgrade your equipment Click Software Upgrade...

Page 34: ...g peed Click ettings button Click Cutting peed button lide progress bar to ad ust cutting speed Cutting Speed Step 1 Click button Click Settings button Slide progress bar to adjust cutting speed Click...

Page 35: ...HINE SettingsMenu thers Click ettings button Click thers button Shield Override Step 1 Click button Click Settings button Slide to On to allow shield to be open during cutting Click Others button Step...

Page 36: ...36 TRITON KEY MACHINE Settings Menu bout s Click bout s button iew details o bout s About Us Step 1 Step 2 Step 3 View details of About Us Click About Us button Click button...

Page 37: ...ace the decoder shown as picture 3 Click Decode button Decoding wait a moment Decoding is done Key Decoding Step 1 Decoding wait a moment Decoding is done Click button Step 2 Step 3 Step 4 1 Confirm k...

Page 38: ...n t h e o r i g i n a l k e y i s l o s t Ch o o s e A u d i i n t h e l i s t Ch o o s e Q 7 i n t h e l i s t Example Audi Q7 Input known bitting numbers to cut a key when the original key is lost...

Page 39: ...c t o r n o t t h e n c l i c k b u t t o n 1 F i x t h e k e y s h o w n a s p i c t u r e 2 I n s e r t c u t t e r 3 Cl i c k c u t t o c u t k e y a f t e r c o n f i r m e d Example Audi Q7 cont...

Page 40: ...stment Ex a m p l e H o n d a A c c o r d Ch o o s e H o n d a i n t h e l i s t Ch o o s e A c c o r d i n t h e l i s t Example Honda Accord Step 1 Step 2 Step 3 Choose Accord in the list Choose Hon...

Page 41: ...a n u f a c t u r i n g Cl i c k b u t t o n t o p o p o u t i n v i s i b l e w i n d o w Ch a n g e t h e c u t t i n g d e p t h b y b u t t o n Example Honda Accord cont Step 5 Change the cutting...

Page 42: ...o c u t a k e y w h e n t h e o r i g i n a l k e y i s l o s t Ch o o s e A u d i i n t h e l i s t Ch o o s e Q 7 i n t h e l i s t Example Audi Q7 Input known bitting numbers to cut a key when the...

Page 43: ...e y i s l o s t Cl i c k b u t t o n Ch o o s e c o r r e s p o n d i n g L a y e r e d Cu t t i n g i c o n Ch o o s e t h e y e a r o f m a n u f a c t u r i n g Example Audi Q7 cont Input known bi...

Page 44: ...t a k e y w h e n t h e o r i g i n a l k e y i s l o s t Ch o o s e A u d i i n t h e l i s t Ch o o s e Q 7 i n t h e l i s t Example Audi Q7 Input known bitting numbers to cut a key when the origin...

Page 45: ...o c u t a k e y w h e n t h e o r i g i n a l k e y i s l o s t Cl a m p m o v e s Ch o o s e t h e y e a r o f m a n u f a c t u r i n g Example Audi Q7 cont Input known bitting numbers to cut a key...

Page 46: ...w h e n o r i g i n a l k e y i s l o s t Ch o o s e H o n d a i n t h e l i s t Ch o o s e A c c o r d i n t h e l i s t Example Honda Accord How to cut a key when original key is lost Step 1 Step 2...

Page 47: ...t h e y e a r o f m a n u f a c t u r i n g I n p u t t h e c o d e M 081 a n d c l i c k S e a r c h t o g e t t h e b i t t i n g n u m b e r s Example Honda Accord cont How to cut a key when origin...

Page 48: ...o s e A u d i i n t h e l i s t Ch o o s e Q 7 i n t h e l i s t Ch o o s e t h e y e a r o f m a n u f a c t u r i n g Example Audi Q7 Step 1 Choose Audi in the list Choose the year of manufacture Ch...

Page 49: ...u t b o x R e v i e w s e a r c h r e s u l t a n d c h o o s e t h e c o r r e s p o n d i n g o n e y o u n e e d Example Audi Q7 cont Step 5 Example Input known bitting numbers 234321 and keep unkn...

Page 50: ...a r d b u t t o n Cl i c k S h o u l d e r b u t t o n Cl i c k J a w b u t t o n Cl i c k Cu t b u t t o n a f t e r d u p l i c a t i n g i s d o n e Step 1 Step 3 Step 5 Step 2 Step 4 Click Duplic...

Page 51: ...a r d b u t t o n Cl i c k S h o u l d e r b u t t o n Cl i c k J a w b u t t o n Cl i c k Cu t b u t t o n a f t e r d u p l i c a t i n g i s d o n e Step 1 Step 3 Step 5 Step 2 Step 4 Click Duplic...

Page 52: ...o n Cl i c k U p S i n g l e T r a c k S h o u l d e r b u t t o n Cl i c k J a w a n d a d j u s t c u t t e r d i m e n s i o n Step 1 Step 3 Step 2 Step 4 Click Duplicate button on Home Page Click...

Page 53: ...S h o u l d e r b u t t o n Cl i c k J a w a n d a d j u s t c u t t e r d i m e n s i o n Cl i c k Cu t b u t t o n a f t e r d u p l i c a t i n g i s d o n e Step 1 Step 3 Step 2 Step 4 Click Dupl...

Page 54: ...d e r b u t t o n Cl i c k J a w b u t t o n a n d a d j u s t c u t t e r d i m e n s i o n Cl i c k Cu t b u t t o n a f t e r d u p l i c a t i n g i s d o n e Step 1 Step 3 Step 2 Step 4 Click Dup...

Page 55: ...a g e Cl i c k T u b u l a r b u t t o n Cl i c k J a w b u t t o n Cl i c k Cu t b u t t o n a f t e r d u p l i c a t i n g i s d o n e Step 1 Step 3 Step 2 Step 4 Click Duplicate button on Home Pag...

Page 56: ...k S h o u l d e r a n d N e x t b u t t o n I n p u t t h e p a r a m e t e r s i n s p a c e l o c a t i o n o f t h e k e y a n d c l i c k N e x t b u t t o n Step 1 Step 3 Step 2 Step 4 Click Cust...

Page 57: ...ers in space width of the key and click Next button Name the new key data and click OK button Input the parameters in depth of the key and click Next button Choose correct Jaw and click Next button Re...

Page 58: ...Step 2 Step 4 Click Custom Keys button on Home Page Click Single Internal Groove Key button then Next button Choose A and input the parameters in space location of the key and click Next button Click...

Page 59: ...utton Review the key data you just added Input the parameters in space width of the key and click Next button Input the parameters in depth of the key and click Next button Input the parameters in Wid...

Page 60: ...Step 3 Step 2 Step 4 Click Custom Keys button on Home Page Click Double Internal Groove Key button then Next button Input the parameters in space location of the key and click Next button Click Add Ne...

Page 61: ...of the key and click Next button Input the parameters in depth of the key and click Next button Input the parameters in Width Thickness Cut Depth Groove and Nose and click Next button Choose correct...

Page 62: ...3 Step 2 Step 4 Click Custom Keys button on Home Page Click Dimple button then Next button Input the parameters in space location of the key and click Next button Click Add New Key button Click Should...

Page 63: ...tep 7 Step 9 Input the parameters in depth of the key and click Next button Input the parameters in Width Thickness and click Next button Choose correct Jaw and click Next button Name the new key data...

Page 64: ...Step 4 Click Custom Keys button on Home Page Click Single Standard button then Next button Input the parameters in space location of the key and click Next button Click Add New Key button Click Should...

Page 65: ...nput the parameters in space width of the key and click Next button Input the parameters in depth of the key and click Next button Input the parameters in Width and click Next button Name the new key...

Page 66: ...stom Keys button on Home Page Click Single External Groove Key button then Next button Choose A and input the parameters in space location of the key and click Next button Click Add New Key button Cli...

Page 67: ...of the key and click Next button Input the parameters in depth of the key and click Next button Input the parameters in Width Thickness Cut Depth Groove and Nose and click Next button Choose correct...

Page 68: ...p 4 Click Custom Keys button on Home Page Click Double External Groove Key button then Next button Input the key parameters in the spaces and click Next button Click Add New Key button Click Shoulder...

Page 69: ...ce width of the key and click Next button Input the parameters in depth of the key and click Next button Input the parameters in Width Thickness Cut Depth and click Next button Choose correct Jaw and...

Page 70: ...4 Click Custom Keys button on Home Page Click Tubular button then Next button Input the parameters in depth of the key and click Next button Click Add New Key button Input the parameters in space loc...

Page 71: ...TON KEY MACHINE CustomKeys Step 6 Step 8 Step 7 Input the parameters in Width Thickness Cut Depth and click Next button Name the new key data and click OK button Review the key data you just added con...

Page 72: ...72 TRITON KEY MACHINE Favorites CutHistory F a v o r i t e s Cu t H i s t o r y You can check what keys you ve saved before You can check what keys you ve cut before Favorites Cut History...

Page 73: ...MACHINE WIFIConnection Click Set Up button on Desktop Click WLAN button Input password and click Connect button Choose the available WIFI connections shown in the list Step 1 Step 2 Step 4 Step 3 WIF...

Page 74: ...Open the software and log in Serial Number and Registration code Find the label on the back cover of the equipment The serial number and registration code are there Click OK button and complete the s...

Page 75: ...e Monday through Friday 8am to 5pm Pacific Standard Time To receive service or support you agree to comply with each of the terms listed below i You will provide a copy of this warranty and a copy of...

Page 76: ...5275 S Arville Street Ste 328 Las Vegas NV 89118 Tel 855 562 5522 Email info lock labs com W W W T R I T O N K E Y M A C H I N E C O M...

Reviews: