background image

EN 


Original Instructions


tritontools.com


3)  Personal safety 

a) 

Stay alert, watch what you are doing and use common sense when 
operating a power tool. Do not use a power tool while you are tired or under 
the influence of drugs, alcohol or medication.

 A moment of inattention while 

operating power tools may result in serious personal injury.


b) 

Use personal protective equipment. Always wear eye protection.

 Protective 

equipment such as a dust mask, non-skid safety shoes, hard hat or hearing 
protection used for appropriate conditions will reduce personal injuries.


c) 

Prevent unintentional starting.


Ensure the switch is in the OFF-position 

before connecting to power source and/or battery pack, picking up or 
carrying the tool.

 Carrying power tools with your finger on the switch or 

energising power tools that have the switch ON invites accidents.


d) 

Remove any adjusting key or wrench before turning the power tool ON.

 A 

wrench or a key left attached to a rotating part of the power tool may result in 
personal injury.


e) 

Do not overreach. Keep proper footing and balance at all times.


This enables 

better control of the power tool in unexpected situations.


f) 

Dress properly. Do not wear loose clothing or jewellery. Keep your hair and 
clothing away from moving parts.


Loose clothes, jewellery or long hair can be 

caught in moving parts.


g) 

If devices are provided for the connection of dust extraction and collection 
facilities, ensure these are connected and properly used.

 Use of dust 

collection can reduce dust-related hazards.


h) 

Do not let familiarity gained from frequent use of tools allow you to become 
complacent and ignore tool safety principles.

 A careless action can cause 

severe injury within a fraction of a second.


4)  Power tool use and care 

a) 

Do not force the power tool. Use the correct power tool for your application.


The correct power tool will do the job better and safer at the rate for which it was 
designed.


b) 

Do not use the power tool if the switch does not turn it ON and OFF.

 Any 

power tool that cannot be controlled with the switch is dangerous and must be 
repaired.


c) 

Disconnect the plug from the power source and/or remove the battery pack, 
if detachable, from the power tool before making any adjustments, 
changing accessories, or storing power tools.

 Such preventive safety 

measures reduce the risk of starting the power tool accidentally.


d) 

Store idle power tools out of the reach of children and do not allow persons 
unfamiliar with the power tool or these instructions to operate the power 
tool.

 Power tools are dangerous in the hands of untrained users.


e) 

Maintain power tools and accessories. Check for misalignment or binding 
of moving parts, breakage of parts and any other condition that may affect 
the power tool’s operation. If damaged, have the power tool repaired before 
use.

 Many accidents are caused by poorly maintained power tools.


f) 

Keep cutting tools sharp and clean.

 Properly maintained cutting tools with 

sharp cutting edges are less likely to bind and are easier to control.


g) 

Use the power tool, accessories and tool bits, etc. in accordance with these 
instructions, taking into account the working conditions and the work to be 
performed.

 Use of the power tool for operations different from those intended 

could result in a hazardous situation.


h) 

Keep handles and grasping surfaces dry, clean and free from oil and 
grease.

 Slippery handles and grasping surfaces do not allow for safe handling 

and control of the tool in unexpected situations.


5)  Service 

a) 

Have your power tool serviced by a qualified repair person using only 
identical replacement parts.

 This will ensure that the safety of the power tool is 

maintained.


Sanding Tool Safety 

  WARNING!


• 

Hold the power tool by insulated handles or gripping surfaces only, 
because the sanding belt/sheet may contact its own cord. 

Cutting a "live" 

wire may make exposed metal parts of the power tool ‘live’ and could give the 
operator an electric shock. 

 
• 

Use clamps or another practical way to secure the workpiece to a stable 
platform. 

Holding the workpiece by hand or against the body makes it unstable 

and may lead to loss of control. 


• 

Recommendation that the tool always be supplied via a residual current 
device with a rated residual current of 30 mA or less. 


• 

If the replacement of the supply cord is necessary, this has to be done by 
the manufacturer or his agent in order to avoid a safety hazard. 


a. 

ALWAYS wear appropriate protective equipment, including a dust mask 
with a minimum FFP2 rating, eye protection and ear defenders


b. 

Ensure all people in the vicinity of the work area are also equipped with 
suitable personal protective equipment


c.


Take special care when sanding some woods (such as beech, oak, 
mahogany and teak),


as the dust produced is toxic and can cause extreme 

reactions 

d. 

NEVER use to process any materials containing asbestos.

 Consult a qualified 

professional, if you are uncertain whether an object


contains asbestos 

e. 

DO NOT sand magnesium or alloys containing a high percentage of 
magnesium


f. 

Be aware of paint finishes or treatments that may have been applied to the 
material that is being sanded. Many treatments can create dust that is toxic, 
or otherwise harmful.


If working on a building constructed prior to 1960, there is 

an increased chance of encountering lead-based paints


g. 

The dust produced when sanding lead-based paints is particularly 
hazardous to children, pregnant women, and people with high blood 
pressure.


DO NOT allow these people near to the work area, even if wearing 

appropriate personal protective equipment


h. 

Whenever possible, use a vacuum dust extraction system to control dust 
and waste


i.


Be especially careful when using a machine for both wood and metal 
sanding. Sparks from metal can easily ignite wood dust. 

ALWAYS clean your 

machine thoroughly to reduce the risk of fire 

j.


Empty the dust bag or container (where applicable) frequently during use, 
before taking breaks and after completion of sanding.


Dust may be an 

explosion hazard. DO NOT throw sanding dust into an open fire. Spontaneous 
combustion may occur when oil or water particles come into contact with dust 
particles. Dispose of waste materials carefully and in accordance with local laws 
and regulations. 

k. 

Work surfaces and sandpaper can become very hot during use. If there is 
evidence of burning (smoke or ash), from the work surface, stop and allow 
the material to cool.


DO NOT touch work surface or sandpaper until they have 

had time to cool


l. 

DO NOT touch the moving sandpaper


m. 

ALWAYS switch off before you put the sander down


n. 

DO NOT use for wet sanding. 

Liquids entering the motor housing can cause 

severe electric shocks


o. 

ALWAYS unplug the sander from the mains power supply before changing 
or replacing sandpaper


p. 

Even when this tool is used as prescribed it is not possible to eliminate all 
residual risk factors.


If you are in any doubt as to safe use of this tool, do not 

use it


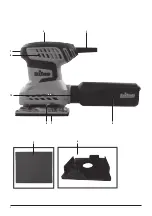
Product Familiarisation 

1.  ON/OFF Switch 
2.  Soft Grip Handle 
3.  Power Cord 
4.  Sanding Sheets 
5.  Sanding Sheet Punch Plate 
6.  Dust Collection Pot 
7.  Sanding Base Plate 
8.  Sanding Sheet Clamping Levers 
9.  Motor Vents 
10. Dust Outlet 
 

Intended Use 

Electric orbital sheet sander for light to medium duty sanding tasks on wood, plastic, 
painted surfaces and other surface coatings. 
 
The tool must ONLY be used for its intended purpose. Any use other than those 
mentioned in this manual will be considered a case of misuse. The operator, and not 
the manufacturer, shall be liable for any damage or injury resulting from such cases 
of misuse. The manufacturer shall not be liable for any modifications made to the 
tool, nor for any damage resulting from such modifications. 
 

Unpacking Your Tool 

•  Carefully unpack and inspect your tool. Familiarise yourself with all its features 

and functions. Ensure that all parts of the tool are present and in good condition 

•  If any parts are missing or damaged, have such parts replaced before attempting 

to use this tool 


Before Use 

  WARNING: Ensure the tool is disconnected from the power supply before 

attaching or changing any accessories, or making any adjustments.


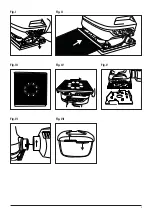
Fitting sanding sheets 
Note:

 DO NOT continue to use worn, torn, or heavily clogged sanding sheets. 

Ensure foreign objects, such as nails and screws, are removed from the workpiece 
before commencing sanding. 

Summary of Contents for TQTRSS

Page 1: ...Instructions Bedienings en veiligheidsvoorschriften Instru es de Opera o e Seguran a Instructions d utilisation et consignes de s curit Instrukcja obs ugi i bezpiecze stwa Sicherheits und Bedienungsa...

Page 2: ...2 3 2 10 1 9 5 7 4 8 6...

Page 3: ...3 Fig II Fig I Fig III Fig V Fig IV Fig VI Fig VII...

Page 4: ...tion emission during actual use of the power tool can differ from the declared total value depending on the ways in which the tool is used There is the need to identify safety measures to protect the...

Page 5: ...and or against the body makes it unstable and may lead to loss of control Recommendation that the tool always be supplied via a residual current device with a rated residual current of 30 mA or less I...

Page 6: ...ander to a vacuum cleaner or dust extraction system using the Dust Outlet 2 Switch the vacuum cleaner or dust extraction system ON before you begin sanding This will significantly reduce the dust in t...

Page 7: ...Retain your receipt as proof of purchase Triton Precision Power Tools guarantees to the purchaser of this product that if any part proves to be defective due to faulty materials or workmanship within...

Page 8: ...el hoge geluidsniveaus zelfs met het dragen van gehoorbescherming stopt u het gebruik van de machine onmiddellijk Controleer de pasvorm en het geluiddempingsniveau van de bescherming WAARSCHUWING Bloo...

Page 9: ...npast toebehoren verwisselt of het elektrische gereedschap opbergt Dergelijke voorzorgsmaatregelen verminderen het risico op het per ongeluk starten van het elektrische gereedschap d Berg elektrisch g...

Page 10: ...ren test de schuurmachine steeds uit op een stuk afvalmateriaal om te bepalen of het schuurvel geschikt is voor de uit te voeren taak Ruw korrelmaat 60 voor gebruik op ruwe materialen Medium korrelmaa...

Page 11: ...ewenste afwerking bereikt is Oefen steeds enkel een gematigde druk uit op de schuurmachine Te hard op het bewerkte oppervlak duwen zal de motor oververhitten of het werkstuk beschadigen Schuur gelijkm...

Page 12: ...ieuw schuurvel met een fijnere korrelmaat Er wordt niet genoeg materiaal verwijderd Ga verder met schuren Er zijn brandplekken op het werkstuk Schuurvel is incompatibel met het materiaal Plaats een co...

Page 13: ...de koper van dit product dat indien een onderdeel defect is vanwege fouten in materiaal of uitvoering binnen 3 jaar na de datum van de oorspronkelijke aankoop Triton het defecte onderdeel gratis repar...

Page 14: ...ssaire Si l intensit sonore devient inconfortable m me avec les protections arr tez imm diatement d utiliser l appareil v rifiez que les protections sont bien en places et adapt s avec le niveau sonor...

Page 15: ...gnes de s curit ne doivent en aucun cas tre ignor es Une action inconsid r e qui ne durerait ne serait ce qu une fraction de seconde pourrait entra ner un accident impliquant de graves blessures 4 Uti...

Page 16: ...ngers tels que des clous ou des vis soient enlev s de la pi ce de travail avant de commencer poncer AVERTISSEMENT NE PAS utiliser une feuille abrasive aillant t utilis e pour poncer le m tal Cela pour...

Page 17: ...male Retirez la ponceuse de la surface de travail avant d teindre celle ci Commencez avec un papier abrasif grain grossier et passez progressivement des papiers grains plus fin jusqu atteindre la fini...

Page 18: ...n plus fin Pas assez de mati re ponc e Continuez le pon age Marques de br lures sur la pi ce de travail Feuille abrasive non compatible avec le mat riau Fixez une feuille abrasive ad quate Trop de pre...

Page 19: ...on ou de mat riau dans les 3 ANS compter de la date d achat Triton Precision Power Tools s engage aupr s de l acheteur de ce produit r parer ou sa discr tion remplacer gratuitement la pi ce d fectueus...

Page 20: ...enen Geh rschutz und begrenzen Sie nach M glichkeit die Belastungsdauer Sollte trotz Geh rschutz Unbehagen irgendeiner Art auftreten beenden Sie die Arbeit unverz glich und berpr fen Sie den Geh rschu...

Page 21: ...rtrautheit mit den Ger ten nicht die Sicherheitsprinzipien Fahrl ssiges Handeln kann in Sekundenbruchteilen zu schwersten Verletzungen f hren 4 Allgemeine Sicherheitshinweise f r Elektrowerkzeuge a be...

Page 22: ...che hinterlassen Verwenden Sie dieses Ger t nicht zum Schleifen von Magnesium oder zum Nassschleifen Ausw hlen der richtigen Schleifblattk rnung Hinweis Verwenden Sie stets hochwertige Schleifmedien u...

Page 23: ...se auf feinere K rnungen bis die gew nschte Oberfl chenbeschaffenheit erreicht ist ben Sie nur m igen Druck auf den Schleifer aus Durch zu starken Druck auf die Arbeitsfl che k nnte der Motor berhitzt...

Page 24: ...it feinerer K rnung einsetzen Nicht ausreichend Material abgeschliffen Schleifvorgang fortsetzen Brandflecken auf dem Werkst ck Schleifblatt f r das bearbeitete Material ungeeignet Geeignetes Schleifb...

Page 25: ...Jahren ab Originalkaufdatum infolge fehlerhafter Materialien oder Arbeitsausf hrung als defekt erweisen das mangelhafte Teil nach eigenem Ermessen entweder kostenlos reparieren oder ersetzen wird Dies...

Page 26: ...are la durata e la frequenza di funzionamento dell utensile ATTENZIONE l emissione delle vibrazioni durante l uso effettivo del dell utensile pu essere diverso dal valore totale dichiarato in quanto d...

Page 27: ...o delle condizioni lavorative e del compito da eseguire L uso di elettroutensili per usi diversi da quelli consentiti potr dar luogo a situazioni di pericolo h Tenere asciutte le maniglie e le impugna...

Page 28: ...rsi fori per l estrazione della polvere e utilizzare una base incorretta andr a danneggiare l utensile 1 Allegare il foglio usando uno dei metodi precedentemente descritti in questo manuale 2 Su una s...

Page 29: ...llare regolarmente che tutte le viti di fissaggio siano serrate La vibrazione potrebbe allentarle nel tempo Prima di ogni utilizzo controllare che il cavo di alimentazione non presenti danni o segni d...

Page 30: ...ateriale Continuare a levigare Segni di bruciatura sul pezzo Foglio abrasivo incompatibile con il materiale Applicare il foglio abrasivo corretto Troppa pressione esercitata sulla levigatrice Utilizza...

Page 31: ...prodotto che se qualsiasi parte dovesse presentare difetti di materiale o di fabbricazione entro 3 ANNI dalla data di acquisto originale Triton riparer o sostituir a sua discrezione la parte difettosa...

Page 32: ...a 85 dB A o cuando est expuesto durante largos periodos de tiempo Si por alg n motivo nota alg n tipo de molestia auditiva incluso llevando orejeras de protecci n detenga inmediatamente la herramienta...

Page 33: ...tilizarlo repetidamente sustituya las normas de seguridad indicadas para utilizar esta herramienta Utilizar esta herramienta de forma incorrecta puede causar da os y lesiones personales 4 Uso y manten...

Page 34: ...ra sujetar el extremo de la hoja de lija Fig II Coloque el extremo de la hoja de lija en la pinza y ci rrela para sujetar el extremo de la hoja de lija Fig II Nota Aseg rese de que los orificios de la...

Page 35: ...eden obtenerse a trav s de www toolsparesonline com Mantenimiento ADVERTENCIA Desconecte siempre la herramienta de la toma el ctrica antes de realizar cualquier tarea de mantenimiento o limpieza Inspe...

Page 36: ...siado grueso Instale una nueva hoja de lija con un grano m s fino No se retira suficiente material Contin e lijando Marcas de quemaduras en la pieza de trabajo Hoja de lija incompatible con el materia...

Page 37: ...to online en un plazo de 30 d as contados a partir de la fecha de compra Si durante ese per odo apareciera alg n defecto en el producto debido a la fabricaci n o materiales defectuosos Triton se har c...

Page 38: ...onfort veis mesmo com prote o auditiva pare imediatamente de usar a ferramenta e verifique se a prote o auditiva est ajustada de forma correta de modo prover a atenua o sonora correta para o n vel de...

Page 39: ...tas medidas de seguran a preventivas reduzem o risco de se ligar a ferramenta por acidente d Guarde a ferramenta el trica fora do alcance de crian as quando n o estiver em uso e n o permita que pessoa...

Page 40: ...usando folhas de lixa com furos o sistema de extra o de p desta lixadeira N O FUNCIONAR IMPORTANTE Use apenas a Placa de perfura o de folhas de lixa fornecida para perfurar as Folhas de lixa uma vez q...

Page 41: ...o de energia da ferramenta antes de cada utiliza o em busca de desgaste ou danos Reparos devem ser realizados em um Centro de Servi os Triton Esta orienta o tamb m se aplica a reparos nos cabos de ali...

Page 42: ...gr o mais fino A remo o de material n o suficiente Continue lixando Marcas de queimadura na pe a de trabalho A folha de lixa incompat vel com o material da pe a de trabalho Instale uma folha de lixa...

Page 43: ...oduto que se qualquer pe a estiver comprovadamente defeituosa devido a falhas de material ou m o de obra durante os pr ximos 3 anos a partir da data da compra original Triton ir reparar ou a seu crit...

Page 44: ...dlatego konieczne jest zastosowanie rodk w ochrony s uchu OSTRZE ENIE Je eli poziom ha asu przekracza 85dB A nale y zawsze stosowa rodki ochrony s uchu oraz ograniczy czas nara enia s uchu na nadmier...

Page 45: ...na go w czy lub wy czy za pomoc odpowiedniego prze cznika Urz dzenia kt re nie mog by kontrolowane za pomoc prze cznika s niebezpieczne i musz zosta oddane do naprawy c Przed dokonaniem regulacji wymi...

Page 46: ...sokiej jako ci Zaleca si na pr b rozpocz szlifowanie od niepotrzebnego fragmentu materia u aby dobra ziarnisto arkusza do zadania Arkusze szlifierskie s dost pne w wersjach o r nej ziarnisto ci gruboz...

Page 47: ...cy z ziarnem U ywaj szlifierki p asko na elemencie obrabianym Przechylanie szlifierki na jej kraw dzi spowoduje uszkodzenie pracy OSTRZE ENIE Nadmierny nacisk nie prowadzi do zwi kszenia wydajno ci sz...

Page 48: ...ejszym uziarnieniem Usuni ta niewystarczaj ca ilo materia u Nale y kontynuowa szlifowanie lady spalania na obrabianym elemencie Nieodpowiednio dobrany arkusz cierny do rodzaju materia u Nale y zamonto...

Page 49: ...zkodzenia z powodu wad materia owych lub jako ci wykonania w ci gu 3 lat od daty zakupu firma Triton naprawi b d wed ug w asnego uznania bezp atnie wymieni uszkodzon cz Powy sza gwarancja nie pokrywa...

Page 50: ...RU tritontools com 50 Triton II AC n0 n 1 AC 230 50 200 12000 1 257 x 114 x 150 110 x 100 113 x 105 IP20 3 1 35 Triton LPA 84 5 LWA 73 5 K 3 ah 6 33 2 K 1 5 2 85 85 www osha europa eu...

Page 51: ...RU tritontools com 51 1 a b c 2 a b c d e f g 30 3 a b c d e f g h 4 a b c d e f g h 5 30 a FFP2...

Page 52: ...RU tritontools com 52 b c d e f 1960 g h i j k l m n o p 1 2 3 4 5 6 7 8 9 10 60 120 240 1 4 2 8 I 3 II III 4 7 IV 1 2 1 2 5 V...

Page 53: ...I 1 2 1 I 1 0 Triton toolsparesonline com Triton 44 1935 382 222 tritontools com ru RU Support Toolstream Ltd Boundary Way Lufton Trading Estate Yeovil Somerset BA22 8HZ United Kingdom EU Toolstream B...

Page 54: ...RU tritontools com 54 1 Triton 7 6...

Page 55: ...RU tritontools com 55...

Page 56: ......

Reviews: