


6
GB
18. NEVER STAND ON TOOL. Serious injury could occur if the tool is tipped or if the cutting tool
is unintentionally contacted.
19. CHECK DAMAGED PARTS. Before further use of the tool, a guard or other part that is
damaged should be carefully checked to determine that it will operate properly and
perform its intended function. Check for alignment of moving parts, binding of moving
parts, breakage of parts, mounting, and any other conditions that may affect its operation.
A guard or other part that is damaged should be properly repaired or replaced.
20. DIRECTION OF FEED. Feed work into a blade or cutter against the direction of rotation of
the blade or cutter only.
21. NEVER LEAVE THE TOOL RUNNING UNATTENDED. SWITCH THE POWER OFF. Do not leave
the tool unattended until it comes to a complete stop.
Oscillating Spindle Sander Safety
WARNING!
• Hold the power tool by insulated handles or gripping surfaces only, because the
sanding belt/sheet may contact its own cord.
Cutting a “live” wire may make exposed
metal parts of the power tool ‘live’ and could give the operator an electric shock.
• Recommendation that the tool always be supplied via a residual current device with
a rated residual current of 30 mA or less.
• If the replacement of the supply cord is necessary, this has to be done by the
manufacturer or his agent in order to avoid a safety hazard.
The warnings, precautions, and instructions discussed in this manual cannot cover all
possible conditions and situations that may occur.
The operator must understand that
common sense and caution are factors which cannot be built into this product, but must be
supplied by the operator.
Do not operate the spindle sander until it is fully assembled and you have read and understood
the following instructions and the warning labels on the spindle sander.
a)
Check the condition of the spindle sander.
If any part is missing, bent, or does not
operate properly, replace the part before using the sander.
b)
Determine the type of work you are going to be doing before operating the spindle
sander.
c)
Secure your work.
Support the workpiece securely on the table, and hold it with both
hands.
d)
Be aware of the direction of feed.
Feed the workpiece into the sanding sleeve against
the direction of rotation of the sanding sleeve.
e)
Always keep your hands out of the path of the sander and away from the sanding
sleeves.
Avoid hand positions where a sudden slip could cause your hand to move into the
spindle. Do not reach underneath the workpiece or around the sanding sleeve while the
spindle is rotating.
f)
Disconnect the sander after turning off the power switch.
Wait for the spindle to stop
rotating before performing maintenance. The sander must be disconnected when not in
use or when changing insert plates, sanding sleeves, rubber spindles, or other items.
g)
Make sure there are no nails or other foreign objects in the area of the workpiece to
be sanded.
h)
Never use this sander for wet sanding.
Failure to comply may result in electrical shock,
causing serious injury or worse.
i)
Use only identical replacement parts when servicing this spindle sander.
j)
Make sure the spindle has come to a complete stop before touching the workpiece.
k)
Take precautions when sanding painted surfaces.
Sanding lead-based paint is NOT
RECOMMENDED. The contaminated dust is too difficult to control, and could cause lead
poisoning.
When sanding paint:
a)
Protect your lungs.
Wear a dust mask or respirator.
b)
Do not allow children or pregnant women in the work area until the paint sanding
job is finished and the clean-up is completed
c)
Do not eat, drink, or smoke in an area where painted surfaces are being sanded
d)
Use a dust collection system when possible.
Seal the work area with plastic. Do not
track paint dust outside of the work area
e)
Thoroughly clean the area when the paint sanding project is completed
Product Familiarisation
1. On-Board Table Insert Storage
2. On/Off Switch
3. Motor Housing
4. Table Top
5. Spindle
6. Spindle Lock Nut
7. Lower Spindle Washer
8. On-Board Spindle Storage
9. Upper Spindle Washers (x3)
10. Table Insert (x 6)
11. Sanding Sleeve (x 6)
12. Rubber Drum (x 5)
13. Dust Extraction Port
14. Wrench
15. Switch Lock
Intended Use
Bench-mounted sanding machine with a rotating and height oscillating sanding drum.
For sanding curved and straight surfaces on intricate as well as larger workpieces.
Unpacking Your Tool
• Carefully unpack and inspect your tool. Fully familiarise yourself with all its features and
functions
• Ensure that all parts of the tool are present and in good condition. If any parts are missing
or damaged, have such parts replaced before attempting to use this tool
Before Use
WARNING:
Ensure the tool is disconnected from the power supply before attaching or
changing any accessories, or making any adjustments.
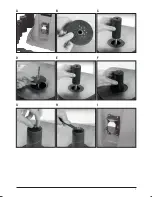
Bench mounting
If the spindle sander is to be used in a permanent position, it is recommended that you secure
it to a rigid work surface.
• Use the holes in the base of the spindle sander (image A) as a template to mark and drill
four holes in your intended mounting surface (ie workbench). Secure the spindle sander
into position using large bolts, washers and nuts (not supplied)
• If the spindle sander is intended to be more portable, fix a board to the base which can be
easily clamped and removed from various mounting surfaces
• f using bolts make sure they are long enough to penetrate the workbench or board
sufficiently for a secure fix
Note:
Use nylon insert lock nuts or spring washers in the fixings to prevent vibration from
loosening the fixings.
Note:
Never use bolts that require force to push through the Bench Mounting Holes as these
may crack the plastic body as will over-tightening the fixings.
Dust extraction
It is recommended that the spindle sander is used with a dust extraction system for a cleaner
and safer work environment.
1. Attach the hose from the dust extraction system to the Dust Extraction Port (13) and
ensure it is secure
2. For greatest efficiency, activate the dust extraction system before turning on the spindle
sander
Selecting a table insert
Failure to use the correct table insert with its matching sanding sleeve could result in pinched
fingers or the workpiece being pulled down between the table insert and the sanding sleeve.
The sanding sleeve should fit snugly into the central cutout of the table insert (Images B
and C).
Use the following chart to help determine the correct table insert and upper spindle washer to
use with each sanding sleeve.
Sanding
Sleeve Dia
Table
Insert Size
Upper Spindle
Washer Size
13 mm / 1/2"
13 mm / 1/2"
Small
19 mm / 3/4"
19 mm / 3/4"
Medium
26 mm / 1"
26 mm / 1"
Medium
38 mm / 1 1/2"
38 mm / 1 1/2"
Large
51 mm / 2"
51 mm / 2"
Large
76 mm / 3"
76 mm / 3"
Large
700094_Manual.indd 6
12/10/2017 11:56
Summary of Contents for TSPS 450
Page 2: ...2 1 14 2 3 4 5 6 8 7 9 10 11 12 13 15...
Page 3: ...3 A D G B E H C F I...